Free JavaScript Resources at:
Click image above to go to web site.
Resources: CodePen
There are a few concepts that you have to always be aware of when writing JavaScript code:
- Every script has to be placed in a pair of <script></script> tags unless it is in an external *.js file.
- A script will run immediately when the page loads:
- if it is not placed inside a function
- if it is not wrapped in the window.onload code block
- Where you place a script is very important to how or if it will work
- There are several ways to write a script that can do the same thing. However, it may not be the most effective way.
- Write the following heading in between the <body></body> tags:
<body>
  <h1>JavaScript Vital Few</h1>
</body>
- Write the following script ABOVE the closing head tag (</head>):
<script>
  alert("Hello, world");
</script>
</head>
ALTERNATIVES: You could also replace the alert("Hello, World") with:
confirm("Do you want to delete this file?"); or
prompt("What is your favorite color?", "");
- CHECK POINT: Save the file and preview it in a browser. You should see the alert dialog box shows IMMEDIATELY. However, the page is not visible because the script executes BEFORE the page loads and the page gets SUSPENDED until you click the OK button. Once you click the OK button then you will be able to see the page.
There are two major ways to write text to a page.
Write Text Directly
The first way to write text DIRECTLY to a page is to use a write() method:
- Using two forward slashes, delete or comment out the alert statement in the head element
// alert("Hello, World");
- Write the following code in between the body element:
<body>
<script>
     document.write("This is computer generated text");
</script>
</body>
- CHECK POINT: Save the file and preview it in a browser. You should see that the text is written to the page.
Write Text Indirectly
You can write text INDIRECTLY to a page. While using the write() method is a COMMON practice, it is not the BEST practice. It is better to use innerHTML property to write text to an existing element whether it is empty or not:
- Write the following id selector to a heading element BELOW the body element:
<h1 id="JS_heading">JavaScript Vital Few</h1>
- Write the following script BELOW the h1 element:
<h1 id="JS_heading">JavaScript Vital Few</h1>
<script>
     document.getElementById("JS_heading").innerHTML = "JavaScript is Awesome!!!";
</script>
CAUTION: Be careful not to make a common mistake of treating the innerHTML property like a method by wrapping the message in parenthesis instead of using an equal sign:
document.getElementById("JS_heading").innerHTML("JavaScript is Awesome!!!");
NOTE: While the code above works if it is BELOW the code that it refers to, if you were to MOVE the same script ABOVE the heading, it will not work.
- Move the entire script element ABOVE the heading tag.
<script>
     document.getElementById("JS_heading").innerHTML = "JavaScript is Awesome!!!";
</script>
<h1 id="JS_heading">JavaScript Vital Few</h1>
- CHECK POINT: Save the file and preview it in a browser. You should see that the heading DID NOT change to "JavaScript is Awesome!!!" because the script is executed BEFORE it could reference the object (i.e., heading) it needed in the code itself. To resolve this problem, we will wrap the code in a window.onload code block in the next step.
- Move the script element BELOW the h1 element:
<h1 id="JS_heading">JavaScript Vital Few</h1>
<script>
     document.getElementById("JS_heading").innerHTML = "JavaScript is Awesome!!!";
</script>
- CHECK POINT: Save the file and preview it in a browser. You should see the header now displayed "JavaScript is Awesome!!!" because the h1 element is stored in memory and can be referenced by the code when it reachs the script code. However, is is not best practice to have the script code in the body of the page.
- Move the script block back in the head and then wrap the entire line within a window.onload code block:
<script>
// alert("Hello, World");
window.onload = function() {
      document.getElementById("JS_heading").innerHTML = "JavaScript is Awesome!!!";
} // end of window.load code block
</script>
</head>
- CHECK POINT: Save the file and preview it in a browser. You should see the header now displayed "JavaScript is Awesome!!!" even though the script is ABOVE the heading element because this time the page loads first because of the window.onload code block and then the code executes and has a reference to the heading element it needs to communicate with.
In the first example above, the alert dialog box displayed before the page even loads. Typically, you want something to happen (e.g., an alert dialog box to be displayed) only after an event happens (e.g., a button is clicked).
There are four methods to make a button interactive. It is important to note that each method yield the EXACTLY SAME RESULT. The difference is the code ability to be reused in another document.
Method 1: Beginner
The first way is to embed an event handler directly inside an element. While this is the easy way to create an event, it is the least preferred method because you are TIGHTLY COUPLING the HTML code which makes it harder to reuse.
- Write the following code for a button tag with an in-line event handler BELOW the heading element:
<h1 id="JS_heading">JavaScript Vital Few</h1>
NOTE: Notice that the attribute is onClick and not onclick. Also note the statement is in single quotes because that attribute is in double quotes. Also, multiple statements could be added by separating them with semicolon.
<button onClick="alert('Hello, World')">Click to open Alert</button>
- CHECK POINT: Save the file and preview it in a browser. You should see that the alert dialog box does not show immediately as before. It only displays when you "click on" the button as the onClick method implies.
Method 2: Intermediate
The second way is to write a function in the <head> and make a call to it FROM another object (e.g., a button). While this is a better approach it still couples the code (e.g., event handler) with the object (e.g., button):
- Replace the alert statement ("alert('Hello, World')") with the following function name INSIDE the button tag:
<button onClick="showAlert()">Click to open Alert</button>
- OUTSIDE of the window.onload code block but WITHIN the script element, write the showAlert function:
<script>
window.onload = function() {
document.getElementById("JS_heading").innerHTML = "JavaScript is Awesome!!!";
} // end of window.load code block
function showAlert()
{
  alert("Hello, World");
}
</script>
- CHECK POINT: Save the file and preview it in a browser. You should see that it works as before. However, this time while the code (event handler function) is still coupled to the object (button), it is not as tightly coupled as the inline event handler in the previous example.
IMPORTANT NOTE: It is important to note that the function is placed OUTSIDE of the window.onload code block. That's because the window.online code block only execute ONCE. So if you attempt to call the showAlert() function after the page loads, it will not execute.
Method 3: Advanced
The third way is to write an event using the object dot syntax that uses an anonymous function (e.g., object.event):
- Replace the event handler (onClick="alert('Hello, World')") with an id attribute in the button element.
<button id="showAlertButton">Click to open Alert</button>
- Write the following highlighted code and comment out the showAlert function as it will be used again later.
NOTE: Unlike a regular function that needs to be called or invoked outside of the function, this anonymous function is "called" when an event handler and as such there is no need for a function name.<script>
// alert("Hello, World");
window.onload = function() {
document.getElementById("JS_heading").innerHTML = "JavaScript is Awesome!!!";
document.getElementById("showAlertButton").onclick = function()
{
alert("Hello, World");
} } // end of window.load code block
/* function showAlert()
{
alert("Hello, World");
} */
</script>
- CHECK POINT: Save the file and preview it in a browser. You should see that it works as before but this time the click event is called FROM the code TO the button. In the previous examples, the click event was called FROM the button TO the code. While this is even better, it still couples the code and the object together.
- (OPTIONAL) Modify the code to include a variable.
<script>
var alertButton = document.getElementById("showAlertButton");
// alert("Hello, World");
window.onload = function() {
document.getElementById("JS_heading").innerHTML = "JavaScript is Awesome!!!";
alertButton.onclick = function()
{
alert("Hello, World");
} } // end of window.load code block
/* function showAlert()
{
alert("Hello, World");
} */
</script> - CHECK POINT: Save the file and preview it in a browser. The code behave the same however, it is more readable because a refer of the button object is stored in a variable (e.g., alertButton )
Method 4: Expert
The last and best method to make an button interactive is to get a reference to the object in code and then tell the object to do something when an event happens. This is accomplished by using an addEventListener using the following syntax that listen for an event and then run a function when the event happens:
element.addEventListener('eventName', eventHandler, boolean)
- Replace the onclick event handler with an addEventListener:
var alertButton = document.getElementById("showAlertButton");NOTE: Notice the event is without the word "on" as used with a click handler. You also have an removeEventListener to remove the event once it is not needed anymore.
alertButton.addEventListener("click", function(){alert("Hello, World")});
} // end of window.load code block
- CHECK POINT: Save the file and preview it in a browser. You should see that it works as before but this time the code is UNCOUPLED from the object. As such, you can copy the code and paste in in another page within a window.load code block and then give the object the same name or a difference name in the code and object and it will work the same. However, having the function INSIDE of addEventListener method is not recommended. This will be fixed in the next step.
- Uncomment and move the showAlert function INSIDE of the window.load code block:
<script>
// alert("Hello, World");
window.onload = function() {
document.getElementById("JS_heading").innerHTML = "JavaScript is Awesome!!!";var alertButton = document.getElementById("showAlertButton");
alertButton.addEventListener("click", showAlert);
function showAlert()
{
alert("Hello, World");
}
} // end of window.load code block
</script> - CHECK POINT: Save the file and preview it in a browser. You should see that it works as before but this time the code is easier to read and update.
The ability to show/hide or toggle an object on a web site or in an app is a common practice. Again, we will create this technique in this order
- HTML - Create Objects
- CSS - Style Objects
- JS - Make Objects Interactivity
Resource: showHideToggleAnObjectComplete.zip
Preview: Finshed Exercise
Lay A Good Foundation
Before doing any programming, it is best to lay a good foundation by creating some or all of the objects that you will need, give them names, and then instruct them to do whatever you want.
A. Create Objects
Before making objects interactive or dynamic, it is best to create objects first without any associated CSS or JavaScript code. This is called the presentation layer.
- In Dreamweaver (or your favorite editor), create the framework for a blank HTML page. This is the HTML "framework" objects (html, head, body, etc.)
CODE VIEW:
!doctype html>
<html lang="en">
<head>
<meta charset="utf-8">
<title>Show Hide Toggle An Object</title>
</head>
<body>
</body>
</html>
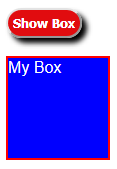
- Add the following objects (button and div) between the body element.
CODE VIEW:
<body>
    <button>Show Box</button>
    <div>My Box</div>
</body>
- CHECK POINT: Save the file and preview it in a browser. You should see the button an the div element.

B. Give Objects Names
While we could have named the objects at the same time we created them, we wanted to do these steps in a systematic manner. This step is used so that these objects can be "talk to" (or reference -- geek term) via CSS and JavaScript later.
- Give name to each objects by adding id attributes to each one of them.
<body>
  <button id="myButton">Show Box</button>
  </br></br>
  <div id="myBox">My Box</div>
</body>
- Save the file.
C. Tell Objects What To Do
Once you create objects, then you can tell them what to do or tell them to tell other objects what to do via CSS or JavaScript.
First, we will "talk" to the objects via CSS. An object need a name in order for it to be talked to. It can be its surname (button or div) or its nickname (id value: #myBox and #myButton). While we could use the ID value to talk to both, we will use the name for one and the ID for the other. The id name is unique (like a fingerprint to each individual of a given family), so only one element can be targeted with it.
- Below the title element, add a style element with the following CSS code:
CODE VIEW:
<title>Show Hide Toggle An Object</title>
<style>
/* Refer object by its real name */
button{
border-radius: 16px;
padding: 5px;
background-color: #E10C0F;
text-shadow: 0px 0px;
color: #FFFFFF;
font-weight: bold;
-webkit-box-shadow: 5px 5px 5px #000000;
box-shadow: 5px 5px 5px #000000;
cursor:pointer;
margin-bottom:30px;
}
/* Refer object by its alias name */
#myBox{width: 100px; height: 100px;
background-color: blue;
color: white;
font-family: Arial;
border: 2px solid red;}
</style>
- Save the file and preview it in a browser. You should see that both the button and the div element has been "styled" via its name of their IDs:
- Add the display:none rule to the style element to hide the button:
CODE VIEW:
#myBox{width: 100px; height: 100px;
background-color: blue;
color: white;
font-family: Arial;
border: 2px solid red;
display:none;}
- Save the file and preview it in a browser. You should see only the button display but not the box because of the display:none rule.

Inspect What You Expect
As a beginner programmer, it is important to inspect portions of your code to ensure that you are getting correct values, data types, etc.
A. Spot Check Code
As a beginner developer, it is common practice to create "DUMMY" code to check to see if you code is written correctly than replace the dummy code with "ACTUAL" code. It this case, we will CHECK to see if the function is working correctly.
- Add the following onClick attribute to the button element to invoke (or call) the showHideBox() function that will be created in the next step:
NOTE: A function as the name implies "tell" an object how to "function" (WOW - Spell it backward - WOW). A function name should reflect what is will "do," In this case, show or hide the box.
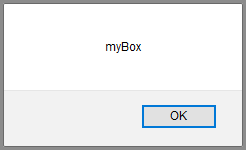
<button id="myButton" onClick ="showHideBox()">Show Box</button>
- Below the closing style tag (</style>), write the following script element with an alert command in it.
CODE VIEW:
</style>
<script>
function showHideBox()
{
  alert("The showHideBox function is working correctly");
}
</script>
- CHECK POINT: Save the file and preview it in a browser. If you click on the Show Box button, you will see the alert dialog box display the message that was added the the alert method. Click the OK button to dismiss the dialog box.

B. Create Stub Code
Stub (noun) - a web page or app code that only provides:
- minimal information
- temporary code
- code that ascertain property values, etc.
that is intended for later development with the actual code.
In this case, we will write code to see if the variable that will be created will return the name of the object.
It is not always obvious as to the type of value that an object will return. You can ascertain properties values of an object by DRILLING down into it using object oriented dot syntax method (e.g., object.property.property or object.method()).
As a beginner developer and sometimes as an experienced developer, it is good to "stub" out the code to see if:
- a function is working as expected
- a variable is return the right value
- a temporary code block to be replace later
- Comment out alert method as it was used on to see if the function was working correctly, add the following variable to the function, and then trace it with another alert method;
function showHideBox()
{
// alert("The showHideBox function is working correctly");
var myBoxVariable = document.getElementById("myBox");
alert (myBoxVariable.id);
}
NOTE: The myBoxVariable was only used to store a reference of the Box object so that this complete line of code is compact and can be used easier for the rest of the code. It is optional but it can save you from having to type this reference every time you need to use it.
- CHECK POINT: Save the file and preview it in a browser. If you click the Show Box button this time, you will see the alert dialog box display the name of the object (myBox). Click the OK button to dismiss the dialog box.
C. Replace With Actual Code
Now that you KNOW for CERTAIN that the variable is returning the the correct REFERENCE name of the object (myBox), we can NOW use it to create the actual code.
- Comment out the alert second method as it was used only to see what value it would return and then add the following code to the function:
function showHideBox()
{
// alert("The showHideBox function is working correctly");
var myBoxVariable = document.getElementById("myBox");
// alert (myBoxVariable);
myBoxVariable.style.display ="block";
}
- CHECK POINT: Save the file and preview it in a browser. If you click the Show Box button this time, you will see the BOX get displayed. However, if you click the button again nothing happen. This will be resolved in the next section.
Enhance Code
While we could stop at the previous step, we could enhance the code so that the button behave as a toggle.
A. Comment Code
Beside using the double slashes (//) to COMMENT OUT code, we can use it to actually COMMENT ON the code:
Particularly true for beginner developers, it is important to comment your code so that if you or someone else needs to refer to it several months later to determine what was done or why it was done. You will find out that the more proficient you become at programming, the less you will have a tendency to comment your code because you will know the code better and you will make your code more self-commenting through the use of descriptive names of variables, functions, methods, etc.
- Add the following highlighted comments to the function. Add any other comment as you see fit.
<script>
function showHideBox()
{
// alert("The showHideBox function is working correctly");
var myBoxVariable = document.getElementById("myBox");
// alert (myBoxVariable);
// Create a toggle function to show or hide second form using an if/then and else statement
myBoxVariable.style.display ="block";
}
</script>
NOTE: Comments are not executed when the program runs, so you can add as many as you like.
- CHECK POINT: Save the file and preview it in a browser. You should see that your code works just the same with or without comments.
B. Make Code Flexible
Instead of static code, you should always stride to make your code more flexible:
- Add the following "if" statement within the function AND then move the myBoxVariable.style.display = "block"; INTO the else code block
<script>
NOTE: The TRIPLE EQUAL SIGN in the "if" statement condition is used to CHECK for a condition, the SINGLE EQUAL SIGN on the two variables are ASSIGNMENT OPERATIONS used to define their variables.
function showHideBox()
{
// alert("The showHideBox function is working correctly");
var myBoxVariable = document.getElementById("myBox");
// alert (myBoxVariable);
// Create a toggle function to show or hide second form using an if/then and else statementmyBoxVariable.style.display = "block";
if (myBoxVariable.style.display === "block")
{
myBoxVariable.style.display = "none";
}
else
{
myBoxVariable.style.display = "block"; // This code was MOVED into the "else" statement
}
}
</script>
CAUTION: Don't ever make the mistake of adding a SINGLE EQUAL SIGN to an "if" statement; otherwise, your code may not work as expected. - CHECK POINT: Save the file and preview it in a browser. If you click the Show Box button this time, you will see the BOX get displayed. And if you click again, you will see that it will be hidden. Click the button several times to see that it acts as a toggle function. However, we have the problem of the button showing Show Box ALL the time. This will be resolved in the upcoming steps.
- Add the following highlighted code to the function:
<script>
function showHideBox()
{
// alert("The showHideBox function is working correctly");
var myBoxVariable = document.getElementById("myBox");
var myButtonVariable = document.getElementById("myButton");
// alert (myBoxVariable);
// Create a toggle function to show or hide second form using an if/then and else statement
// myBoxVariable.style.display ="block";
if (myBoxVariable.style.display === "block")
{
myBoxVariable.style.display = "none";
myButtonVariable.innerHTML = "Show Box";
}
else
{
myBoxVariable.style.display = "block";
myButtonVariable.innerHTML = "Hide Box";
}
}
</script>
NOTE: The innerHTML property is used to change the inner HTML content (its button label) within the button element.
- CHECK POINT: Save the file and preview it in a browser. If you click the Show Box button several times, you will see that the button Label toggle based on if the box is displayed or not.
C. Add New Features
Once you have completed the basic needs of your project, you may want to add some additional features or improvement to it. For example, you may want to add the ability to:
- change onClick method to an event listener.
- change the width of the Show Box button so that it does not change size when clicked.
- and more...
As a beginner developer you should always strive to make your code more flexible by separating the code from the elements, using functions, etc.
It is best practice not to have code "tightly coupled" with page elements. One way to decouple code is to use event listeners instead of simply event attributes.
IMPORTANT CONCEPT TO REMEMBER: Instead of invoking the showHideBox() function from WITHIN the button, an addEventHandler method will be used so that it will add this functionality to the button element from a distance so that the code can be made more flexible. For example, now you can cut and paste the code in the script element and paste it in another document and link it to a different element by using the element id attribute. Let's see how this works.
- Delete the onClick attribute in the button element.
<button id="myButton"
onClick ="showHideBox()">Show Box</button>
- Move themyButtonVariable variable OUTSIDE of the function and then add an event handler.
CODE VIEW:
<script>
var myButtonVariable = document.getElementById("myButton");
myButtonVariable.addEventListener("click", showHideBox);
function showHideBox()
{
// alert("The showHideBox function is working correctly");
var myBoxVariable = document.getElementById("myBox");var myButtonVariable = document.getElementById("myButton");// This line is moved up ABOVE the function
// alert (myBoxVariable);
// Create a toggle function to show or hide second form using an if/then and else statement
// myBoxVariable.style.display ="block";
if (myBoxVariable.style.display === "block")
{
myBoxVariable.style.display = "none";
myBoxButton.innerHTML = "Show Box";
}
else
{
myBoxVariable.style.display = "block";
myBoxButton.innerHTML = "Hide Box";
}
}
</script>
- Wrap the entire script in a window.onload function. This function ensures that all of the object references (HTML elements) get loaded in memory BEFORE they are referenced in code. Otherwise, the code will not work.
ALTERNATIVE: Instead of adding the window.onload function code, you could move the entire script element above the closing body tag (</body>). This allow all of the HTML elements to get loaded BEFORE the script code is executed so that objects can be referenced correctly.
CODE VIEW:
<script>
window.onload = function() {
var myBoxButton = document.getElementById("myButton");
myBoxButton.addEventListener("click", showHideBox);
function showHideBox()
{
// alert("The showHideBox function is working correctly");
var myBoxVariable = document.getElementById("myBox");
var myBoxButton = document.getElementById("myButton"); // This line is moved up ABOVE the function
// alert (myBoxVariable);
// Create a toggle function to show or hide second form using an if/then and else statement
//myBoxVariable.style.display ="block";
if (myBoxVariable.style.display === "block")
{
myBoxVariable.style.display = "none";
myBoxButton.innerHTML = "Show Box";
}
else
{
myBoxVariable.style.display = "block";
myBoxButton.innerHTML = "Hide Box";
}
}
} // end of window.onload code block
</script>
- CHECK POINT: Save the file and preview it in a browser. You should see that it works the same. However, the code is more flexible because now you can copy the code within the script element, paste it into another document, and call a total different object.
- Add a width property to the button style rules.
CODE VIEW:
button{
border-radius: 16px;
padding: 5px;
background-color: #E10C0F;
text-shadow: 0px 0px;
color: #FFFFFF;
font-weight: bold;
-webkit-box-shadow: 5px 5px 5px #000000;
box-shadow: 5px 5px 5px #000000;
cursor:pointer;
margin-bottom:30px;
width:100px;
}
- CHECK POINT: Save the file and preview it in a browser. You should see that the width of the button does not change when the label of the button changes.