CREATING WEB SITE TEMPLATE FOR CMS
Creating a web site template will help to simplify the site creation and make updating "common" areas (i.e., header, footer, and navbar) easier to update as well as provide common typography (i.e., font color, etc.) and design elements (i.e., table style) for each page that the template is created from.
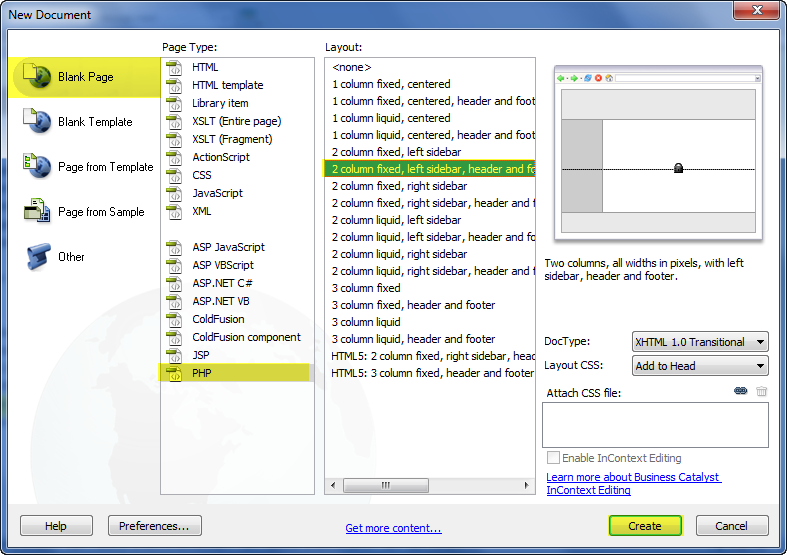
- In Dreamweaver, select File > New... and it the dialog box that appears select the following highlighted options and then click the Create button.
CAUTION: It is very important the you select PHP as the Page Type.
- Give the page a title (i.e., Rich Media Creative Services: ) and save the page as template_base.php. Add colon and a space at the end of the title that will become handy later when you create pages based off of the template you are about to create.

Update Header
- Click inside of the header area and then choose <div.header> from the tag chooser at the bottom of the application.

- Delete any default text of image placeholder (i.e., Insert image 180 x 90). While the cursor is still in the header area, select Insert > Image and navigate to the images folder and select the header image (i.e., images/kc_logo_intranet_main.jpg).
- While the cursor is still in the header area, if necessary, open the CSS panel (Window > CSS Styles) and double-click on the .header CSS rule in the CSS panel to open the CSS Rule Definition for .header dialog box.
- If necessary, select the Background category from the list and change the Background color to match the color of your logo.
- TIP: To select a color from the header logo image to create a matching background color, click and drag from the color picker to the header image.
- The cursor will change to an eyedropper tool indicating that you can select a color from an image (in this case, the header logo.)
- (Optional) Click the Apply button to see the background color change in the logo.
NOTE: By clicking the Apply button instead of the OK button, you can "apply" the change (i.e., color) without closing the dialog box. So, if you picked the wrong color, you can repeat step 5 again. - Click the OK button to close the CSS Rule definition dialog box.
Update Footer
- Repeat the same set of steps for the footer that you did for the header, except select the <div.footer> from the tag chooser and use a footer image from the images folder (i.e., images/kc_footer_intranet.jpg).
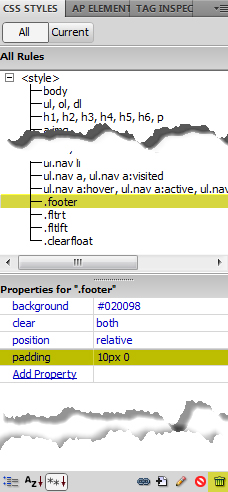
- Select but don't double click the .footer CSS rule in the CSS panel. Then in the panel below select the padding rule and then click the Delete key or the trash can icon.
Covert file to template
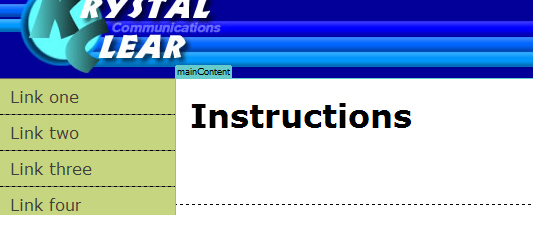
- Delete all of the text in the main content area except the first title (i.e., Instructions)
- While cursor is still in the main content area, select the <div#container> from the tag chooser to select the entire area.
- Select Insert > Template Object > Editable Region and then click OK in the dialog box that appears that will convert the page to a template.
- In the New Editable Region dialog box that appears, name the region mainContent and then click OK.
- Attached the external CSS file that is provided for you by clicking on the Attach Style Sheet icon at the bottom of the CSS Panel and then click on the Browse button and navigate to it (e.g., rmcs.css) and then click OK. (Or create your own file if you know how.)
NOTE: You should see the heading text changed. - Select File > Save or File > Save As Template... from the menu and in the dialog box that appears, choose the current site (i.e., PHP_CMS) and keep the template a name (i.e., "template_base") in the Save As Template dialog box and then click the OK button.
- If you look in the File panel, you will see that Dreamweaver will automatically create a Templates folder in the site and add the template you just created to it. This is a template and not a *.php or *.html page. It has an extension of *.dwt (i.e., template_base.dwt.php)
- Unlike creating an HTML template which use only the *.dwt extension, the naming convention for a server-side page like PHP include both the ".dwt" and ".php" extensions.
- Click Yes in the Update Link dialog box.