HOW TO AUTHENTICATE USERS (PART 4)
IMPORTANT NOTE: This is a continuation of the HOW TO CREATE A CF CONTENT MANAGEMENT SYSTEM (CMS) (PART 3)
It is important to authenticate users especially as it relates to ensuring only authorized users have access to administrative pages (i.e., add, update or delete employees) as well as having only register users view specific pages. This is done by creating pages that allow users to register, log in or log out through a authentication framework in order to access pages that requires authentication. Other pages are accessable to the public. Using Server Behaviors with Dreamweaver makes creating these pages a painless process.
CAUTION: It is best NOT to provide a link on your website to your administrative pages to prevent hackers from attempting to hack your site. Instead, provide a link that the administrative users have to enter manually. This also prevent search engines from indexing those links. However, you should provide links (register, login and logout) to other users (members, client login, guests, etc.)
- CREATING REGISTRATION PAGES
- CREATING LOGIN PAGES
CREATING REGISTRATION PAGES
Before you can provide login capability, you need to already have a table in the database with usernames, passwords, etc. so that the login page can match them. Instead of having an admin user enter the username and password for a user (i.e., visitor), you can allow the visitor to create his or her own username and password. This can be accomplished by creating a registration page that will allow user to enter their own username and passwords into the database. Also, a way of ensuring that there are no two users with the same username much be implemented.
Create Registration Page:
- Select File > New... from the menu and then select Page from Template. Ensure the current site is (e.g., RMCS_CMS) and the current Template (e.g., template_base.dwt) is selected and the click the Create button.
- Give the page a title in the Title text field (e.g., Rich Media Creative Services - Registration Page) and then save the file with a descriptive name (e.g., registration_page.cfm).
- Select the Heading in the mainContent area (Instructions) and type Registration Page (Please register): in its place and then press the ENTER key.
- Select Insert > Data Objects > Insert Record > Record Insertion Form Wizard from the menu and add the following highlighted items:

IMPORTANT NOTE: THIS IS NOT THE CORRECT TABLE BUT WILL SUFFICE FOR NOW
NOTE: The advantage of using the Record Insertion Form Wizard menu over the Insert Record menu is that it AUTOMATICALLY add the form, table, button as well as the Insert Record code. The Insert Record matches the form elements names to the columns (fields) in the database.
- Select the button and in the Properties panel, change the Value from Submit to REGISTER.
- (SKIP FOR NOW) Click anywhere in the form and then select Hidden Field icon from the Forms tab and give it a name of userGroup and a Value of visitor.
NOTE: The Hidden Field tag is used to pass hidden data (i.e., userGroup type) when the form is submitted. Since the application will provide various level of access (i.e., visitors, guest, employees) that need different permission, then this information is pass so that all user can use the same form. The hidden tags helps to determine what is the user access level. So anyone who register with this form will be set up as a visitor. - Test form and then check database to see if data was enter. Page will give an error because the other page is not yet created.
Validate Form Elements:
Anytime you create a form, you should validate the form element using client-side JavaScript or server-side script.
- Select the REGISTER button and add a Validate Form behavior from the Behaviors panel (not Server Behaviors).
- Make all field required.
- If email is used as a username, check Email as the validation option.
Create New User Behavior:
It is important to check to ensure that two users do not have the same username. As a result, the Check New User Behavior will be used to confirm if a username already exist.
- Select the REGISTER button and then select User Authentication > Check New Username from the Server Behaviors panel by clicking on the plus sign.
- Add the following highlights:

CREATING LOGIN PAGES
The Login page allows a user to enter a username and password that will be checked against a username and password in the database. If there is a match the user is relocated to the appropriate page. If there is not a match, the user is presented with a message on the same page or another page that states that the username/password was invalid. Session variables are used to allow user to navigate from page to page without having to login multiple times. Once a user is logged in, a session variable is created. Any page that restrict access will check for a session variable and allow or restrict access to that page depending on if the login is successful or not. If not successful, the user will be redirected to another page.
The user is also allowed to log out to close the session variable.
Create Login Page:
- Select File > New... from the menu and then select Page from Template. Ensure the current site is (e.g., RMCS_CMS) and the current Template (e.g., template_base.dwt) is selected and the click the Create button.
- Give the page a title in the Title text field (e.g., Rich Media Creative Services - Admin Login) and then save the file with a descriptive name (e.g., admin_login.cfm).
- Select the Heading in the mainContent area (Instructions) and type Administrative Login in its place and then press the ENTER key.
- Click on the form icon in the Forms tab to insert a Form and give it a name of formLogin.
- While cursor is still in the form, click on the table icon in the Common tab to insert a table with the following highlighted properties and then click OK:

- Insert the word Username and Password with colon ( : ) after them, two Spry TextFields and a Button in the highlighted cells below from the Forms tab and give them the following ID name: tfUserName, tfPassword, and btLogin, respectively.
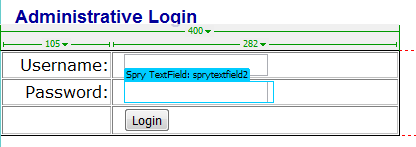
- In the Properties panel, select the Password checkbox for the Type of text field so that dots or asterisks will be shown when the user enter a password and set the Value for the button to Login to give the button a label. Also, select the Username and Password word individually and select Right from the Horz combo box.
Add Login Server Behavior:
A Log In User server behavior will be used to automatically create the code that will check the form text fields (UserName and Passwords) against UserName and Password in the database. If there is a match, user will be redirected to appropiate page. If there is not a match, user will be given an error message.
- Select the Form from the tag selector and then open the Server Behaviors panel and click on the plus sign and choose User Authentication > Log In User from the menu.


- In the Log In User dialog box that appears, add/select the following highlighted properties and then click OK:

NOTE: Most of the fields are self-explanatory. However, a few points needs to be made:- The first section defines the form, the second defines the connection, the third defines where the user will go if the page succeed or fail and the fourth is how the the page access is restricted.
- The "If login succeeds, go to: ....
- The "Restrict access based on....
- Notice that the Log In is now listed in the SERVER BEHAVIORS panel. To return to the Log In User dialog box double-click on it.
- The following Login code was created:

The following form code was updated:

Create admin_succeed.cfm and admin_fail.cfm pages:
- Select File > New... from the menu and then select Page from Template. Ensure the current site is (e.g., RMCS_CMS) and the current Template (e.g., template_base.dwt) is selected and the click the Create button.
- Give the page a title in the Title text field (e.g., Rich Media Creative Services - Login Failure) and then save the file with a descriptive name (e.g., admin_fail.cfm).
- Select the Heading in the mainContent area (Instruction) and type Administrative Login Failure in its place and then press the ENTER key and type Login failed. Please try again. Make this text a link back to the Login page.
- Select File > New... from the menu and then select Page from Template. Ensure the current site is (e.g., RMCS_CMS) and the current Template (e.g., template_base.dwt) is selected and the click the Create button.
- Give the page a title in the Title text field (e.g., Rich Media Creative Services - Login Succeed) and then save the file with a descriptive name (e.g., admin_succeed.cfm).
- Select the Heading in the mainContent area (Instruction) and type Administrative Login Succeed in its place and then press the ENTER key and type Login successful.
- In the Application.cfm file created in the previous tutorial, add the following line of code below the existing code:
<cfapplication name="RMCS_CMS" sessionmanagement="yes">
- Test admin_login.cfm by enter valid and non-valid usernames and passwords.
Create LogOut Page:
It is important for a user to log out so that the another user can not use the same computer with previous user still login. The Log User Out behavior will be used to destroy the session variables.
- Select File > New... from the menu and then select Page from Template. Ensure the current site is (e.g., RMCS_CMS) and the current Template (e.g., template_base.dwt) is selected and the click the Create button.
- Give the page a title in the Title text field (e.g., Rich Media Creative Services - Admin LogOut) and then save the file with a descriptive name (e.g., admin_logout.cfm).
- Select the Heading in the mainContent area (Instructions) and type Administrative LogOut in its place and then press the ENTER key and type Click here to Log Out.
- Open the Server Behaviors panel and click on the plus sign and choose User Authentication > Log User Out from the menu. Add the following highlighted fields and then click OK:

- Save page.