MOTION EFFECTS
There are many motion effects that can be created in Actionscript. Many of them are based on the laws of physics and they build upon one another in a logical sequence. We will examine:
- Speed - which is the rate of change with no direction.
- Velocity - which is the rate of change and position (speed / direction) of an object.
- Acceleration/Deceleration - which is the rate at which velocity changes to sped up or slow down an object.
- Gravity - is the natural force that act on an object to pull it downward.
- Bounce / Elasticity - which causes an object to bounce back and forth and tampers off until it stops.
- Friction - forces that causes an object to slow down.
These effects are simulations (not real-world examples) so that they can be easily implemented into any project. They don't take into account every factor (i.e., wind resistance, etc.) that can be exerted on an object. For simplicity sake, the direction will be kept in a straight line in these examples. Examples with both x/y will also be given but not explained in detail.
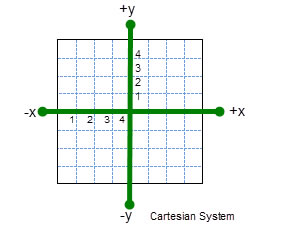
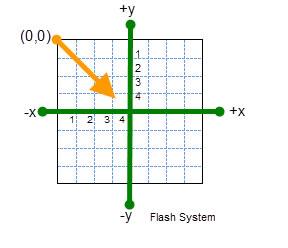
IMPORTANT NOTE: Unlike the traditional Cartesian coordinate system where the y direction is positive when moving UP. In the Flash coordinate system, the y direction is positive when moving DOWN, not up. This is because Flash treat the default starting point of a display object object at x/y coordinates of (0,0). Moving away from this TOP-LEFT edge of the stage means the value of x and y will be positive as you move away from this point.
There are two types of ActionScript animation you can create in Flash.
- Time-based animation plays for a certain amount of time and ensures that the animation will play at the same speed on all computers but will drop frames to conpensate for processor speed on low-end computers.
- Frame-based animation plays a certain number of frames and ensure that all frames are played but the playback speed may suffer on low-end computers. NOTE: An acceptable frame rate for most games and movies is 24 fps.
However, in the real world, animation is time-based. While time-based examples can be created in Flash, we will be creating code in these examples using frames. The time-based variables will be replaced with frame-based variables. As a result, the frame variable will always be 1.
Speed vs Velocity
Speed is defined as distance/time (i.e., 85 mph). In technical term, it is the ratio of the distance cover over the time taken to cover that distance.
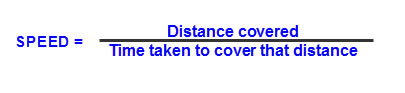
For example, 60 miles/hr is typically read as "60 miles per hour." In essence, you will have covered a distance of 60 miles in 1 hour. In this example, it is easy to see that the distance is 60 miles. However, in a more complex example, such 90 miles/2 hours would equate to 180 miles (Distance = speed * time). Time traveled would be: Time = distance/speed. In our exampes, we will replace all references of time with frames.
However, because we will be using frame-based animation, our equation will be distance/frame. Speed is expressed as a SCALAR quantity which means that its value is expressed with a magnitude only (75 mph). Velocity which is the rate of change of speed, on the other hand, is expressed as a VECTOR quantity which means that it is expressed with both magnitude and direction (75 mph north).
Speed by itself is not a vector nor is direction. It takes both magnitude (speed) and direction to be a vector. Acceleration and force are also vectors.
While speed is expresed in how fast an object is moving (i.e., 75 mph), velocity is the speed in a given direction (75 mph north). Velocity is easy to create in Flash because we will update the position for every frame--so if an object has a velocity of 5 that means it will move 5 pixels for every frame. To animate an object with a CONSTANT SPEED, all you have to do is INCREMENT or DECREMENT its X or Y value.
All animation with code is done with some type of loop. The ENTER_FRAME event is typically used to create this effect. It is helpful to think on the ENTER_FRAME as a type of endless loop but based on the frame rate (fps) of the movie. There are two ways to increment or decrement a property (in this case, x or y or both):
- myObject.x++ or myObject.x-- (Used when you want to increment or decrement by a value of one). Unless you want an object to move 1 pixel/frame, you will more that likely use the next option more often.
- myObject.x += 10 or myObject.x -= 10 (Used when you want to increment or decrement by a specific amount (in this case, 10) instead of one unit at a time)
NOTE: This also applies to the y direction.
NOTE: If you increment or decrement both the x and y values with the same amount with a positive direction (+), the object will move diagonally at a 45 degree angle downward. If you increment or decrement both the x and y values with the same amount with a negative direction (-), the object will move diagonally at a 45 degree angle upward. - Velocity can have the following characteristics:
- Because velocity is the rate of CHANGE, velocity can equal zero. For example, if you took two steps forward and two steps backward, you would have a velocity of zero because there were NO CHANGE. While you do have movement, you do not have change in rate and direction because you wind up in the same place you started.
- If you walk at the same pace (magnitude) with the same steps down the street (direction), you will have a CONSTANT velocity.
- If you increase your speed over time by starting to run instead of walk, you will create acceleration which will be discussed in the next section.
- Because velocity is a vector that measure the rate of change, it can be added. For example, if a train is going 50 mph W and a person inside of the train is running 10 mph E, then his total velocity is 40 mph (50 + (-10)).
- Create a ball symbol and give it an instance name of Ball0 and place it on the left side of the stage as shown in the demo above.
- Select the following coded by double-clicking on the code below and copy and paste it into the Action Panel.
- Save (CTRL+S) and test movie (CTRL+ENTER).
// Velocity ball ~~~~~~~~~~~~~~~~~~~~~~~~~~~~~~~~~~~~~~~~~~~~~~~~~~~~~~~~
// These variables will control the amount that the movie clip move on the stage
// for every frame iteration for both x and/or y.
var xVelocity:Number = 8;
// Velocity expressed in speed (8)s and direction (implied).
// var yVelocity:Number = 8;
addEventListener (Event.ENTER_FRAME, onVelocity);

function onVelocity (eventObject:Event):void
{
	Ball0.x +=  xVelocity;
// Position is incrementally updated based on the xVelocity value.
	// Ball0.y +=  yVelocity;
}
- NOTES:
- Because the xVelocity or yVelocity is ALWAYS 8 pixels for each increment, the object (Ball) will move at a CONSTANT VELOCITY.
- Because velocity is a vector, the magnitude is expressed as speed and the direction is expressed as a positive or negative (+/-) value. A positive value is implied (5 is the same as +5) EXAMPLE: xVelocity = -5; 5 is the speed and the minus sign (-) is the direction.

- Velocity can also be expresses as an angular direction. EXAMPLE: angle = 130 and speed = 4. (Not explained in this tutorial)
- Two make the object move in two directions (x and y), uncomment the two commented lines (Line 6 and 13) to see the ball move diagonally (down and to the right) at a 45 degree angle because the x and y values are positive and equal. Try experimenting with different positive and negative values for xVelocity and yVelocity.
- Since the onVelocity event handler is executed at a given frame rate, if the current frame rate is 9 fps and the ball is advanced 8 pixels per frame, then in one second (9 frames) the ball will have traveled 72 pixels (8 pixels x 9 frames which is about .5 inch).
Bonus: Make object move diagonally correctly
See page 64-65 of flash mx game design.
Acceleration and Deceleration
While a constant velocity can be thought of as turning your car's cruise control on so that it moves at a uniform speed, acceleration can be thought of as turning off the cruise control and pressing the accelerator pedal to INCREASE the speed of the car.
Acceleration is a vector quantity and is defined as the rate of change in velocity over time.
Acceleration is the ratio of difference in velocity over the difference in time over whcih the acceleratin occurred. In equation form, it would look like this:

If you INCREASE the rate of change of an object, you will accelerate the object. For example, if an object is moving at a constant 5 pixels for every frame, then it will travel 50 pixels in a span of 10 frames (10 fps). However, if you add a 1 pixel "acceleration" to each frame the object will travel 95 frames (5+6+7+8+9+10+11+12+13+14) in a ten frame span of 10 fps.
[SHOW PICTURE TO DEPICT THIS]
To create acceleration, all you have to do in increase the velocity by the acceleration rate (in this case, 1) for every frame iteration.
- Drag and drop another instance of the Ball symbol from the library below the previous one as shown in the demo.
- Copy (CTRL+C) the complete velocity code and paste (CTRL+V) it below the existing code and change the comment to read Acceleration ball
- Add the two hightlighted lines of code to the velocity example.
- Save and test movie again.
 // Acceleration ball ~~~~~~~~~~~~~~~~~~~~~~~~~~~~~~~~~~~~~~~~~~~~~~~~~~~~~~
var xVelocity2:Number = 8;
// var yVelocity2:Number = 8;
var xAcceleration:Number = 1;
// var yAcceleration:Number = 1;
addEventListener (Event.ENTER_FRAME, onAcceleration);
function onAcceleration (eventObject:Event):void
{
	Ball.x +=  xVelocity2;
// Ball.y +=  yVelocity2;
	xVelocity2 +=  xAcceleration;
// yVelocity2 +=  yAcceleration;
}
-
NOTES:
- Uncomment the four commented lines (Lines 3, 5, 10 and 12) to see the ball move diagonally (down and to the right) in a 45 degree angle because the x an y values are equal. Try experimenting with different positive and negative values for x and y.
- While velocity is typically a CONSTANT rate of change, acceleration is a INCREASE rate of change and deceleration is a DECREASE rate of change.
- To create deceleration, decrease the rate of change of the velocity.
- Acceleration occurs when there is a change in the velocity's speed OR direction. While the change in speed is obvious, the change in direction also constitute acceleration.
Bonus: Make object accelerate or decelerate with keyboard keys.
See page 68-69 of flash mx game design.
Gravity
A gravity effect can be create and then attached to an object or several objects. This effect is particually useful when creating games. As mentioned earlier, gravity can be thought of as acceleration in the y direction instead of the x direction.
- Write the following code
- Create a ball and save it as a symbol and give it an instance name of Ball.
- Test and save movie
//Gravity ball ~~~~~~~~~~~~~~~~~~~~~~~~~~~~~~~~~~~~~~~~~~~~~~~~~~~~~~~~~~~~~~~~~~~~~~~~~~~~~~~~~~~~~~~~~~
var xVelocity:Number = 10;
var yVelocity:Number = -10;
var xAcceleration:Number = 1;
var yAcceleration:Number = 1;
var gravity:Number = .5;

addEventListener (Event.ENTER_FRAME, onGravity);

function onGravity (eventObject:Event):void
{
	xVelocity +=  xAcceleration;
	yVelocity +=  yAcceleration;

	// NOTE: It is important to place the gravity is in the middle of velocity and position variables.
  // The yVelocity is changed based on the yAcceleration. Then the Ball.y position is changed based on the yVelocity.

	yVelocity +=  gravity;

	Ball.x +=  xVelocity;
	Ball.y +=  yVelocity;
}
-
NOTES:
- A gravity variable was created and then its value was added to the yVelocity variable for every frame iteration. While acceleration is used to INCREASE the value of the xVelocity or the yVelocity, gravity is use to DECREASE the value of only the yVelocity.
- This code simulate throwing an object up at an angle. The object would first appear to rise because of the yVelocity is negative (in this case, -10, remember, negative is up in Flash). However, by adding a positive value (let's say 1 for simplicity sake) to the yVelocity for each frame iteration, the velocity will decrease from -10 to -9 then to -8 and so on giving the illusion that the object is slowing down on its upward ascent as if gravity was affecting it. However, the yVelocity will reach zero at the peak of the toss and then the velocity will change to a positive value of 1, 2, 3, and so on as the object begin its downward descend as if gravity was affecting it again. The gravity variable is a multiplier coefficient (a modifier that alters a property). As a multiplier, if the value is less than one, the gravity effect is reduced. If the value is greater than one, the effect is exaggerated. For example, if you change the gravity to 2, the gravity effect would be doubled. If you change the gravity to .5, the gravity effect will be cut in half.
Bounce with Boundaries
In order to create a bounce effect, you have to have something for it to bouce off of. So, a series of "if/then/else" statements
will be created to add borders for the object (i.e., Ball) based on the stage. A rectangle that is the same demension as the stage was created for visual appeal.
- Create a new Flash movie and save it as BallWithBoundaries.fla or whatever descriptive name you want.
- (Optional) Create a 2 pixels rectangle with no fill with the same size as the stage (In our case, 550W x 400H). You don't need to make it a symbol.
- Create a small ball with a gradient as a symbol as shown in the demo and save it as a movie clip (F8).
- In the Convert to Symbol dialog box, give the movie clip an instance name of BallWithBoundaries and then click on the Export for ActionScript checkbox and then click on the Edit class definition button (a pencil icon) for the Class (not Base Case).
NOTE: Once you give the symbol a Name and than click on the Export for ActionScript checkbox, several actions will occur AUTOMATICALLY: The Class and Base class fields will be filled in and the Export in first frame checkbox will be selected. - In the Edit ActionScript 3.0 Class dialog box that appears, select the Flash Professional radio button and then click OK.
- Double click to select the code below and copy and replace the existing code with the following code into the Action panel and save the Script-x (x is a number) as BallWithBoundaries.as.
- Save (CTRL+S) and test movie (CTRL+ENTER)
package
{
	// Import necessary classes
	import flash.display.Sprite;
	import flash.events.Event;
	import flash.geom.Rectangle;

	public class BallWithBoundaries extends Sprite
	{
		// Horizontal and Vertical velocity (speed & direction)
		public var velocityX:int = 10;
		public var velocityY:int = -10;

		// Constructor function
		public function BallWithBoundaries ()
		{
			addEventListener (Event.ENTER_FRAME, onBounce);
		}
		// Cause Ball to bounce of boundaries
		private function onBounce (eventObject:Event):void
		{
			// Move ball based on velocity. The word "this" is optional.
			this.x +=  velocityX;
			this.y +=  velocityY;

			// Get bounding box rectangle of ball
			var bounds:Rectangle = getBounds(parent);
			//trace(bounds)

			// Reverse horizontal direction if Ball hit left/right side of stage. "-1" could also be used.
			if (bounds.left < 0 || bounds.right > stage.stageWidth)
			{
				//velocityX *=  -1;
				velocityX =  -  velocityX;
			}
			// Reverse vertical direction if Ball hit top/bottom side of stage
			if (bounds.top < 0 || bounds.bottom > stage.stageHeight)
			{
				//velocityY *=  -1;
				velocityY =  -  velocityY;
			}
		}
	}
}
NOTE: Using the steps above, you created the graphics and attached the code for it all from within the Convert to Symbol dialogo box. In the previous example, you used the Library panel, etc. It is important to note that the ActionScript code is "attached" to the ball in the Library (not in the timeline or an external document class).
In the previous example, the "code" for the ball is attached to it in the library, so you have to drag a copy of it from the library to the stage to see the ball bouncing. Howvever, you could delete the ball from the stage and then recreate the bouncing effect in code.
For example, delete the ball from the stage and then add the following code to Layer1/Frame 1 of the timeline and save and test the movie again::
var myBall:BallWithBoundaries = new BallWithBoundaries()
    myBall.x = stage.stageWidth/2;
    myBall.y = stage.stageHeight/2;
    addChild(myBall);
Because the bounce "behavior" is attached to the ball in the library, you could also drag multiple instances of the ball onto the stage and they will "behave" similiarly. You could also change their size, alpha, tint, etc. because these properties can be different for each instance. Because each instance in placed at different location on the stage, it appears that they are behaving differently. However, if you look carefully when the movie first starts, you will notice that they all follow a similar path. See demo below:
The problem with the previous example it that you have to MANUALLY drag and drop each instance on the stage and then change properties (i.e., size, alpha, tint, etc.) for each instance. It would be better to create a class file that could AUTOMATICALLY create all of the instances on stage and randomly set their properties (i.e., size, alpha, etc.):
- Open the file called BallsOnStage.fla and save it as BallWithBoundariesMultiple_Class.fla or whatever descriptive name you like.
- Double-click on the code below to select it and copy and paste the code into new Actionscript file (not fla).
- Save the ActionScript file as BallsOnStageMovingMultiple.as
- Return to the main fla file and type BallsOnStageMovingMultiple in the document class text file
- Save and test movie.
- (Optional) Replace the document class with the original class and save the movie again.
NOTE: The reason for reverting back to the original document class is that other swf file of the BallsOnStage.fla will reflect the latest document class name. In this case, BallsOnStageMovingMultiple.
package
{
	import flash.display.Sprite;
	import flash.display.StageAlign;
	import flash.display.StageScaleMode;
	import flash.events.Event;
	import flash.events.MouseEvent;
	import flash.display.MovieClip;

	public class BallsOnStageMovingMultiple extends MovieClip
	{
		private var ball:Ball;
		private var vx:Number;
		private var vy:Number;
		private var bounce:Number = -0.7;
		private var gravity:Number = .5;
		private var left:Number;
		private var right:Number;
		private var top:Number;
		private var bottom:Number;

		public function BallsOnStageMovingMultiple ()
		{
			stage.scaleMode = StageScaleMode.NO_SCALE;
			stage.align = StageAlign.TOP_LEFT;

			for (var i:uint=0; i<150; i++)
			{
				var ball:Sprite = Sprite(new Ball());
				ball.x = Math.random() * 550;
				ball.y = Math.random() * 400;
				vx = Math.random() * 10 - 5;
				//
				vy = Math.random() * -10 - 5;
				//
				ball.scaleX = ball.scaleY = Math.random() * 1 - .7;
				ball.alpha = Math.random() * 1 - .5;
				addChild (ball);
				ball.addEventListener (Event.ENTER_FRAME, onMove);
			}
		}

		function onMove (eventObject:Event):void
		{
			//Get a reference to the current object on a EnterFrame event
			var ball:Sprite = Sprite(eventObject.currentTarget);
			//vy +=  gravity;
			ball.x +=  vx;
			ball.y +=  vy;

			//Boundaries~~~~~~~~~~~~~~
			left = 0;
			right = stage.stageWidth;
			top = 0;
			bottom = stage.stageHeight;

			if (ball.x + 30 > right)
			{
				ball.x = right - 30;
				//vx *=  bounce;
				vx =  -  vx;

			}
			else if (ball.x - 30 < left)
			{
				ball.x = left + 30;
				//vx *=  bounce;
				vx =  -  vx;
			}
			if (ball.y + 30 > bottom)
			{
				ball.y = bottom - 30;
				//vy *=  bounce;
				vy =  -  vy;
			}
			else if (ball.y - 30 < top)
			{
				ball.y = top + 30;
				//vy *=  bounce;
				vy =  -  vy;
			}
		}
	}
}
Drag and Throw
Instead of having the ball randomly move on the stage, we will add the ability for the ball to be thrown. Throwing involves dragging an object in a particular direction and then releasing it. The challenge is to track its start and end positions to determine the direction and velocity to use AFTER the object is released.
First, let's create a ball class. Instead of using a ball that is on the stage or retrieved from the library, we will first create a "virtual" ball by creating a custom class for it:
- Double-click on the code below to select it and then copy and paste it into a new ActionScript (not fla) file
- Save this file as Ball.as in the same directory as the main fla file.
package
{
	import flash.display.Sprite;

	public class Ball extends Sprite
	{
		public var radius:Number;
		public var color:uint;

		public function Ball (radius:Number=60, color:uint=0x00ff00)
		{
			this.radius = radius;
			this.color = color;
			graphics.beginFill (color);
			graphics.drawCircle (0, 0, radius);
			graphics.endFill ();
		}
	}
}
NOTE: This Ball class can be used in any movie that needs a "virtual" ball. The Ball class will be used next in the DragAndThrow Class as a document class inside the actually Flash file (DragAndThrow.fla).
BONUSES: Create balls on Stage using timeline or a document class | Create multiple balls on the stage randomly
Next, we will create the DragAndThrow class.
- Double-click on the code below to select it and then copy and paste it into a new ActionScript (not fla) file
- Save this file as DragAndThrow.as in the same directory as the main fla file.
package
{
	import flash.display.Sprite;
	import flash.display.StageAlign;
	import flash.display.StageScaleMode;
	import flash.events.Event;
	import flash.events.MouseEvent;
	import flash.display.MovieClip;

	public class DragAndThrow extends Sprite
	{
		private var ball:Ball;
		private var vx:Number;
		private var vy:Number;
		private var bounce:Number = -0.7;
		private var gravity:Number = .5;
		private var oldX:Number;
		private var oldY:Number;


		public function DragAndThrow ()
		{
			stage.scaleMode = StageScaleMode.NO_SCALE;
			stage.align = StageAlign.TOP_LEFT;

			ball = new Ball();
			ball.x = stage.stageWidth / 2;
			ball.y = stage.stageHeight / 2;
			ball.buttonMode = true;
			vx = Math.random() * 10 - 5;
			vy = -10;
			addChild (ball);
			ball.addEventListener (MouseEvent.MOUSE_DOWN, onMouseDown);
			addEventListener (Event.ENTER_FRAME, onEnterFrame);
		}

		private function onEnterFrame (event:Event):void
		{
			vy +=  gravity;
			ball.x +=  vx;
			ball.y +=  vy;
			var left:Number = 0;
			var right:Number = stage.stageWidth;
			var top:Number = 0;
			var bottom:Number = stage.stageHeight;

			if (ball.x + ball.radius > right)
			{
				ball.x = right - ball.radius;
				vx *=  bounce;
			}
			else if (ball.x - ball.radius < left)
			{
				ball.x = left + ball.radius;
				vx *=  bounce;
			}
			if (ball.y + ball.radius > bottom)
			{
				ball.y = bottom - ball.radius;
				vy *=  bounce;
			}
			else if (ball.y - ball.radius < top)
			{
				ball.y = top + ball.radius;
				vy *=  bounce;
			}
		}

		private function onMouseDown (event:MouseEvent):void
		{
			oldX = ball.x;
			oldY = ball.y;
			stage.addEventListener (MouseEvent.MOUSE_UP, onMouseUp);
			ball.startDrag ();
			removeEventListener (Event.ENTER_FRAME, onEnterFrame);
			addEventListener (Event.ENTER_FRAME, trackVelocity);
		}

		private function onMouseUp (event:MouseEvent):void
		{
			stage.removeEventListener (MouseEvent.MOUSE_UP, onMouseUp);
			ball.stopDrag ();
			removeEventListener (Event.ENTER_FRAME, trackVelocity);
			addEventListener (Event.ENTER_FRAME, onEnterFrame);
		}

		private function trackVelocity (event:Event):void
		{
			vx = ball.x - oldX;
			vy = ball.y - oldY;
			oldX = ball.x;
			oldY = ball.y;
		}
	}
}
NOTE: The key to determine the velocity once the object is released is to subtract the new position from the old position. [SEE SCREENSHOT on page 183 of the ActionScript 3.0 Animation book]. The initial x/y position is stored in two variables (oldX and oldY). That way, when the object is dragged to a new position, its new position x/y values can be substracted from the old ones.The enterFrame handler is removed BEFORE the trackVelocity is ADDED using the MouseDown method. When the object is released, the enterFrame is reversed again.
Finally, we will create the main Flash movie:
- Create a new Flash movie and save it as DragandThrow.fla or whatever descriptive name you want.
- (Optional) Create a 2 pixels rectangle with no fill with the same size as the stage (In our case, 550W x 400H). You don't need to make it a symbol.
- Type DragAndThrow (without .as) into the document text field. That's it.
- Save and test movie.
-
NOTES:
- Because the Ball class is in the same directory as the fla file and it is "called" from within the DragAndThrow class it is AUTOMATICALLY implemented within the movie.
- If you want to change the color or size of the ball, you can change them in the Ball.as class.
Bounce with Multiple Objects
There are many occasions where you have to create a bouncing effect using multiple objects. While the example below is not perfect, it does show that you can create objects the reacts to bouncing.
- Create a new Flash movie and save it as PlatFormTest.fla or whatever descriptive name you like.
- Create a rectangle with a 2 pixels stroke and no fill to match the size of the stage.
- Create a rectangle column like you see in the demo and convert it to a symbol (F8) and give it and instance name of Wall1.
- Drag another instance of the Wall symbol from the library and position it and rotate it like you see in the demo and then give it an instance name of Wall2.
- Open the DragAndThrow.as file as save it as PlatForm.as in the same directory as the main fla movie.
- Change DragAndThrow to PlatForm in liines 10 and 21
- Add the following lines of code that are highlighted (Lines 67-84)
package { import flash.display.Sprite; import flash.display.StageAlign; import flash.display.StageScaleMode; import flash.events.Event; import flash.events.MouseEvent; import flash.display.MovieClip; public class PlatForm extends Sprite { private var ball:Ball; private var vx:Number; private var vy:Number; private var bounce:Number = -0.7; private var gravity:Number = .5; private var oldX:Number; private var oldY:Number; public function PlatForm () { stage.scaleMode = StageScaleMode.NO_SCALE; stage.align = StageAlign.TOP_LEFT; ball = new Ball(); ball.x = stage.stageWidth / 2; ball.y = stage.stageHeight / 2; ball.buttonMode = true; vx = Math.random() * 10 - 5; vy = -10; addChild (ball); ball.addEventListener (MouseEvent.MOUSE_DOWN, onMouseDown); addEventListener (Event.ENTER_FRAME, onEnterFrame); } private function onEnterFrame (event:Event):void { vy += gravity; ball.x += vx; ball.y += vy; var left:Number = 0; var right:Number = stage.stageWidth; var top:Number = 0; var bottom:Number = stage.stageHeight; if (ball.x + ball.radius > right) { ball.x = right - ball.radius; vx *= bounce; } else if (ball.x - ball.radius < left) { ball.x = left + ball.radius; vx *= bounce; } if (ball.y + ball.radius > bottom) { ball.y = bottom - ball.radius; vy *= bounce; } else if (ball.y - ball.radius < top) { ball.y = top + ball.radius; vy *= bounce; } if (ball.hitTestObject(Wall1)) { trace ("hit"); vx *= bounce; vy *= bounce; //vy += gravity; ball.x += vx; ball.y += vy; } if (ball.hitTestObject(Wall2)) { trace ("hit"); vx *= bounce; vy *= bounce; //vy += gravity; ball.x += vx; ball.y += vy; } } private function onMouseDown (event:MouseEvent):void { oldX = ball.x; oldY = ball.y; stage.addEventListener (MouseEvent.MOUSE_UP, onMouseUp); ball.startDrag (); removeEventListener (Event.ENTER_FRAME, onEnterFrame); addEventListener (Event.ENTER_FRAME, trackVelocity); } private function onMouseUp (event:MouseEvent):void { stage.removeEventListener (MouseEvent.MOUSE_UP, onMouseUp); ball.stopDrag (); removeEventListener (Event.ENTER_FRAME, trackVelocity); addEventListener (Event.ENTER_FRAME, onEnterFrame); } private function trackVelocity (event:Event):void { vx = ball.x - oldX; vy = ball.y - oldY; oldX = ball.x; oldY = ball.y; } } } - Save and Test movie.
(Optional) Friction
info