CREATING A 3D ANIMATED CUBE WITH PAPERVISION
EXECUTIVE SUMMARY: In this tutorial, we will be using PaperVision3D to create a 3D animated cube.
Download Class Library
THEORY: There are many Flash animation class libraries that we could use. However, we will be using one from Google that allow you to easily create 3D object with animation. While you can write the code yourself, you can save yourself a ton of time by using class libraries that has already been created and are typically available for free on the web.
We will be using a class library called PaperVision3D. It is used to create all types of 3D with animation. Animation created by code is easier to maintain then timeline-based animation. The later is controlled by the timeline's frames; whereas, code-based animation is controlled by time.
- Down the class library from Google. Go to http://code.google.com/p/papervision3d/downloads/list and download the latest class library (In our case as of this writing, it will the the Papervision3D_2.1.932.zip).
NOTE: Advanced user can place the classes in a global ActionScript class folder. - Create a project folder (i.e., Creating a 3D Cube).
- Unzip the zip file in this project folder.
NOTE: Take note of the directory structure as it will be useful when you import the classes later. - Create a new ActionScript 3 Flash movie in the project folder (i.e., 3D_Cube.fla).
Create a Path to the Class
THEORY: Before you an use classes, you have to point Flash to them. There are two ways to point to classes: Locally or globally. By using the File > Publish Settings..., you are setting a path to the classes ONLY for the current Flash movie. If you are an advanced user, you can create a path to a global directory that can be used with ANY Flash movie.
APPLICATION: We will create a local path for this tutorial.
- Select File > Publish Settings... to open the Publish Settings dialog box.
- In the Publish Settings dialog box, select the Flash tab and then:
- Select ActionScript 3.0 for the Script type (if it is not already selected)
- Click on the Settings... button to open the Advanced ActionScript 3.0 Settings dialog box and select the Sourch path and then:
- Select the folder icon and navigate to the folder where the packages are located (i.e., ...\Papervision3D_2.1.932\src).
- Click OK to set the classpath and close the Advanced ActionScript 3.0 Settings dialog box
- Click OK again to close the Publish Setting dialog box.
Create Faces for Cube
THEORY: Since a cube has six sides, movie clips for each side has to be created.
APPLICATION: We will need to create six movie clips that represent the six sides of the cube. We will later "map" these movie clips to the cube itself.
- Create six movie clips (with images/video, etc in them) with a dimension of 110w x 110h.
TIP: CREATE IMAGES FOR CUBE WITH YOUR FAVORITE WEB SITE LOGOS, ETC. - Drag all six movie clips to stage.
- In the Property panel, give each symbol an instance name (in our case, side1, side2, side3, side4, side5 and side6)
- Align all movie clips to the stage center.
TIP: Use the align tools. - Select ALL movie clips and set the Blend mode to Erase.
NOTE: By setting the Blend mode to Erase, you are in effect making the movie clips available for use but invisible.
Import Papervision3D classes
THEORY: Before you can use classes from a package, you have to first import import them for use. To import all classes from a given package, you can use the asterisk (*) as a wildcard. There is no problem with doing this because Flash will only compile the classes it needs from your project even though you import more than you needed.
APPLICATION: We will import the PaperVision3D pakages that is need for our project.
Write the following code to import the PaperVision3D packages and their corresponding classes.
//Import PaperVions3D classes needed for project =========================================================
import org.papervision3d.scenes.*;
import org.papervision3d.cameras.*;
import org.papervision3d.objects.*;
import org.papervision3d.objects.special.*;
import org.papervision3d.objects.primitives.*;
import org.papervision3d.materials.*;
import org.papervision3d.materials.special.*;
import org.papervision3d.materials.shaders.*;
import org.papervision3d.materials.utils.*;
import org.papervision3d.lights.*;
import org.papervision3d.render.*;
import org.papervision3d.view.*;
import org.papervision3d.events.*;
import org.papervision3d.core.utils.*;
import org.papervision3d.core.utils.virtualmouse.VirtualMouse
Construct 3D World
THEORY: When working with 3D, there is the concept of 3D space. It is helpful to think of this 3D space as the universe and other things (i.e. planets, etc.) as objects in this universe.
APPLICATION: We will construct a 3D environment so we can later add object to this environment.
Write the following code after the existing code to create a variable to hold what represent the viewport (universe). Comments are optional.
//Construct 3D environment (viewport) =====================================================================================
//Container for 3D scene is an instance of the Viewport3D class with four arguments (width, height, viewport scale to w/h of stage, interactive viewport)
var viewport:Viewport3D = new Viewport3D(0,0,true,true);
//Add viewport to display list (Remember, create object, give it a name, and then tell it do do something -- in this case display it.)
addChild(viewport);
//(Optional) Make viewpoint behave like a button with "hand" cursor instead of "arrow" cursor.
viewport.buttonMode = true;
Create Objects for Scene
THEORY: Now that we created the "universe", we need to turn our attention to creating objects to populate this universe.
APPLICATION: We will now create a 3D scene, 3D camera, and 3D renderer.
- Write the following code after the existing code to create a variable for the scene, camera, and renderer. Comments are optional
//Create scene, camera and renderer ====================================================================
var scene:Scene3D = new Scene3D();
//Create a basic render engine to render scene. Will activate it later.
var renderer:BasicRenderEngine = new BasicRenderEngine();
//Create camera
var camera:Camera3D = new Camera3D();
//Set camera to have cube sides in scene match movie clips size
camera.zoom = 11;
camera.focus = 100;
Create Material for Cube From Movie Clips
THEORY: Before we create the cube, we need to create the material that will be mapped to its six sizes.
APPLICATION: We will create six movie clips that will be used for each side of the cube later.
- Create six MovieMaterial objects and set some properties for each. There are two properties that are being set. Comments are optional.
- Interactive -- make movie clip interactive
- Smooth -- antialias movie clip
//Create material for each cube side (6) =================================================================
// Instances of each cube side is on the stage with blend mode set to erase so they are not visible. Alternatively, you could use a MovieAsset Material to retrieve them from the library.
var material1:MovieMaterial = new MovieMaterial(side1);
material1.interactive = true;
material1.smooth = true;
var material2:MovieMaterial = new MovieMaterial(side2);
material2.interactive = true;
material2.smooth = true;
var material3:MovieMaterial = new MovieMaterial(side3);
material3.interactive = true;
material3.smooth = true;
var material4:MovieMaterial = new MovieMaterial(side4);
material4.interactive = true;
material4.smooth = true;
var material5:MovieMaterial = new MovieMaterial(side5);
material5.interactive = true;
material5.smooth = true;
var material6:MovieMaterial = new MovieMaterial(side6);
material6.interactive = true;
material6.smooth = true;
Create Cube Object
THEORY: While we have created material to use for the cube, we have not create the cube itself and map faces to it.
APPLICATION: We will create a visible 3D cube.
- Write the following lines of code after the existing code to create a 3D cube object and then use the MaterialsList to "map" material created earlier to cube's faces. Comments are optional.
//Create cube ============================================================================================
//The first parameter include instance of the material list class which has itself a generic object as a parameter with a list of the six sides of the cube
//The next three parameters are the width, height and thickness of the cube -- all being 110 to match size of movie clip.
//The last three parameters are the number of triangle to use for cube x, y and z faces -- all being 10.
var cube:Cube = new Cube(new MaterialsList({front:material1,back:material2,left:material3,right:material4,top:material5,bottom:material6}),110,110,110,10,10,10);
// Display cube INSIDE of scene
scene.addChild(cube);
// Render the scene
renderer.renderScene(scene, camera, viewport);
- Press CTRL+ENTER to preview movie.
RESULT TEST POINT: You should only see ONE side of the cube. We will add code in the next section so that you can see all sides of the cube while it rotates.
Add Code to Rotate Cube
THEORY: While the cube is created and can be viewed, it has no motion. While there are many ways to animate an object (i.e., looping, recursive function,etc.), in this case, we are use a common practice of using the ENTER_FRAME event to cause the cube to animate. While in many cases, objects are "seen" with the addChild method, when creating this 3D environment, we have to "render" the scene.
APPLICATION: We will animate the cube by adding some additional code.
- Create an addEventListener with an ENTER_FRAME event and an event Handler (rotateObject function) to have the cube rotate continuously. Comments are optional.
// Add EventListeners to run a function (loop) to constantly render scene. ==================================
addEventListener(Event.ENTER_FRAME, loop);
function rotateObject(eventObject:Event):void
{
// Use mouse position to spin cube in center of stage
var xDist:Number = mouseX - stage.stageWidth * 0.5;
var yDist:Number = mouseY - stage.stageHeight * 0.5;
cube.rotationY += xDist*0.05;
cube.rotationX += yDist*0.05;
renderer.renderScene(scene, camera, viewport);
}
- Press CTRL+ENTER to preview movie.
RESULT TEST POINT: You should only see all sides of the cube while it rotates.
Add EventListeners to Cube Sides
THEORY: It is also good to be able the make the object interactive. In this case, we will add code to make each side a link to a web site.
APPLICATION: We will create several event Listeners to make each side of the cube linkable.
- Write the following code after the existing code to create a new event for each cube side.
TIP: Advance user could use a loop to create all of the eventListeners.
//Set up eventListeners for each side =========================================================
side1.addEventListener(MouseEvent.CLICK, side1Click);
function side1Click(eventObject:MouseEvent):void
{
navigateToURL(new URLRequest("http://www.yahoo.com"));
}
side2.addEventListener(MouseEvent.CLICK, side2Click);
function side2Click(eventObject:MouseEvent):void
{
navigateToURL(new URLRequest("http://www.google.com"));
}
side3.addEventListener(MouseEvent.CLICK, side3Click);
function side3Click(eventObject:MouseEvent):void
{
navigateToURL(new URLRequest("http://www.flickr.com"));
}
side4.addEventListener(MouseEvent.CLICK, side4Click);
function side4Click(eventObject:MouseEvent):void
{
navigateToURL(new URLRequest("http://www.youtube.com"));
}
side5.addEventListener(MouseEvent.CLICK, side5Click);
function side5Click(eventObject:MouseEvent):void
{
navigateToURL(new URLRequest("http://www.sidebook.com"));
}
side6.addEventListener(MouseEvent.CLICK, side6Click);
function side6Click(eventObject:MouseEvent):void
{
navigateToURL(new URLRequest("http://www.adobe.com"));
}
- Press CTRL+ENTER to preview movie.
RESULT TEST POINT: You should only see all sides of the cube while it rotates. And you should be able to click on any side to take you to the corresponding web site.
Bonus: Control What Axis Cube Rotate On
THEORY: While not necessary, there may be times when you want to constrain rotation to a single axis.
APPLICATION: We will add to the existing code to give the use the option to constrain the rotation to the x or y axis or both.
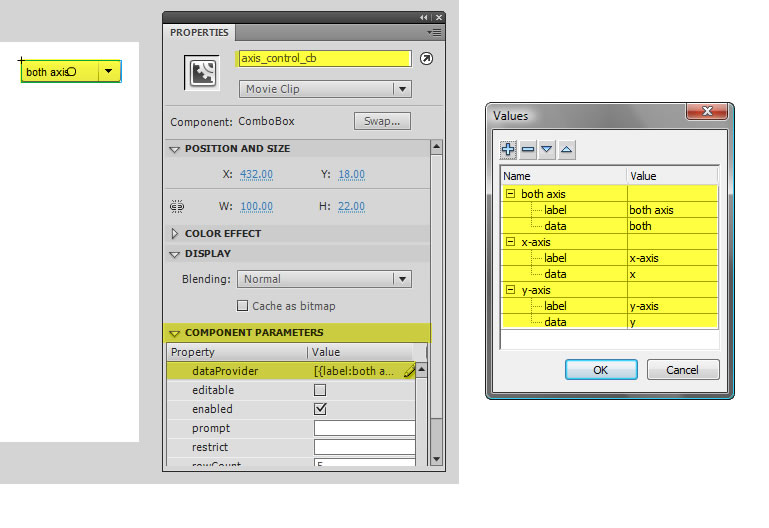
- Select Window > Components (CTRL + F7) and then expand the User Interface folder and then drag-and-drop the ComboBox to the stage in the top-right corner (or where ever you like other than the middle of the stage).
- Select the ComboBox on the stage and in the Property panel set:
- The instance name to axis_control_cb.
- Expand the Component Parameters section, click on the small pencil icon on the dataProvider line to open the Values dialog box and set the following name/value pairs (highlighted in yellow in the Values dialog box snapshot below):
- Add the following code below the import code (highlighted in bold):
.
.
.
import org.papervision3d.core.utils.*;
import org.papervision3d.core.utils.virtualmouse.VirtualMouse
var axis:String = "both"
axis_control_cb.addEventListener(Event.CHANGE, changeAxis);
function changeAxis(eventObject:Event):void
{
axis = eventObject.target.selectedItem.data
}
- Write the following code (highlighted in bold) above the cube.rotationY += xDist*0.05 line to create two if statements for the x and y axis. Then WRAP the two rotation code with an if statement for the axis == both (highted in bold):
CAUTION: Watch curly braces ( { } ).
// rotation values are reduced by multiplying their value by 0.05. Otherwise, cube would spin to fast
if (axis == "y")
{
cube.rotationY += xDist*0.05;
}
if (axis == "x")
{
cube.rotationX += yDist*0.05;
}
if (axis == "both")
{
cube.rotationY += xDist*0.05;
cube.rotationX += yDist*0.05;
}
renderer.renderScene(scene, camera, viewport);
}
- Press CTRL+ENTER to preview movie.
RESULT TEST POINT: You should only see all sides of the cube while it rotates. However, you have the option to select the x and y axis only using the combo box.