CREATING YOUR FIRST MOBILE APP
It is a common tradition as a programmer/developer to create your first app that will display the phrase "Hello, World" to the screen. In this introductory tutorial, we will create a simply mobile app that will do this. In fact, you will only have to write (or copy and paste) two lines of code.
Creating a new mobile project
We will be creating a simply mobile application using Flash Builder 4.5:
- Create a project folder on your desktop and give it a descriptive name (i.e., MyFirstMobileApp)
- Select File > New > Flex Mobile Project to open the New Flex Mobile Project dialog box.
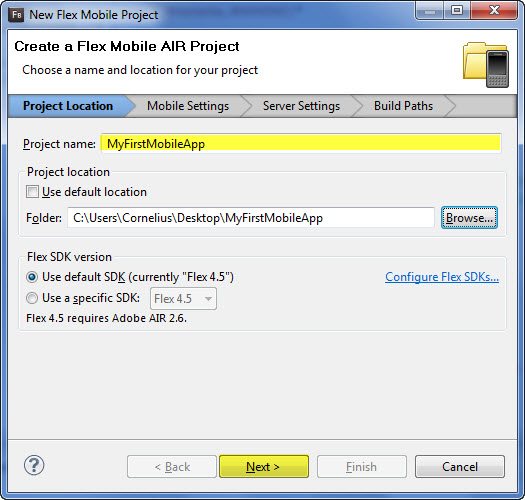
- On the Project Location tab, type a project name: MyFirstMobileApp
- Click on the Browse... button and navigate to the folder you just created.
NOTE: This is similar to defining a web site in Dreamweaver using Site > New Site.... - Keep other default settings and click Next.
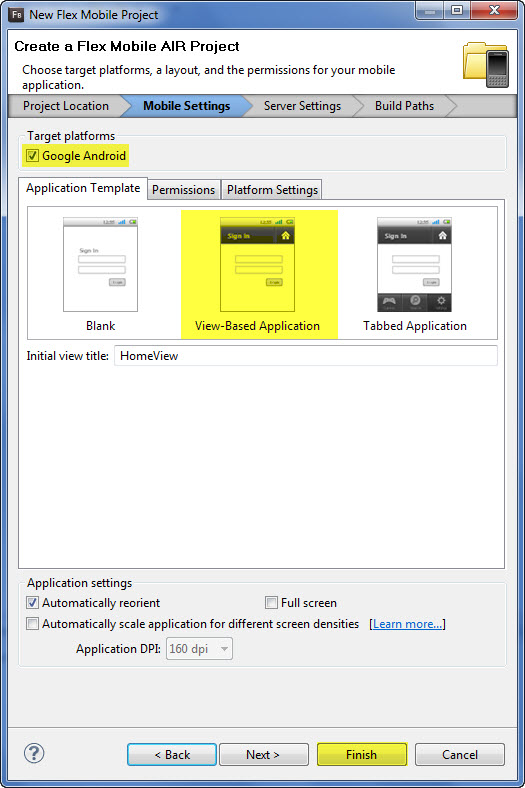
- On the Mobile Settings tab, select the target platform checkbox(s) you want to develop apps on. Choose the View-Based Application as the Application Template and leave the other defaults settings and click Finish.
NOTE: The Finish button was clicked instead of the Next button because we skipped the Server Settings and Build Paths that is not needed for this simply project.
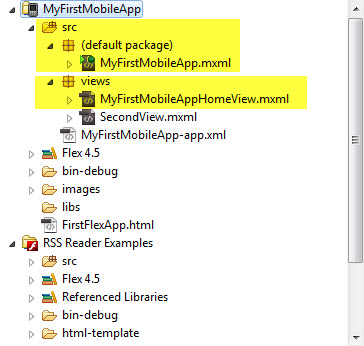
NOTE: After setting up the project, Flash Builder will automatically create two mxml files (MyFirstMobileApp.mxml and MyFirstMobileAppHomeView) and open the first in Code View. The file names matches the name of the project with the word HomeView appended to the start page. The main application file (MyFirstMobileApp) usually does not contain content---instead it is used as a shell for the other views.
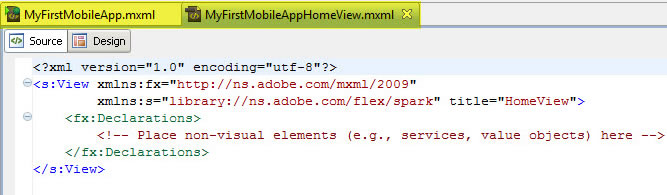
NOTE: Notice that the main mxml file is placed in the default package folder; whereas, the two View mxml files (MyFirstMobileAppHomeView and SecondView) are placed in the views folder.
Adding Views to Project
First View:
The first view (MyFirstMobileAppHomeView.mxml) is automatically created for you when you choose to use a View-Based Application earlier. All you need to do now is populate it with other components.
- Click on the MyFirstMobileAppHomeView.mxml tab to select it and switch to the Design View.
- From the Components panel's Layout folder, drag and drop a VGroup component to the stage.
NOTE: The VGroup component is an empty container that ensures that all of the components inside of it stacked and aligned neatly.
- With the VGroup component still selected, in the Properties panel's Common tab set the Horizontal align to center and the Vertical align to middle to center the objects (button and label) that will be created next. Also, set the width and height both to 100% and delete any values from the X and Y fields.
- From the Components panel's Controls folder, drag and drop a Label component and then in the Properties panel's Common tab write Hello, World in the Text field.
NOTE: The VGroup tag arranges elements in a group vertically, hence the name VGroup. As a result, the label "Hello, World!" and the Continue button appear on top of one another (vertically). Also, you may have notice that FlashBuilder "forced" the Label to the center and middle of the VGroup container based on the previous VGroup settings we set earlier (Horizontal align to center and the Vertical align to middle to center). Also, when you drag and drop the Button, you may have notice that both components re-align themselves as a group to the middle and center of the screen. (How cool is that!)
- From the Components panel's Controls folder, drag and drop a Button component and then in the Properties panel's Common tab set the text in the Label field to Next. Also, click on the arrow next to the lightning bolt icon to the right of the On click field and select Generate Event Handler from the drop down list.
NOTE: Flash Builder will automatically switch you to the Source View mode and write the necessary code for the event handler. Noticed that it wrote a click handler attribute in the button element and then wrote a script block to include the event handler function at the top of the code (How cool is that!!!).
- Replace the comment (// TODO Auto-generated method stub) with the following line of code:
navigator.pushView(SecondScreen);
NOTE: It is important to note that the SecondScreen is the name of the mxml file and NOT the title attribute of the mxml file.
NOTE: This line of code basically allows you to "transition" from the Home View to the SecondScreen view that will be created later.
NOTE: If you were writing this code in Flash, it would look almost the same. The Event Listener is simplified as an attribute in the button element (<s:Button label="Next" click="button1_clickHandler(event)" styleName="next"/> ); however, the function is basically the same.
button.addEventListener(MouseEvent.MOUSE_DOWN, button1_clickHandler)
function button1_clickHandler(event:MouseEvent):void
{
navigator.pushView(SecondScreen);
}
- Save file (CTRL+S) and click Run button to see the "home page" view.
Second View:
Since the SecondScreen is basically the same as the HomeView, we will take a shortcut and copy and paste it to a new mxml file:
- Right-click on the MyFirstMobileApp.mxml in the Package Explorer panel and select Copy. In the dialog box that appears, change the name the SecondScreen and click OK.
- Double-click on the SecondScreen link in the Package Explorer to open it up in Code View.
- Change the four highlighted word/phrase in bold:
<?xml version="1.0" encoding="utf-8"?>
<s:View xmlns:fx="http://ns.adobe.com/mxml/2009"
xmlns:s="library://ns.adobe.com/flex/spark" title="Second View">
<fx:Script>
<![CDATA[
protected function button1_clickHandler(event:MouseEvent):void
{
navigator.popView();
}
]]>
</fx:Script>
<fx:Declarations>
<!-- Place non-visual elements (e.g., services, value objects) here -->
</fx:Declarations>
<s:VGroup width="100%" height="100%" horizontalAlign="center" verticalAlign="middle">
<s:Label text="Goodbye, World"/>
<s:Button label="Previous" click="button1_clickHandler(event)"/>
</s:VGroup>
</s:View>
NOTE: Unlike the pushView which requires a mxml file as an argument, the popView does not require an argument.
- Save file (CTRL+S) and click the Run icon.
Testing App on Desktop
Flash Builder has a built-in emulator so you don't necessarily need a device to test your application. Instead, you can test it on your desktop. However, you should test your final application on a real device.
- Click on the main application (MyFirstMobileApp.mxml) to select it or double-click it in the Package Explorer to open and select it, if necessary.
- Click Run button on the main toolbar
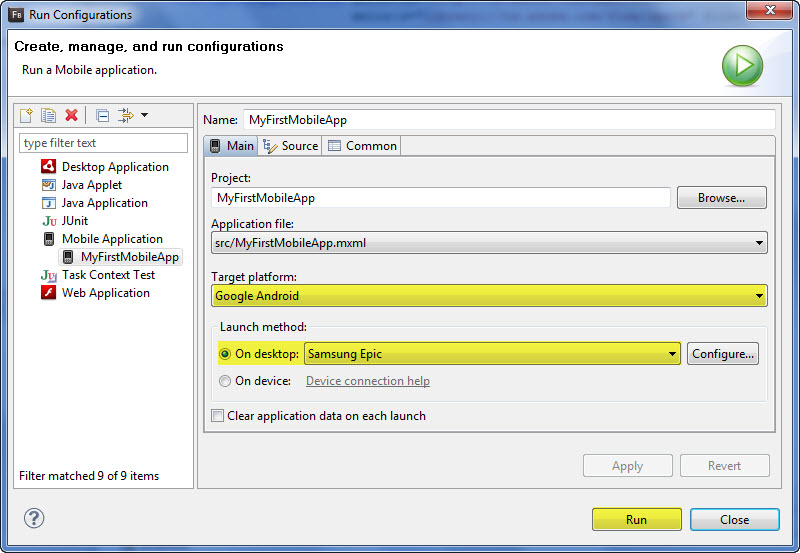
- In the Run Configuration dialog box, select a target platform, a launch method of On Desktop and then select a phone of your choice and then click Run.
- Test Application by clicking repeatedly on the button.
- Close application window to return to Flash Builder.
Testing App on Device
There is no substitute for testing your application on a real device.
- Ensure that USB debugging mode is enabled on your device by launching the system settings application and checking to see if the USB Debugging option is checked. If not, check device documentation or manufacture web site.
- Plug your device into computer via a USB cable. If you are prompted for a connection type, choose disk.
NOTE: If you devices is not listed, click "I do not see my connected devices in the list."
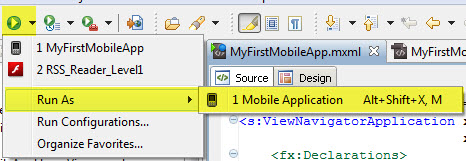
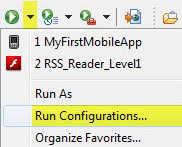
- IMPORTANT STEP: Click the arrow next to the Run button (not the Run button itself) and select the Run Configurations... option. The reason for this is that the Run button will run the last profile that was ran.
- In the Run Configurations dialog box that appears, change the Launch Method to On device and click Run to export the app to your device.
NOTE: Your device should launch automatically. If your computer prompts you to upgrade your device, click Yes.
Changing the App Style (Optional)
You can change the appearance of the app by changing the "skin" using a style sheet and changes to the mxml files.
- Download the sample project file (HelloWorld-source.zip) from the top of the article and extract its contents to a folder of your choosing (for example, on the desktop).
- Select File > Import Flash Builder Project from the main menu. In the Import Flash Builder Project dialog box, browse to the FXP file you just extracted from the sample file for this article (HelloWorldSkins.fxp) and click Open. Click Finish in the confirmation dialog box to complete the process.
- Note the addition of the HelloWorldSkins project to the Package Explorer. Expand the HelloWorldSkins folder to reveal the main.css file in the HelloWorldSkins/src/(default package) folder.
- Drag the main.css file from the HelloWorldSkins project to the corresponding HelloWorld/src/(default package) folder (see Figure below).

- In the Move dialog box, confirm that you want HelloWorld/src/(default package) as the destination folder for the move (see Figure 18). If a different destination is highlighted, just click "(default package)" to select it. Click OK.

- Select File > New > Package from the main menu. In the New Package dialog box, make sure that "HelloWorld/src" appears as the source path and enter skins as the package name. Click Finish to complete the process.
- Back in the Package Explorer, expand the HelloWorldSkins/src/skins folder to reveal four MXML files:
- BackButtonSkin1.mxml
- BackButtonSkin2.mxml
- NextButtonSkin1.mxml
- NextButtonSkin2.mxml
- Drag all four files to the empty HelloWorld/src/skins folder you just created. This time the Move dialog box asks you to confirm the destination of the four resources you're moving. Make sure that "skins" is highlighted and click OK to complete the move. Your HelloWorld asset structure should now look like Figure 19.

- To make your HelloWorld project aware of the main.css file that you just moved there, you need to add a link to it in the project file. If the HelloWorld.mxml tab is not already visible, double-click the HelloWorld.mxml file in the "(default package)" folder to open it in the workspace. Insert the following line just above the closing </s:ViewNavigatorApplication> tag:
<fx:Style source="main.css"/> Your code should resemble Figure 20.

- Select File > Save to save the HelloWorld.mxml file.
- With the HelloWorld project selected in the Package Explorer, click the Run button. You should now see a very different set of buttons on the screens (see Figure 21).

- Earlier you moved four skin files from the article's sample file to your own. Figure 21 shows one set of skins; a simple code change can alter the buttons' look considerably.
- First close the ADL window showing the app demo. Then double-click the main.css file in HelloWorld/src/(default package) to open it in the workspace. Change the skin names being referred to from "1" to "2":
- NextButtonSkin1 becomes NextButtonSkin2
- BackButtonSkin1 becomes BackButtonSkin2
- Save the main.css file (File > Save) and re-run the HelloWorld app. You should now see a very different set of buttons on the screens (see Figure 22).

Congratulations! You've seen how easy it is to change the appearance of a button in your HelloWorld app buy making a simple change to the main.css file, which references a specific skin definition file that you inserted into your project.
Packaging App for Market
You can now "package" your application for the Android, iOS or Blackberry market.
- Select Project > Export Release Build
- In the Export Release Build dialog box that appears, ensure that MyFirstMobileApp appears in the Project and Application selector.
- Connect device to computer, if necessary.
- Specify the base filename of the Android Package (APK) file or leave the default.
- Ensure that "Signed packages for each target platform" is selected and then click Next
- Select a digital signature that is used to sign the application. Trusted signatures are obtained from certificate authorities, but you can create a self-signed certificate for now. Either locate your existing certificate and enter your password, or click the Create button and fill out the information in the Create Self-Signed Digital Certificate dialog box. (Use your name as the publisher name and enter your password where indicated.)
- Click Browse to save your certificate to your computer. The path and filename you entered will now appear in the Save As field (see Figure 16). Click OK to return to the Export Release Build dialog box.
- Click Finish.

NOTE: Flash Builder created the release build (APK) file and deployed and installed it on your device. Also note that the release build is called MyFirstMostApp, while the MyFirstMostApp-debug app is the test build app.
The app is now ready to be submit to one of more markets.