LEVEL 1: If copying and pasting two lines of code is considered programming, then this level requires minimal amount of programming.
Creating a New Flex Project
First, we will create a new project for our RSS application.
- Create a project folder somewhere on your desktop and give it a descriptive name (i.e., MyFirstWebApp)
NOTE: If we did not have the index.xml file to use, we could have let Flash Builder automatically create the project folder for us by just giving Flash Builder a path and the name of the intended folder (i.e., .../MyFirstWebApp. - Download the index.xml file or create your own and place it inside of the project folder.
- Start FlashBuilder 4/4.5.
- Select File > New > Flex Project from menu and name the project RSS Reader in the Project name field. Keep all other default settings and click the Finish button.
Similar: Creating a Flex Project is similar to defining a web site (Site > New Site...) in Dreamweaver.
- Move the index.xml file into the src folder by dragging and dropping it.
NOTE: Moving the index.xml file into the src folder makes the project more portable if you wanted to move it to a new location later.
NOTE: If you click on the Source view (CTRL+~), you will see that a default shell has been automatically created for you.
Similar: The Flex shell is similar to the (X)HTML shell created in Dreamweaver when selecting none as the layout except Flash Builder uses an <Application> element instead of an <html> element. The "s:" and "/s:" represent the Sparks namespace. - Switch to Design view (CTRL+~) by clicking on the Design button.
Similar: Flash Builder's Source View and Design View are similar to Dreamweaver Code and Design Views, respectively. However, Flash Builder does not have a Split View.
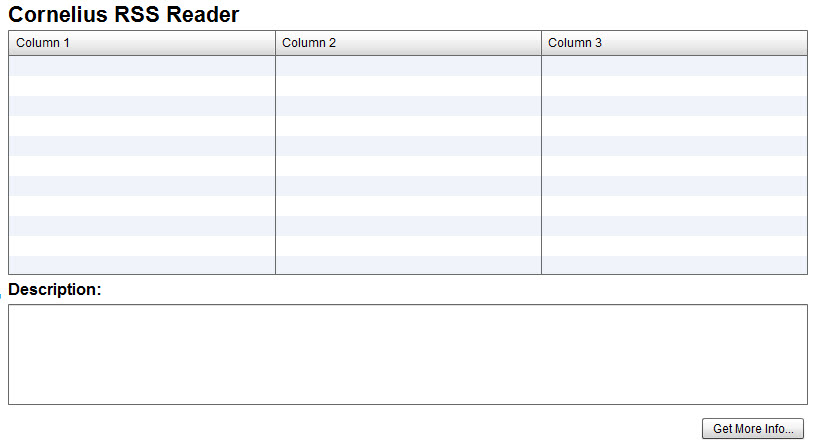
Creating Application Layout
Using the Design view, we will layout the application simply by dragging and dropping components to the stage from the Control folder in the Components panel:
TIP: While the Componenst panel is selected, you can click on a letter to go to the first instance of a component with that letter in most cases: L for Label, B for Button, D for DataGrid, etc.
Drag and drop the following five components and set some of their properties in the Flash Builder Properties panel:
- Label - to the top left corner of the stage and then in the Properties panel add the following properties:
- In the Common tab, Type <Your Name> RSS Reader in the Text: text field. Where <Your Name> is whatever you want to add.
TIP: You can edit the label's text "in-place" by double-clicking on it instead of using the Flash Builder Properties panel. - In the Style tab, change font size to 22 and click on the bold icon (bold T) to bold the text.
- In the Common tab, Type <Your Name> RSS Reader in the Text: text field. Where <Your Name> is whatever you want to add.
- DataGrid - below the Label you just created. For now, manually resize the width of the DataGrid component to extend across the stage with about 5-10 pixels margin on both sides.
- In the Properties panel's common tab, name the component dgLineItems in the ID text field.
Similar: The Flash Builder Properties panel is similar to Properties Panel in Flash and Dreamweaver. The ID attribute is similar to setting an instance name in Flash or an ID name in Dreamweaver.
NOTE: You could have skipped this step because Flash Builder would have given it a default name (dataGrid) when you modify its bounding. However, it is also best to give components more descriptive names.
NOTE: You do not have to give a component a ID name if it will not be referred to in code. Hence, since the DataGrid is the only component that will be "talked" to directly, it is the only one with an ID name. - In the Properties panel's Size and Position tab, change the width to 800 and height to 245.
- In the Properties panel's common tab, name the component dgLineItems in the ID text field.
- Label - below the DataGrid component. In the Properties panel's commonn tab, name it Description in the Text: text field. In the style tab, change font size to 22 pixels and click on the bold icon to bold it.
ALTERNATIVE: You could have copy and paste the previous label and double-click on it to rename it Description: - TextArea - below Label component and resize it manually to match the width of the DataGrid with a height of about 100 pixels.
- Button - to the lower right corner of the DataGrid. In the Properties panel's common tab, give the Label a name of Get More Info... in the Label: text field and then reposition it again so that the right edge of the button line up with the edge of the Text Area component.
ALTERNATIVE: You could have double-click on the button label to change it name and then position it the the right edge of the TextArea component.
Creating a Data Service
- Click on the Data/Services tab in the Data/Services panel at the bottom of the Flash Builder window and then click on the Connecdt to Data/Services... link.
Similar: This is similar to creating a recordset using server-side technologies like ColdFusion, PHP, etc. - Click the XML button, click the Next button and then click on the Browse... button to navigate to the index.xml file and then click Open.
- Accept the other default options and then click on the Finish button.
NOTE: Flash Builder will create that service and show a data tree in the Data/Services panel to allow you to see the XML structure. It will also automatically bind the data to the datagrid.
Binding Data to DataGrid Component
- Click on the link at the top left corner of the datagrid to open the Bind To Data dialog box.
- In the Bind to Data dialog box that appears, select Item[ ] from the Data Provider drop-down menu and click OK.
NOTE: Item[] represent the repeating nodes in the XML file and it is depicted as an array with square brackets.
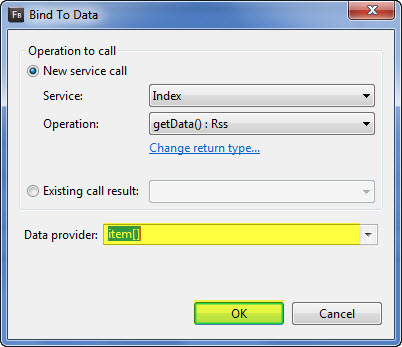
NOTE: This will bind the repeating nodes in the XML data to the DataGrid.
NOTE: You should have also notice the the default three columns in the DataGrids (Column1,2, and 3) were replaced by children nodes (title, description, link, guid, category, and pubDate) of the repeating parent item nodes.
- Select the Run button (and then OK , if necessary) to preview Project in a browser.
Result Test Point: You should see ALL of columns populated with data from the XML file in the datagrid. Pay special attention to the description and link columns as they will be deleted and then reused later to bind data to the TextArea and Button component.
Updating DataGrid
The DataGrid has too many fields listed then we need. We will remove some of those fields (columns) and use their data later.
- Right click on the DataGrid and select the Configure Columns... from the menu.
- Select Description from the list and then click the Delete button.
- Repeat previous step for guid and link and then click OK.
- (Optional) You can also update the Column headings (i.e., capitalizing them), etc, if you want.
NOTE: Flash Builder will update the DataGrid to reflect the deletions. - Select the Run button (and then OK , if necessary) to preview Project in a browser.
Result Test Point: You should see only three columns displayed in the DataGrid.
Binding DataGrid Selected Item (row) to Text Area
Now that we have the datagrid populated, let's bind the dataGrid selected item property to the Text Area's text property.
- Click on the Text Area to select it and then in the Properties panel's common tab, and then cut and paste the following text to the Text's field.
CAUTION: Be careful NOT to paste in into the on Change field instead.
NOTE: This will bind the selectedItem (row) that is clicked in the DataGrid to this TextArea:
{dgLineItems.selectedItem.description}
Why? When the user clicks on a row in the DataGrid, the Text Field will automatically be updated to reflect the description node from the XML file that is already loaded based on the selected item (row).
- Test Application by clicking on the Run icon.
Result Test Point: You should see the Text Area populated when you click on a row in the DataGrid.
Binding DataGrid Selected Item (row) to Button
Again, since the XML file is already completely loaded, we can also bind the link node that contain the URL from the XML file to correspond to the currently selected row in the DataGrid.
- Click on the button to select it and in the Properties panel's common tab, and then cut and paste the following text into the On click text field.
NOTE: This will bind the selectedItem that is clicked in the DataGrid to this Button:
{navigateToURL(new URLRequest(dgLineItems.selectedItem.link))}
Why? When the user click this button, the current url from the selected item in the DataGrid is used to create a link to a external website by creating a URLRequest object and passing it an argument (or link).
- ALTERNATIVE: Instead of embedding all of the code in the <Button> element as a click handler, it is best practice to create an event handler in a <Script> element code block. To add an event handler:
- In the Properties panel's common tab, click on the lightning bolt icon on the right side of the On click field and select Generate Event Handler.
NOTE: Flash Builder will automatically add the click handler (click="button1_clickHandler(event)) in the <Button> element and will automatically open in Code View and write the stub code for the event handler. All you have to do is replace the comment with you own code:
protected function button1_clickHandler(event:MouseEvent):void
{
navigateToURL(new URLRequest(dataGrid.selectedItem.link));
}
NOTE: DO NOT add the curly brackets "{}" when writing this code. The curly brackets were used on the Text Area's Text field.
- In the Properties panel's common tab, click on the lightning bolt icon on the right side of the On click field and select Generate Event Handler.
Test Application by clicking on the Run icon.
Result Test Point: When you click on a selected item and then click on the Get More Info... button, a browser window will open to reflect the URL from the XML file.
Adding Page Title (optional)
We can add some finishing touches to complete our RSS application.
- Select the Application component from the Outline panel and then add a Page Title in the Properties panel.
NOTE: This will add a pageTitle attribute to the <mx:Application>
Why? So that the title shows up in the title bar when viewed in a browser.
Similar: The pageTitle is similar to the <title> tag used in an (X)HTML page in Dreamweaver. - Test Application by clicking on the Run icon.
Result Test Point: You should see the page title in the title bar when the appplication is viewed in a browser.
BONUS: Creating a Second Web App
- Create a project folder somewhere on your desktop and give it a descriptive name (i.e., MySecondWebApp)
- Download the Techniques.xml file or create your own and place it inside of the project folder.
- Start FlashBuilder 4/4.5.
- Select File > New > Flex Project from menu and name the project RSS Reader in the Project name field. Keep all other default settings and click the Finish button.
- Move the Techniques.xml file into the src folder by dragging and dropping it.
- Switch to Design view (CTRL+~) by clicking on the Design button.
Creating Application Layout
Using the Design view, we will layout the application simply by dragging and dropping components to the stage from the Control folder in the Components panel:
- Label - to the top left of the Stage. In the Properties panel's commonn tab, name it Teaching Techniques in the Text: text field. In the style tab, change font size to 22 pixels and click on the bold icon to bold it.
- DataGrid - below the Labelcomponent about 5-10 pixesl. For now, manually resize the width of the DataGrid component to extend across the stage with about 5-10 pixels margin on both sides. Then, in the Properties panel's Size and Position tab, change the width to 900 and height to 500.
Creating a Data Service
- Click on the Data/Services tab in the Data/Services panel at the bottom of the Flash Builder window and then click on the Connecdt to Data/Services... link.
- Click the XML button, click the Next button and then click on the Browse... button to navigate to the Techniques.xml file and then click Open.
- Accept the other default options and then click on the Finish button.
Binding Data to DataGrid Component
- Click on the link at the top left corner of the datagrid to open the Bind To Data dialog box.
- In the Bind to Data dialog box that appears, select Techniques[ ] from the Data Provider drop-down menu and click OK.
- Select the Run button (and then OK , if necessary) to preview Project in a browser.
Result Test Point: You should see the datagrid populated with data from the XML file in the datagrid.
Updating DataGrid
The DataGrid has too many fields listed then we need. We will remove some of those fields (columns) and use their data later.
- Right click on the DataGrid and select the Configure Columns... from the menu.
- Update the Column headings (i.e., capitalizing them)
- Select the Run button (and then OK , if necessary) to preview Project in a browser.
- Switch to Source View (CTRL+~) and add the following attribute in the <DataGrid> to create alternating row colors:
alternatingRowColors="[0xF3F3F3, 0xFFFFFF]"
- In the Properties panel, click on the Alphabetic View icon in the top right corner of the panel. Scroll down to the rowHeight property and set its value to 60.
- Set the text wrap to.....
Result Test Point: You should see the table row taller and the row colors alternating.