CREATING 3D OBJECTS:
There are many ways to create 3D objects in Illustrator:
Create a 3D Objects Using 2D Shapes with Gradient Fill
First, we will convert a simple filled circle to make it look more spherical like a ball.
- Using the Ellipse tool, hold down the SHIFT key and create a perfect circle with a fill but no stroke.
- Add a two-color radial gradient of any color to a black color. Position the gradient with the gradient annotation tool.
Next, let's create a simple transparent solid cylinder using simple 2D shapes
- Using the rectangle tool, click without dragging to create a rectangle that is three times as tall as it is wide (i.e., 100W x 300H).
- Add a two-color linear gradient from left-to-right of the same color but different tint.
- Using the Ellipse tool, click without dragging to create a 300 px oval and position it at the bottom of the rectangle with the center point at the center point of the base of the rectangle.
NOTE:
Is should have the same gradient applied to it automatically as the rectangle because Adobe Illustrator remembers the last gradient you applied.
- Hold down the ALT click and drag the the oval to the top of the rectangle and then immediately press the SHIFT key to constraint is movement vertically and center it with the center of the rectangle top line.
Now, let's convert this transparent cylinder to a solid cylinder:
- Select the bottom oval and the rectangle and select the Unite option in the PathFinder panel and press the Expand button to convert the shapes into one shape with a stroke on the tool half of the oval.
Next, let's convert the solid cylinder to a hollow cylinder:
- Select the top oval and copy it and then select Edit > Paste In Front which will paste the selected oval in the same place (similar to Paste In Place in Flash).
- With the copied oval still selected, hold down the SHIFT and then the ALT keys to scale the oval proportionally and from the center and then drag slightly to reduce the oval size.
NOTE: It is important to hold down the SHIFT key FIRST to constrain the object and then hold down the ALT key to "pin" the object to its center point. If you had held down the ALT key first you would duplicate the object.
- With the reduced oval still selected, change the angle to -90 in the Gradient panel so the gradient will be rotated from top-to-bottom instead of left-to-right.
- (Optional) Remove all of the stokes.
- (Optional) Using the Gradient panel, explore changing the angle or reversing the direction of the creating on the top oval.
Bonus: Create 3D Text
- Using the text tool, create some large bold text on the canvas and convert it to an outline.
- Using the Gradient tool, apply a gradient (black and white for starter is fine)
- Using the Rectangle tool, create a rectangle over the text with the same gradient applied and send it to back of the text.
- In the Gradient panel, change the angle of the rectangle to 90 degrees and then select the text and set its angle to -90 degrees.
- Use the ALT key and click and drag a copy of the text and offset it slightly and change its angle to 90 degrees.
Bonus: Create 3D Text with Step and repeat
- Click ALT and drag a copy of the gradient text.
- Select Edit > Copy and then Edit Paste In Back.
- With the text object in the back still selected, press the up arrow key twice and the left arrow key twice.
- Click CTRL+D repeatily to create the 3D effect. The number of times you do this step will determine the "depth" of the text object.
Bonus: Create a 3D Round Button
- Perform similar steps as creating a 3D text but only with two round rectangles.
Create a 3D Object Using Blending and Shapes
- Create an object using any vector drawing tool and give the object a fill (we used red) and a stroke (usually black)
- Duplicate the object you just created and:
- delete its stroke
- change its fill color
- scale it down
- place it below original object
- Double-click on the blend tool and select Specified Stps as the Spacing option and the number of steps to about 100 or so.
- Ensure the object with the stroke is in front of other object (i.e., Arrange > Bring to Front)
- Select both objects (CTRL+A) and then select Object > Blend > Make from the main menu.
- (Optional) Use the Direct Selection tool to carefully select the back of the 3D object (letters, in our case) that and then select the Selection to to move it somewhere else to change the 3D perspective.
NOTE: It is important to remember the blend mode is based on the stacking order. So if you are trying to create a 3D effect from a type shape, make sure the main text object is on top.
Create a 3D Object Using Blending and Lines
- Create an object using any
There are three effects (Rotate, Revolve and Extrude & Bevel) under the Effect > 3D menu that allows you to create 3D objects. However, you create the initial 2D shape using various vector tools.
CAUTION: Once you create a 3D object and you want to edit it again after closing the 3D dialog box, don't select Effect > 3D > .... again from the main menu. Instead, to get back to the 3D dialog box, you need to use the Appearance Panel to make further changes.
REAL 3D EFFECTS USING THE THE EFFECT MENU
You can create 3D objects from 2D objects using a variety of techniques (Extrude & Bevel, Rovolve and Rotate). Then you can applied additional options including rotation, texture, lighting, and map artwork (symbols) on the faces of the object.
Create a 3D Object with Revolve Effect
Any object that has a "circular" base, you can use the revolve effect.
Create 3D object with Blob tool
In this example, we will create a bowl:
- Using the blog tool, create a shape in the form of a capital "J" shape with a medium size brush stroke with a gray color fill but no stroke.
- Select Effect > 3D > Revolve... from the main menu and click on the preview button to see the result. Change properties (position, lighting, etc.) as needed and then click OK.
- Use the Direct Selection tool to scale or reshape shape, if necessary, to make it look more like a bowl.
Create 3D object with Ellipse Tool
In this example, we will create some apples and use a clipping mask to "place" them in the bowl we just created:
- To create a 3D apple, draw an upright oval shape (like an egg standing on its end) and then select Effect > 3D > Revolve... from the main menu and click on the preview button to see the result. Change properties as needed and then click OK.
- Duplicate (ALT+click on the apple and drag) the apple several times and change the color of each apple to have a different tint of greens or reds and then move them over the top of the bowl. If necessary, select Arrange > Send to Back or Front to position the apples accordingly.
- Draw another oval over the top of the apples with no fill so that you can "see" the apples inside the oval. Position this oval over the opening of the bowl.
- Select the oval you just created and all of the apples and then select Object > Clipping Mask > Make to hide the bottom "edges" of the apples so they appear to be in the bowl and not on top of it.
TIP: It is best to select everything first and then SHIFT+click the bowl's vector to select the Mask and all of the apples ealier.
- If necessary, use the Direct Selection tool to move anchor points on either side of the Mask to adjust it to fit the lip of the bowl. (ADD PICTURE)
Create 3D Object with Pen Tool
In this example, we will create a wine glass:
- With the pen tool draw half of a wine glass profile with a stroke only (See below).
- Select Effect > 3D > Revolve... from the main menu and set properties as needed and click OK.
TIP: Follow the guidlines below for thickness and fill. NOTE: The objects below have a 180° view so you can "see" the effects better.
1. The size of the stroke dictate the "thickness" of the object "skin."
2. How you draw the object will dictate how it appears. For example, if you draw a single path you will get a solid object's skin and if you draw a double path, you will get a "hollow" object's skin.
3. The fill color will dictate how the object get "fill." However, you have to be careful how the object's path is drawn or you may get an undesired result.
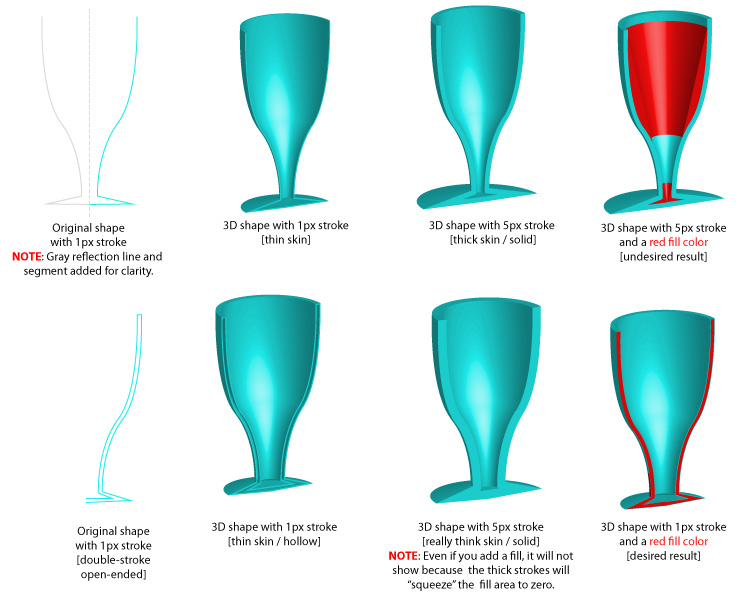
NOTE: The way the fill color works with a 3D object is that it will attempt to "fill" an enclosed shape. If it does not find an enclosed shape, it will fill from the "opening" of that shape to the the other side whether it is opened or closed.
TIP: To create a double-stroke on an object, you can select the object and then select Object > Path > Offset Path... from the menu and specify a offset value (i.e., 5 pixel) and click the preview checkbox to see result. It is important to note that when you use this command you create a seperate object that you may want to delete.
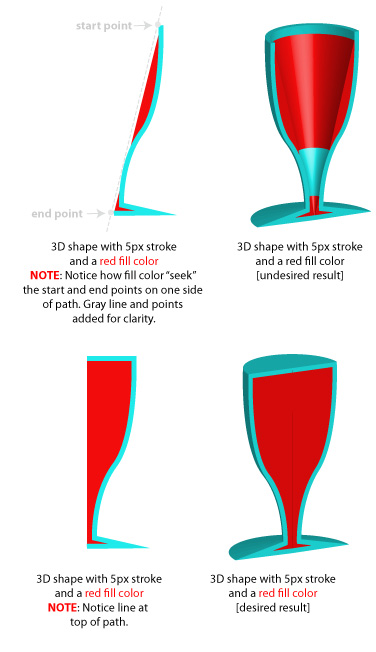
NOTE: To add a "liquid fill" to an object, you could follow the procedures below:
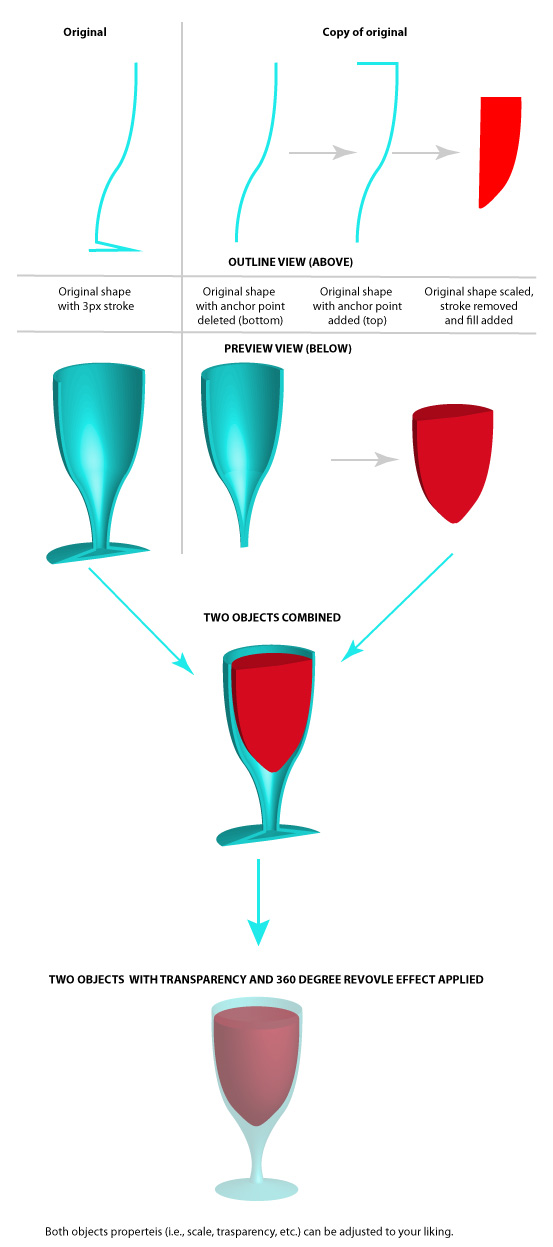
Create 3D Object with PathFinder Tool (Alternative to those who are not proficient with pen tool)
In this example, we will create a wine glass:
- For those who may not be proficient in using the pen tool, create a series of boxes that represent half of a wine bottle. (ADD IMAGE)
- Use the PathFinder tool and combine the shapes into one shape.
- Delete left side of object by using the scissors tool.
- Use the Convert Anchor Point Tool to convert corner points to curve points to "pull out" curve from the "edges" of the boxes (See below).
- If necessary, use the Direct Selection Tools to move points to correct shape of path.
- Select Effect > 3D > Revolve... from the main menu and set properties as needed and click OK.
- (Optional) To change the color of the bottle, simply change the stroke color.
Create a 3D Object with Extrude and Bevel Effect
Any object that you would like to give "depth" to, you can use the extrude and bevel effect.
Create 3D object with Pen tool and Extrude and Bevel Effect
In this example, we will create slices of bread.
- Using the pen tool to draw a complete profile of a slice of bread with a brown stroke and a light yellow fill.
- Select Effect > 3D > Extrude and Bevel and click on the preview checkbox. Then adjust the Extrude option to make the object look like a 3D slice of bread. Then rotate object so that it will almost laid flat.
- ALT+click and drag on 3D bread slice and make several more slices that appear to stack on top on one another.
Create 3D Object with Text Tool
In this example, we will create a 3D text.
- With the text tool, write some large text on the canvas without a stroke.
TIP: If you don't add a stroke to the text, it will render will fewer surface pane. This comes into play when you want to map artwork onto the object (See below). Also, don't convert text to outline so that it can be editable at all times. To make it easier to edit the text on the canvas, temporarily switch to the Preview mode (CTRL+Y).
- Select Effect > 3D > Extrude and Bevel... from the main menu and set properties as needed and click OK.
Create a 3D Object with Rotate Effect
Any object that you would like to rotate in 3D space (without depth) you can use the Rotate Effect.
Create 3D object with Rotate Effect
In this example, we will create the napkins.
- Using the rectangle tool, draw a rectangular shape with a very light gray fill and a very small light gray stroke (.25px) that is one shade darker than the fill color that will represent a napkin.
- Select Effect > 3D > Rotate and click on the preview checkbox. Adjust the angle of the napkin so that it laid almost flat.
- Duplicate and move serveral copies of the napkins so the laid on top of one another but offset them to see the underlying napkins.
TIP: After duplicating one napkin and moving it SLIGHTLY on top of the other, press CTRL+D to step-and-repeat additional napkins with the same angle but different location.
Bonus: How to Map Symbols to 3D Objects
You can map any symbols to the surfaces of a 3D object in the 3D dialog box.
- Use an existing symbol or create another symbol by creating a shape and then pressing the F8 key to convert shape to a movieclip symbol and give it a name and click OK.
Bonus: How to create a Transparent Sphere and Box
First we will create some strips we later map to the sphere.
- Create a narrow strip using the rectangle tool with a fill color but no stroke.
- ALT+click and draw six additional copies out with hold down the Shift Key.
- Space these strips evenly and change the color of each.
- Select all slices and click on the Shear tool and click and drag at top of selection to shear it.
- Select all slices and convert them to a symbol (F8) and give it a name of strips.
ALTERNATIVELY: You could select all of the strips and drag them into the Symbol panel and give it a name when prompted and click OK.
Next, we will create a sphere. Note, if you attempt to create a circle and then use the Extrude and Bevel Effect option, you will not create a sphere but a cylinder.
- Create a light color sphere with no stroke by creating a circle and then using the scissors tool and click on the top and bottom anchor points. Then using the Selection tool, cut and delete half of it to create a semi-circle..
- With the semi-circle still selected, select Effect > 3D > Revolve... from the main menu and click on the preview button.
- Click on the Map Art... button and select the strip from the list to apply it to the ball and click on the Scale to Fit button to fit the strip over the entire ball and then click OK.
NOTE: Because we are using a sphere with no stroke, we only have one surface. Note also that the dark gray area represent the back side of the object and the white represent the front of the object that we can see.
- Rotate the sphere so you can see the top axis for a better perspective of the strips.
- If the strips are not filled in or they are touching one another, click on the Map Art... button again and stretch the symbol while at the same time look at the ball on the canvas to see if it is correct. Adjust accordingly.
- To make the sphere transparent, open the Appearance panel and change the Opacity of both the object Fill (ball) and the 3D Revolve (Mapped) to about 75%. You may need to click on the arrow next to the Fill to expand it so you can see the Opacity setting.
Next, we will create a set of dice.
- Create six symbols for each side of the dice.
NOTE: If you were using text, you will need to convert the text to outline
- Create a perfect square with a little white color but not stroke. Take note of the width or height of the square because it will be used later.
TIP: You can create a perfect square by selecting the rectangle tool and clicking without dragging and then entering the same value for the width and height into the dialog box and click OK.
- Select Effect > 3D > Extrude & Bevel.. from the main menu and click the preview button and make the extrude length the same as the width or height to make a perfect box.
- Click the Map Art... button and map each side of the box by clicking on the advance button and map the corresponding sides (Don't worry if you don't know what sides the symbol goes on)
NOTE: You can tell what surface you are on because it will be highlighted in red.
- To make the box transparent so that you can "see' the hidden faces, we need to turn on the hidden surfaces. To do this, In the 3D Extrude and Bevel dialog box, select the More Option button and then select the Show Hidden Faces checkbox.
- Open the Appearance panel and change the Opacity of both Opacity setting to about 75%.
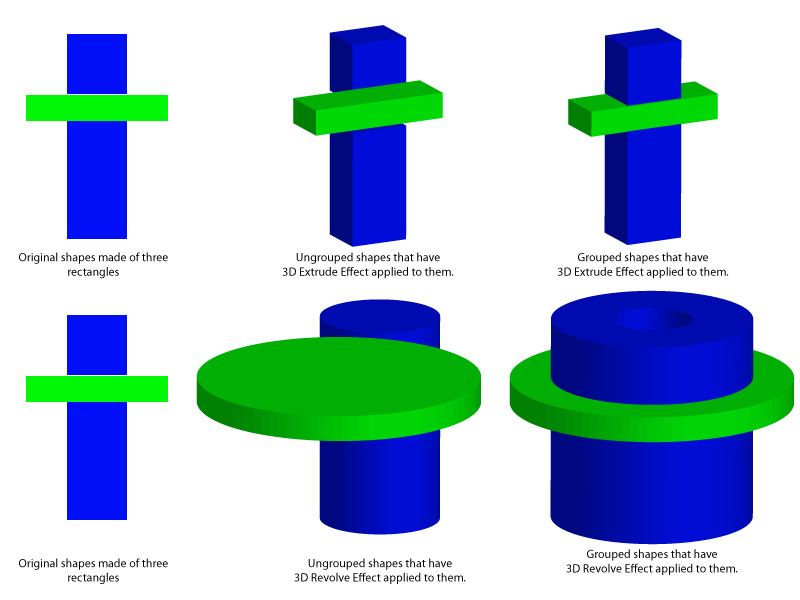
Ungroup and Group Paths Behave Differently When 3D Effects Are Apllied to Them
It is important to note that you will get different result depending if a group of paths are grouped or not.
Additional Examples
- 3D_Columns
- 3D Objects
- CountTheWays
- Earth
- HybridView
- TableWith3DObjects
- ExplodedView 1
- ExplodedView 2
- blockbuster
- chess_pieces
- columns
- dices
- Isometric Building
- Isometric City
- piston
- plant
- Roman Columns
- Spring
Additional Resources:
PathFinder Resources
Shape Builder Resources
Opacity and Clipping Mask In Illustrator Resources
Draw Inside and Draw Behind As Masks
How to Draw Inside an Object/Text in Adobe Illustrator
Illustrator: Draw Inside of Objects - Tutorial
How to draw inside a clipping mask | Adobe Illustrator Quick Tips & Tricks #1
How to use DRAW INSIDE Mode | Illustrator Tutorial (how to Draw a Rose)
Illustrator, Drawing Inside, Draw Behind, Draw Normal
Illustrator CS5 using Draw Behind and Draw Inside Modes
Draw Behind | Illustrator CC Tutorial #184/365