USING LAYER COMPS
Layer comps allow you to create, manage and preview a variety of images from the same Photoshop file by experimenting with different layer comps (short for compositions). This can save you a ton of time if you need to create a multitude of images that are basically the same but need different text and graphics on each image. A file with a layer comp is smaller than if you had to create each comp separately in a different file. You also have the added advantage of having all of the layer comps in one file for convenience as well as the ability to use them with other applications like Illustrator and InDesign.
IMPORTANT NOTE: It will be important to remember that Layer Comps will take "snapshots" or "states" of the layer position and visibility. For example, if you have an image that is smaller than the canvas size, that image can be positioned anywhere WITHIN the canvas area. It is also important to remember that the Opacity and Blend modes are layer properties and as a result can be included in a layer comp. Layer comps are saved with the psd file so they will be there the next time you open the file.
CREATE AND PREPARE IMAGES
It is best to create images and layers in advance of using the layer comps technique and that they be of the same size. Layer Comps will not track any changes to pixel information.
- Open Photoshop but don't create a file.
NOTE: A file will automatically be created for you in the next step.
- Select File > Scripts > Load Files into Stack from the menu.
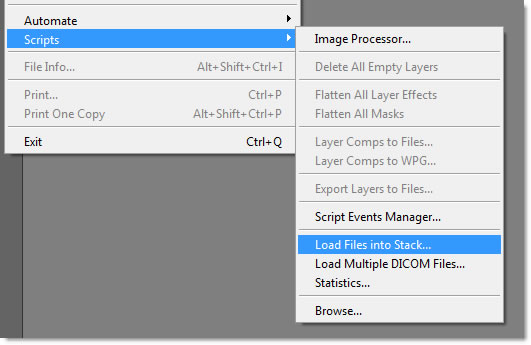
- In the Load Layers dialog box, select the Use Files from the dropdown menu, click the Browse... button to navigate to the folder where images are located and then select some or all of the images in the Open dialog box and then click OK.
NOTE: You should see the list in the Load Layers dialog box get populated with the images you choose.
NOTE: Using the Load Layers command has three advantages:
i.
This is an easier way of insert multiple images than to open multiple files and dragging images into one of them.
ii. Automatically set the stage size based on the size of the images particularly when using images of the same size.
iii. Automatically name the layers the same as the file names (i.e., ann_taylor.jpg, bob_anderson.jpg, etc.).
NOTE: You can also choose one or both checkboxes: Attempt to Automatically Align Source Images
or Create Smart Object After Loading Layers.
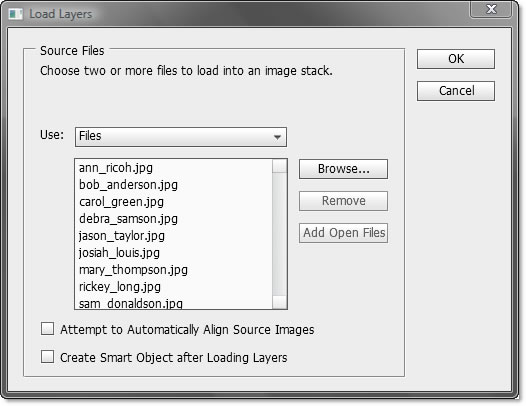
- Click OK to close the Load Layers dialog box.
NOTE: This will load all of the images into separate layers.
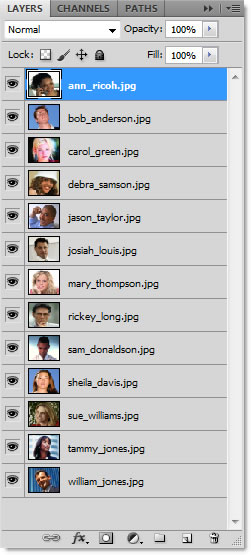
- Select the last layer and press CTRL + ALT and click on the Create New Layer icon. In the Name Layer dialog box, name the layer Background.
NOTE: Normally, a background layer is created automatically. However, because you did not open a file but ran a command a background layer was not created. Pressing CTRL + ALT has a dual role of not only creating a layer below the selected layer but also gives the opportunity to name the layer before it is created.
- Select the crop tool and drag a crop selection around the whole background layer and then scale the crop selection LARGER then the canvas to approximately the size you need for your project.
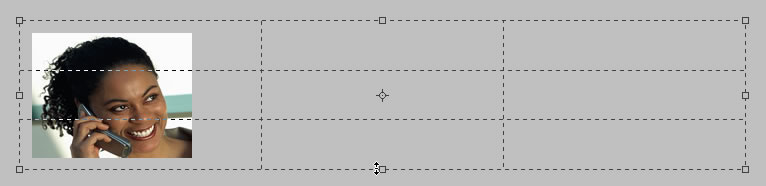
- Double-click or press the ENTER key to commit the changes.
NOTE: Typically the crop tool is used to "subtract" pixel from an image. However, if you make the crop selection larger then the canvas, you will "add" pixels. Also, since there were no default backgound, the background is transparent.

- Add a solid, gradient or another image to the Background layer to your liking. In this case, a simply gradient was created.

- (Optional) Select all layers with images and place them in a group (folder) by selecting New Group from Layer... from the Layers panel flyout's menu and give the group a name (i.e., images). This is best used if you have a lot of images and want to manage and organize them better.
CREATE STATIC TEXT
Create difference STATIC text fields that will be used for all comps and align them to the left or right if needed.
TIP: If you don't think any of static text will need to be changed in the future then you can use one text layer instead of separate text layers. In our example, this is what we did in our example.

CREATE DYNAMIC TEXT FIELDS
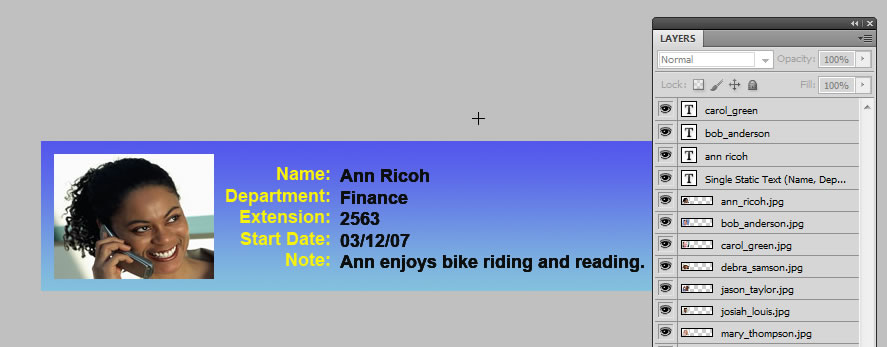
Create difference dynamic text fields that will be use for each individual comp and name the layers accordingly (i.e., Ann_Ricoh, Bob_Anderson, etc.).
TIP: It is best to stack these layers in the reverse order that correspond to the image layers so that they will be easier to select later. Also, you can copy the static text field and modify it as needed. For example, we copy the static text field, left justified it, changed the text to black and then replaced the static text with real data (i.e., Name: with Ann Rico, Department: with Finance, etc.).
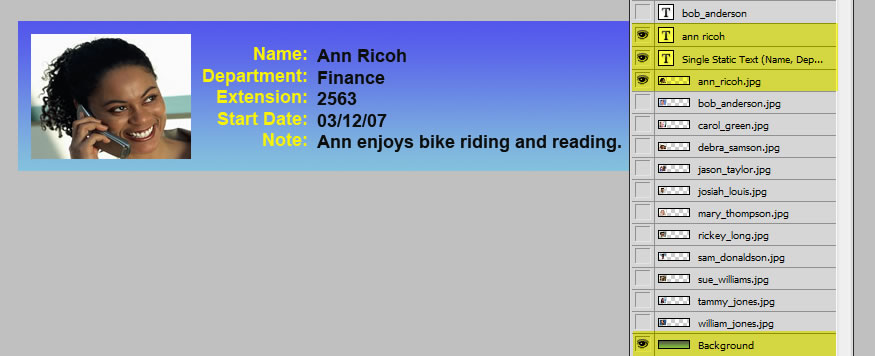
SELECT LAYERS FOR FIRST LAYER COMP
Turn off all layers (eye icons) and then turn back on (visibility) just the layers you want on the FIRST layer comp. If an image on one of the layer is smaller than the canvas size, you can position it as well. Add layer styles, etc. as needed.
TIP: Press ALT and
click on the Background layer icon to turn off all layers except that layer then select the layers that correspond to the first comp (ones with eye icons).
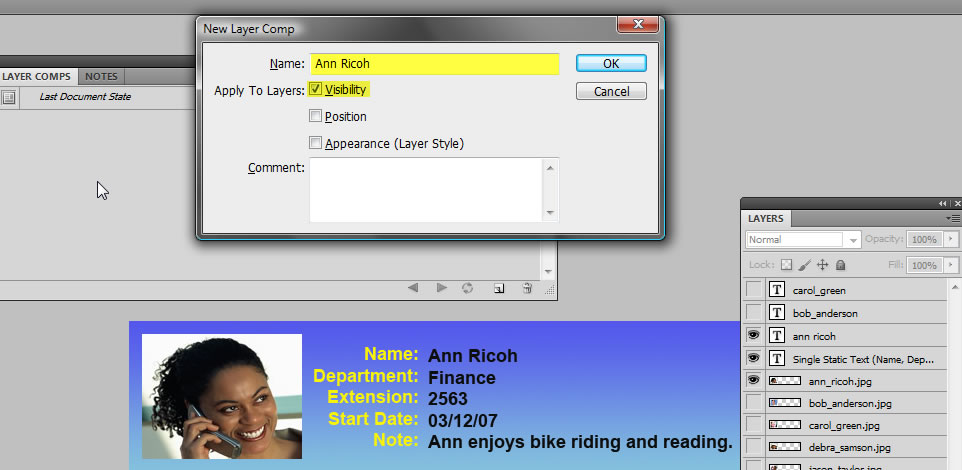
CREATE FIRST LAYER COMP
- Select Window > Layer Comps from the menu.
- Click on the New Layer Comps icon at the bottom of the Layer Comps panel and give it a descriptive name (i.e., Ann Ricoh).
NOTE: Do not close the Layer Comps dialog box as you will next it in to create the other layer comps in the next section.
- Select the Apply to Layers options that you want the layer comp to track:
- Visibility - tracks visibility of layers and layer masks.
- Position - tracks position of each layer
- Appearance (Layer Style) - tracks layer style as well as layer opacity and blend settings.
NOTE: What tracking means is the if you set one of the properties to track, let's say position, and then later move that layer in the Layers panel, if you return to the Layer Comps panel it will move that image back to it original position -- in essence tracking its starting point.
Layer comps CAN NOT track:
a. Re-arranging layers (It will be changed in all saved comps)
b. Clipping masks
c. Smart Filters
(It will change in all saved comps)
d. Transformation (scale/rotation) (It will change in all saved comps)
e. Pixel changes (brushes, colors, etc.)
f. Adjustment Layers
g. Adding Layer (all existing layer comps see the layers as being off)
h.
Delete/Merge Layers (Layer comp panel will show yellow warning sign.)
- (Optional) You can also add a comment to describe the comp features (i.e., thumbnail image with shadow).
NOTE: If you add a comment, a small triangle will appear beside comp name and can be clicked to view the comment.
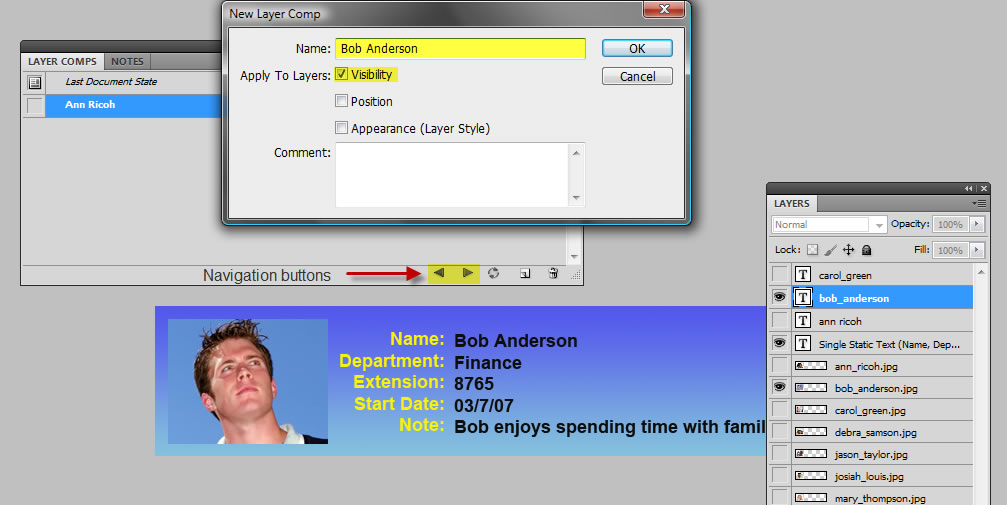
CREATE OTHER LAYER COMPS
- Turn off all layers (eye icons) except the Background layer and then turn back on just the layers you want for the SECOND layer comp. Position the image on the layer if needed.
TIP: Press ALT and
click on the Background layer icon to turn off all layers except that layer.
- Click on the New Layer Comps icon at the bottom of the Layer Comps panel and give it a descriptive name (i.e., Bob Anderson).
- Repeat steps 1 and 2 above for all additional comps you would like to create.
NOTE: To preview comps click on the left and right arrow at the bottom of the Layer Comps dialog box or click on the left column for a particular comp. To preview ONLY selected comps, select them first.
- Click the OK button in the Layer Comps dialog box to close it.
CLEAR LAYER COMP WARNINGS (Review steps 1- 4 later)
CAUTION: If you attempt to manipulate layers (i.e., delete/merge layers or convert layer to a background), the layer comp will display a little triangle with an exclamation point that indicate layer comp can no longer be fully restored. You can do one of the following options:
- You can disregard the warning which may result in the loss of one or more layers. Other saved options may be preserved.
- You can update the layer comp which results in the loss of the previously tracked options but this will update the layer comp.
- You can click the caution icon to see the message and choose Clear to remove the alert icon and leave the remaining layers unchanged.
- You can right-click the caution icon to see the popup menu that lets you choose either the Clear Layer Comp Warning or the Clear All Layer Comp Warnings command.
DELETE / DUPLICATE LAYER COMPS
- To duplicate a layer comp, select a layer comp in the Layer Comps panel and drag it to the Create New Comp icon.
- To delete a layer comp, select a layer comp in the Layer Comps panel and drag it to the trash can icon or simply click on the trash can icon.
NOTE: These procedures are basically the same you do for layers. You can also use the panel flyout's menu to perform these tasks.
OUTPUT LAYER COMPS
After you create a series of layer comps, you can output them using a varieties of formats.
- Select File > Scripts > Layer Comps to Files... if you would like to save the layer comps as individual bitmap files (psd, jpg, png, etc.) and then select the appropriate options and click the Run button.
- You can also save the layer comps as a Web Photo Gallery (WPG) or PDF file in Bridge under the Output Module by navigating to the layer comp folder and choosing the appropriate options and then saving the images in the appropriate format.
NOTE: You can also Refresh the Preview or Preview your results in a Browser by clicking on the Refresh Preview or the Preview in Browser button, respectively.

USING LAYER COMPS WITH ILLUSTRATOR AND INDESIGN (Review steps later)
After creating layer comps in Photoshop, you can place the Photoshop file (psd) into Illustrator or Indesign. In both cases, you can choose the option Use Photoshop's Layer Visibility to view layer comp in Illustrator or InDesign.
- ILLUSTRATOR: With a selection tool selected, hold down the ALT key and double-click on the PLACED psd file to open it in Photoshop. Then choose a different layer comp and re-save the file. When you return to Illustrator, the placed file will be updated. ALTERNATIVELY: You can select Window > Links menu and the click the Relink icon to open the Place dialog box and choose the same file. In the next dialog box, select a different layer comp.
- INDESIGN: Select Object > Object Layer Options and then select a different layer comp.