USING VARIABLES IN PHOTOSHOP WITH AN INTERNAL DATA SOURCE
NOTE: Using variables in Photoshop with an internal data source is similar to using variables with an external data source with the exception that the data is created INSIDE of Photoshop and is done later in the process. It is best used if you have only a few images that you want to use.
Using variables in Photoshop is akin to using layer comps. The major different is that when you use variables you are retrieving the data from a data source instead of just turning layers on and off. Photoshop can use layer names as variable placeholders. Then, these placeholders can be "filled" with data from a data source which could be an internal data source. This is akin to using a mail merge program or even server-side scripting like Coldfusion, ASP(.NET), PHP or JSP. Like Layer comps, this can save you a ton of time if you need to create a multitude of images that have basically the same layout (template) but need different text and graphic on each image (i.e., business cards, trading cards, web ads, web banners, posters, etc.).
CREATE OR PREPARE IMAGES
Images need to be created or prepared that will be used to replace the placeholders.
- Create or prepare an image for each placeholder in the data set (explained next) and place them in the same folder as the Photoshop file you will be creating.
NOTE: It is best that the images be of the same size.
CREATE LAYOUT TEMPLATE
Create a layout template using static and dynamic text and graphics layers as placeholders.
IMPORTANT: Because the layer names will be treated as variables later, you must follow the following naming convention for layers that will be dynamic: Variable names must begin with a letter, underscore, or colon and cannot contain spaces or special characters (except for periods, hyphens, underscores, and colons).
Create Background Layer
- Create a new file with the desired dimension you need for your project. (The Photoshop default size will be used to demonstrate this example)
- If necessary, create a background layer or import a background image. (A gradient background is used in this example -- See below)
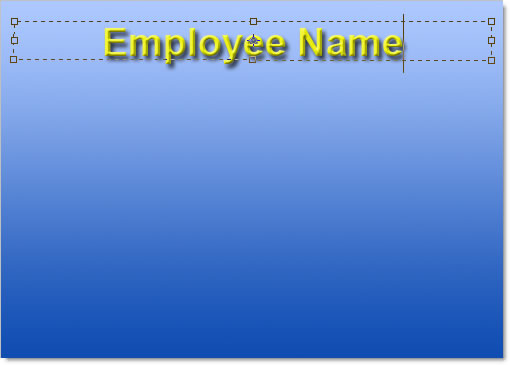
Create Dynamic Text Placeholder(s) via Text tool
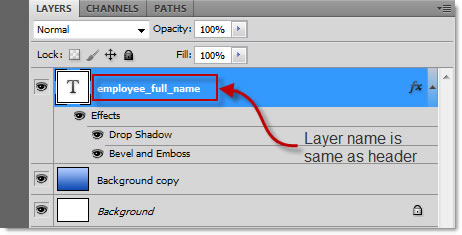
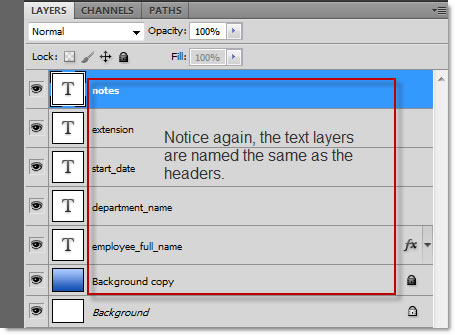
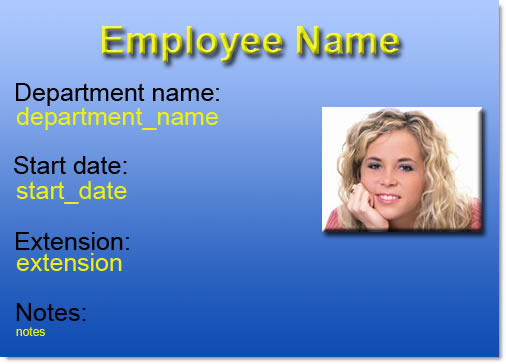
- Create a text layer as a DYNAMIC text placeholders and adjust the font size and style to your liking and then give the layer the SAME name as the variable need that you will be creating later. (In this case, employee_full_name is used for the first text field.).
NOTE: Remember, by naming the layer the same as the variable, it will be treated as a variable for the text placeholder later.
TIP: Use the longest text in your data source as the length for each text placeholder so that the text does not get cut off. It is best NOT to simply click on the canvas to create a text object. Instead "drag out" a text area that is almost the width of the canvas and "center" the text inside of the text object using the align center tool. See example below:
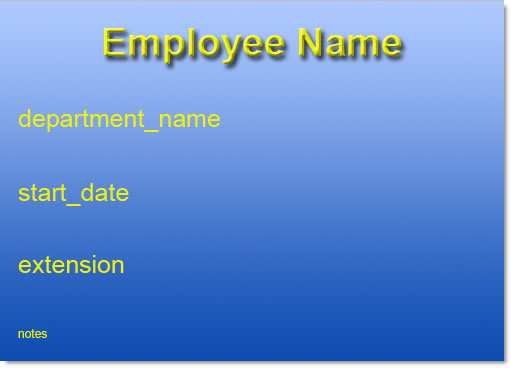
- Repeat the previous steps to create additional dynamic text holder(s) as needed. (Here, four more text placeholders were added.)
NOTE: The text placeholders in this case are left justified instead of centered and the notes font size has been reduced.
TIP: Turn on the grid to assist you in aligning text placeholders if needed.
Create Dynamic Graphic Placeholder(s) via Rectangle Tool or a Real Image
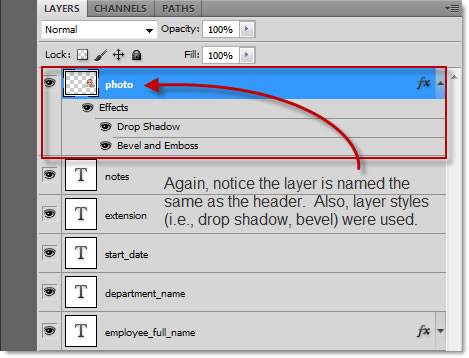
- Similiar to the text placeholders, use the Rectangle Tool (U) with the Fill pixels option selected in the Option bar to "draw" a graphic placeholder that represents the typically size of the image that they will be replaced later and then give the layer the SAME name as the data variable name you created later.
TIP: You could also use an actual image as a placeholder; however, since it will be replaced with data from the data set later, it is not necessary. This is a better approach because it helps you visualize your project and you don't have to find out the image size if they are set already. In fact, in this case, this is just what was done.
TIP: Just like the text field, you can also "style" the image placeholder with layer styles as was done in the screen shot below.

- Repeat the previous steps to create additional dynamic graphics holder(s) as needed, if needed.
Create STATIC text fields or STATIC graphics
- Create STATIC text fields via Text tool or create / import STATIC graphics that will be the same on all images. (In this example, only static text fields are added.)
TIP: You can duplicate the existing dynamic text fields and then edit and move them into place so that you don't have to type them in. If you do, don't forget to rename the layers to something more descriptive (i.e., department_name to department_name static text so that you don't get them confused with the dynamic text fields when you make them variables.
NOTE: Once you are completed adding dynamic text/graphic and static text/graphics, you have create a template that will be used in the next section.
DEFINE DATA VARIABLES
The dynamic layers names in the Layers Panel need to be "matched" to the variable names in the data source for both the text and graphics layers.
Choose Image > Variables > Define... and then make the following changes.
Create Text Data Set
- Ensure that Define (CTRL+1) is selected and not Data Set (CTRL+2) in the first drop-down menu.
- Select a Text Layer from the Layer: drop down menu. (In this case, employee_full_name was selected)
- Select the Text Replacement checkbox and then give the variable the SAME name as the name in the Layer: drop-down box you selected earlier.
NOTE: If you wanted to create an OPTIONAL TEXT variable, select the Visibility checkbox and enter or select a variable. A good use for this option would be if you were selling some products and you want to have a SOLD text appear across items that have been already sold. You could create a TRUE and FALSE variables in your data source to determine when to show the text..
NOTE: An asterisk ( * ) will appear next to the layer name in the Layers text field.
NOTE: If you choose an existing variable to link to a link icon will appear next to the Name text field.
- Repeat this process for the other text layers. DO NOT select the static layers. (In this case, four more layers were defined (department_name, st art_date, extension, and notes)
NOTE:
You can use the left and right navigation arrows on the right side of the Layer text field to move between layers or select a Layer from the Layer: drop-down menu.

Create Graphic Data Set
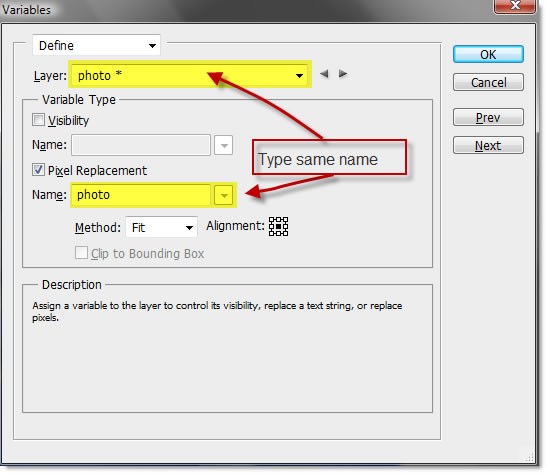
- Select a Graphic Layer from the Layer: drop down menu. (In this case, photo)
- Ensure that the Pixel Replacement checkbox is selected and then give the variable the SAME name as the Layer: drop-down box you selected earlier.
NOTE: If you wanted to create an OPTIONAL IMAGE variable, select the Visibility checkbox and enter or select a variable. A good use for this option would be if you were selling some products and you want to have a SOLD image appear across items that have been already sold. You could create a TRUE and FALSE variables in your data source to determine when to show the image.
NOTE: While you can define variable for any custom background layer (i.e., Background copy), you cannot define variables for the default Background layer.
- Set the Method (In our example, the Fit method was selected. However, because all of our images are of the same size, we could have also used the As Is option).
TIP: Select a method and then hover over the Method text field to see a visual and text on how that method works:
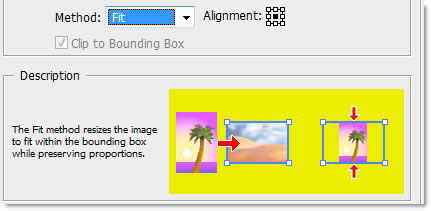
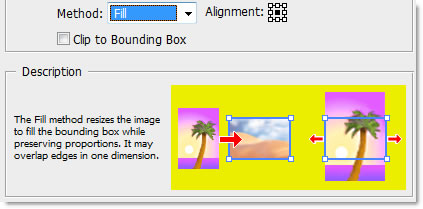
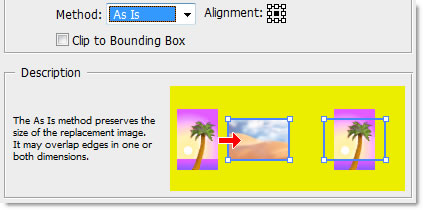
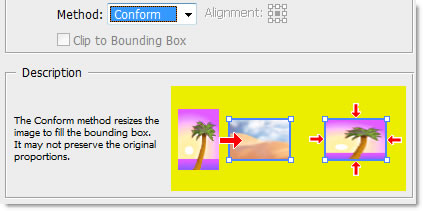
NOTE: You can also select Clip To Bounding Box to clip areas of the image that do not fit in the bounding box. This option is available only when the Fill or As Is replacement method is selected except for the Conform method.
NOTE:
You can also click on one of the Alignment alignment point (square) except for the Conform method to resized image to the center or to an edge.
- Repeat this process for any other graphic layer (In this case, there is none.)
TIP:
You can use the navigation arrows to move between layers.
NOTE: You can also set the visibility of both a text or graphic layer.
NOTE: To rename a variable, enter a new name in the Name text box. To remove a variable, simply deselect it.
CREATE AN INTERNAL DATA SOURCE
- Select Image > Variables > Data Sets from the menu or select Data Sets from the pop-up menu at the top of the Variables dialog box if it is already open.
- Select Create New Data Set based on the current data set icon button and then enter a name for the Data Set. (i.e., Ann Ricoh)
NOTE: You should see the Variables area get populated.
- In the Variables area, choose a variable from the Name menu or click a variable in the list.
- In the Values section, specify the text value of the selected variable (i.e., Ann Ricoh) or if it is an image, click on the Select File... button to navigate to where the image is located.
- (Optional) Click the Apply button to commit the changes for that data set to the canvas.
- Repeat steps 2-6 for each data set.
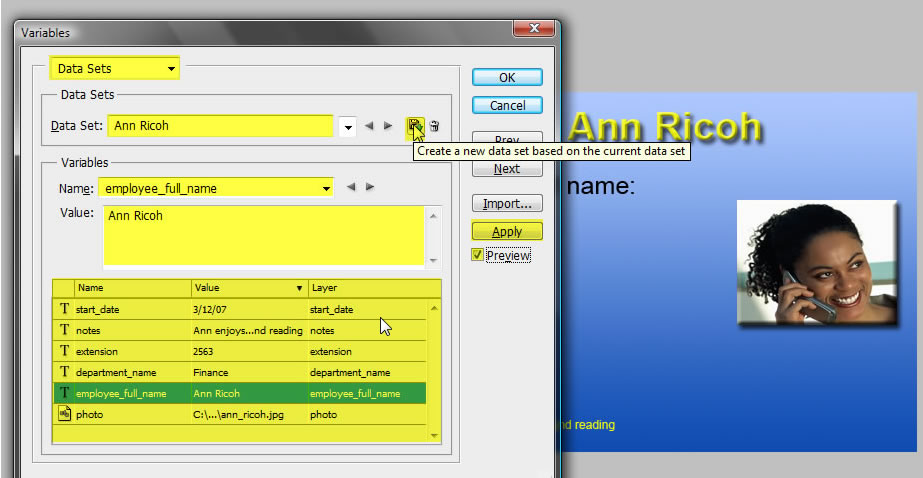
- Click OK to close the Variables dialog box and to return to Photoshop.
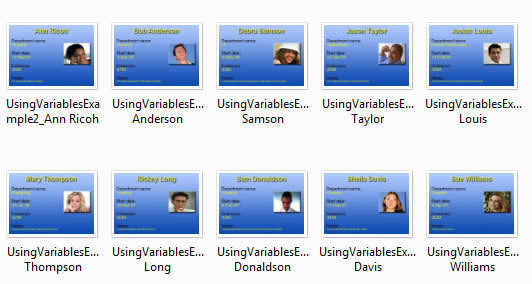
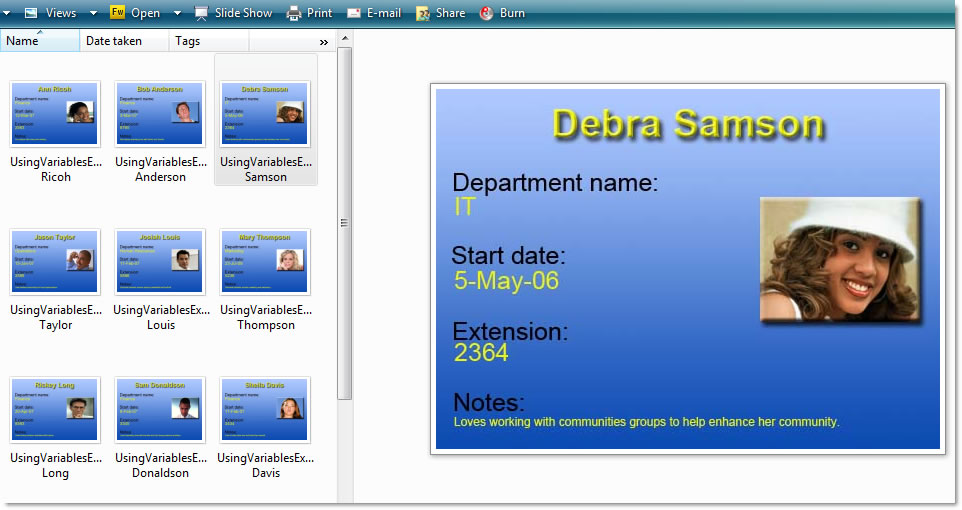
EXPORT DATA SETS
You can now export the the result as individual Photoshop psd files.
Choose File > Export > Data Sets as Files.... In the dialog box, select your destination folder and file naming options and then click OK to export each data set "record" as an individual Photoshop psd file.
NOTE: Each file is a layered psd file and can be open and edited separately.
TIP:
To flatten these images, select File > Scripts > Image Processor... or select them in Bridge and choose Tools > Photoshop > Image Processor.
You can also use Bridge to create a Web Photo Gallery (WPG) by selecting the images in Bridge and choosing the Output option.
(Bonus) Transforming Graphics using Layer Comps
Normally if you try to transform (i.e, rotate) an image on a layer, when it is replaced by the real image it will be straight again. To resolve this problem, create a script to rotate that particular layer and then preform a Batch process on those images
Create a simply Action to:
- Select a layer (in this case, the photo).
NOTE: Since the photo layer is common to all images, the Batch process will work correctly.
- Rotate the image
- Save the Action
- Run a Batch process using the Action you just created to transform (i..e., rotate) the image in all psd files.