WordPress is one of the most popular open source free CMS blogging software which is easy to setup, easy to use and is very extensible via plug-ins and widgets. It also has a large community of users that helps to support and develop new versions of WordPress software. It comes in four versions:
Hosted (WordPress.com) – you can have WordPress hosted the blog on their site (i.e., http://www.your_domain_name.wordpress.com) and does not require any software and no download. It has the limitation of not being able to install plugins or themes or customizing your blog with CSS. It also has a 3G limit unless you upgrade for more storage. However, if you start with WordPress.com, you can later move to the self-installed or self-hosted version by importing the content.
Self-installed / Self-hosted (WordPress.org) – you can download WordPress software and install it either of your own server or someone else server. It is more flexible that the hosted version.
Multi-user (mu.wordpress.org) – is a multi-user version (WordPress MU) and can run on hundreds of blogs on one domain and is used mainly by corporations and other large organizations.
Enterprise (mu.wordpress.org) – is a version of the WordPress MU that caters to large corporations but it is not free. Companies pay for consulting fees and services that helps manage and maintain their WordPress MU installation.
This tutorial will cover only the first two versions (hosted and self-installed/self-hosted). If you update WordPress posts regurlarly, search engines (i.e, Google) will love your site. You can create personal blogs, blog networks. Using the BuddyPress suite of plugins, a WP site can be transformed into a social networking site (www.buddypress.org). Businesses, colleges and universities are all using WP.
WordPress.com verses WordPress.org:
WordPress.com vs. WordPress.org
WORDPRESS.COM
WORPRESS.ORG
Free Hosting
Yes
No
Disk space
3G Free, more Cost
Use your own server
CSS
Cost ($15/yr)
Yes
Easy Setup
Yes
Depend
Automatic BackUp
Yes
Cost
Themes
Limited (<100)
Yes (>1000)
Create your own themes
No
Yes
Avoid Automattic ads for users
Extra cost
Yes
Choose from existing widgets
Yes
Yes
Choose from existing plug-ins
No
Yes
Create your own plug-ins
No
Yes
Run your own ads
No
Yes
TIP: If you set up a WP.com website it will have a name of yourblogname.wordpress.com. It is best to get your own domain name as soon as possible. If someone sees that your WP site is successful, nothing can prevent them from registering your domain name as www.yourblogname.com and directing traffic to thier website instead of yours. If you are starting a business, it is best to use Wordpress.org because there are some restrictions for commercial purposes (i.e., making money) when you use WordPress.com.
WordPress Community
You can get help from the WordPress Community either on:
Below is a list of features that you get with most versions that will be explained in detail thoughout this lesson:
Sort and organize everything that is posted either by category or data AUTOMATICALLY.
Allows you to post blogs and get feedback comments from readers that you can edit, respond to or delete. The posts that you don't delete can be shown on your web site. You don't have to allow comments if you don't want to.
RSS, Atom and OPML feeds. Built-in RSS (Really Simply Syndication) feeds that is a way to find "What's New" on your site. When a readers subscribe to your RSS, a feed reader is used to automatically download your feed when you post new content. Some popular reader include:
Tools for importing content from other bloggers (i.e., Blogger)
Link directory (blogroll)
Media Files (video, images, etc.)
Akismet - a spam killer
Search Engine friendly URLS (permalinks) that includes .htaccess
Automatic upgrades with a click of a button
Backup capability
Easy to use administration interface
Rich Text Editor (TinyMCE)
Basic Image Editor for uploading and editing images and automatically generating thumbnails
Menu Management
Installing a Hosting Account
Browser to http://www.wordpress.com.
On the home page, click on the Get started here button or sign-up now link below this button to go to the sign-up page.
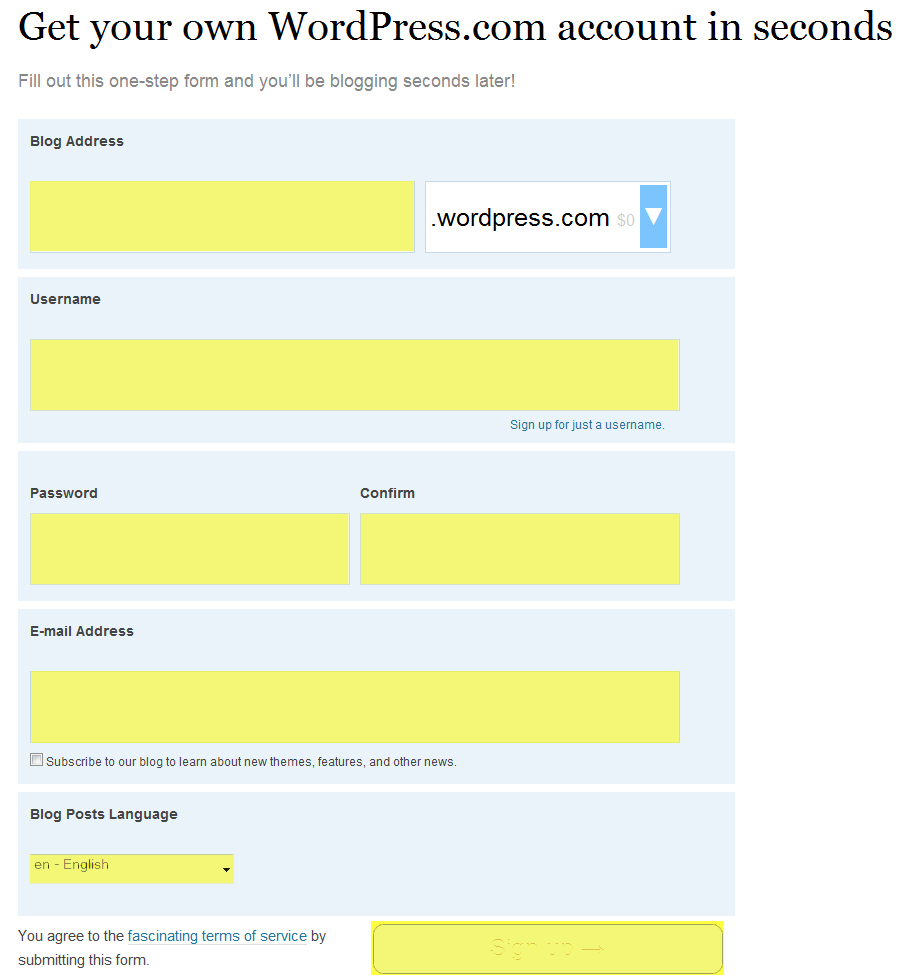
On the sign-up page, enter or select the following:
Blog Address (i.e., RichMediaCreativeServices.wordpress.com) NOTE: You CANNOT change the Blog Address so think carefully about what name you want. NOTE: While the ".wordpress.com" option is free, you also have the option of using your own domain name for a fee by clicking on the drop-down menu next to the word worpress.com. You will see three options (.com, .net, .org—each for $17/year).
Username NOTE: You can use the same username to create many blogs. NOTE: (Optional) You also have the option of signing up for just a username by clicking on the "Sign up for just a username" link below the Username text field
Enter Password/Confirm that is at least four characters, letters or numbers. NOTE: Four characters may not be a good password. WP will show a strength rating scale to determine how "strong" your password is.
Email Address
(Optional) Select the "Subscribe to our blog to learn about new themes, features, and other news" if you want.
Blog Posts Language from the drop-down menu, if necessary.
Click on the big Sign up button at the bottom of the form. That's it!!! NOTE: By clicking on the Sign up button
you agree to the "fascinating terms of service" by submitting this form. Click on the link to see the details.
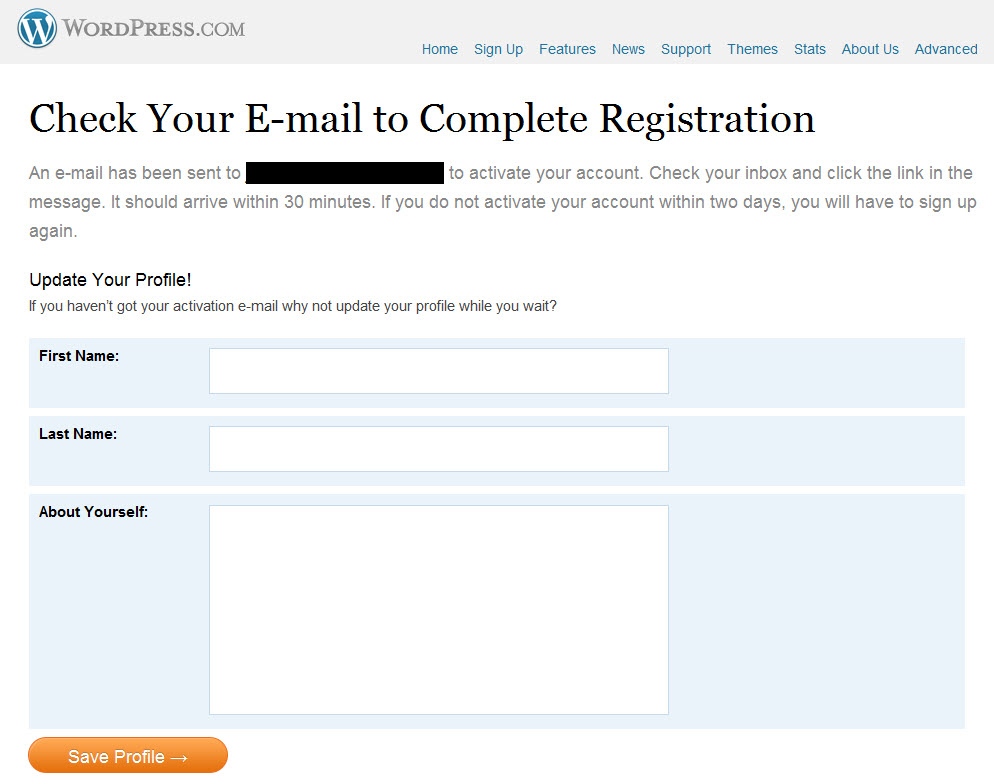
When you are finished you will be prompted to check your email on how to activate your blog. You also have the option to update and save your profile. NOTE: If the link in the email does not work, cut and paste it into a browser address bar. WP will send you a second email message with login in instructions that includes your API key for your blog????
Installing a Self-Hosting Version
WordPress requires PHP 4.3+ and a mySQL 4.0+ database to store all content (i.e., posts, comments, administrative settings) of your site. It can be run on the Apache or IIS web servers. For clean URLs (a URL rewriting module that understands .htaccess directives (i.e., mod_rewrite on Apache or URL Rewrite on IIS)). Theme design is NOT part of the database content but part of the file system.
NOTE: You should backup both the database and the them on a regular basis.
WordPress is known for its five-minutes installation. Many ISP offer an installer program from their account control panel usually using the Fantastico application installer. You can also upload WP files to your web directory yourself. You can then complete the installation using the web interface or modify a sample configuration files (sample_wp_config.php) that is included with the download with the correct settings and save it as wp_config.php.
Choose only one of the option below based on ISP capability:
OPTION 1: ISP Application Installer (Fantastico)
Fill out the information that Fantastico need to create a database and a site. You can change any of these settings later so if you are not sure just add something:
In your ISP host panel, click on the Fantastico icon located in the blogs category and choose WordPress. NOTE: You may see a screen showing how much disk space is required and that one of your MySQL database will be used.
On the screen that appears, specify the domain if you have more than one, the directory location and then enter an administrative account username, email and password. NOTE: Fantastico will use this information to automatically create a database for you.
Give the site a name and a description.
Press the Install WordPress button.
In the log in screen that appears, enter the username and password you provided when you install WP and then press the Log In button to login to WP for the first time.
OPTION 2: WordPress Installer
If your ISP doesn't not have an application installer (i.e., Fantastico) or if you prefer to install WP yourself on your own computer or another server, you need to create a blank MySQL database, upload the WP files to the server, run the WP installer and then log in:
Create Blank MySQL Database:
If your host already created a database for you, all you need is the database name, username, and password that were provided to you when you signed up for an account. If you are creating a database on your local computer or you want to install it yourself on a host remote server, follow the general steps below (using phpMyAdmin) or your host's instructions: NOTE: phpMyAdmin is the most popular MySQL web interface tool on the market that is used by many ISPs.
Install XAMPP (http://www.apachefriends.com), if necessary (or another bundle package like LAMP, MAMPP, or Zend) and ensure the server is working properly (See "How to Create a MySQL Database"). We will be using XAMPP in this tutorial.
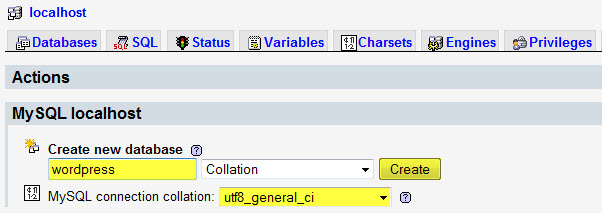
Type localhost/phpmyadmin in your browser to open phpMyAdmin and type wordpress (or whatever you want the database name to be).
Ensure that the MySQL connection collation is set for UTF-8 (utf-8_general-ci) and then press the Create button. NOTE:
The UTF-8 character set support most languages.
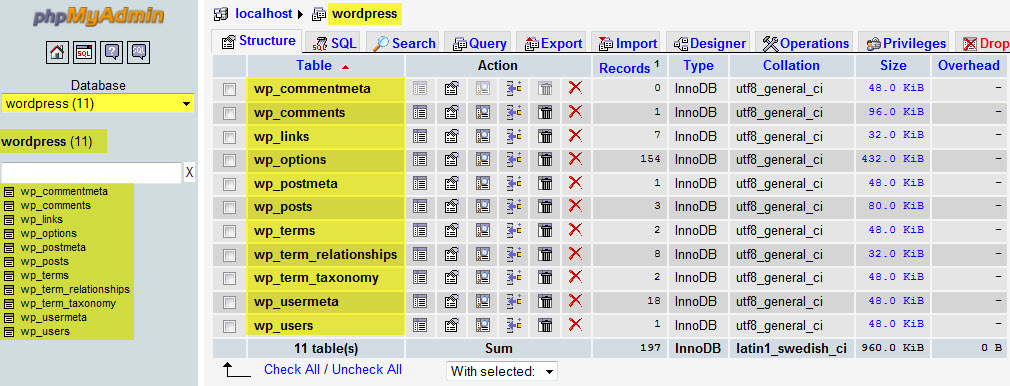
NOTE: You should see a note that says, "Database wordpress has been created" (or whatever name you gave the database). Notice also that we did not create ANY table in this database. When we install WP, you will see later that WP will AUTOMATICALLY create 11 tables and populate them with default data.
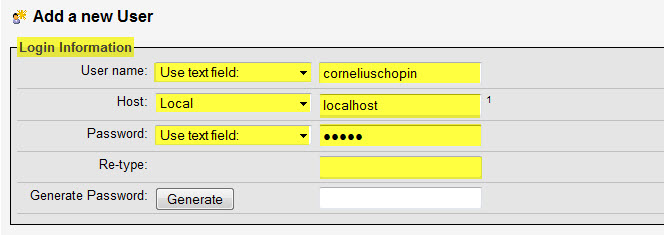
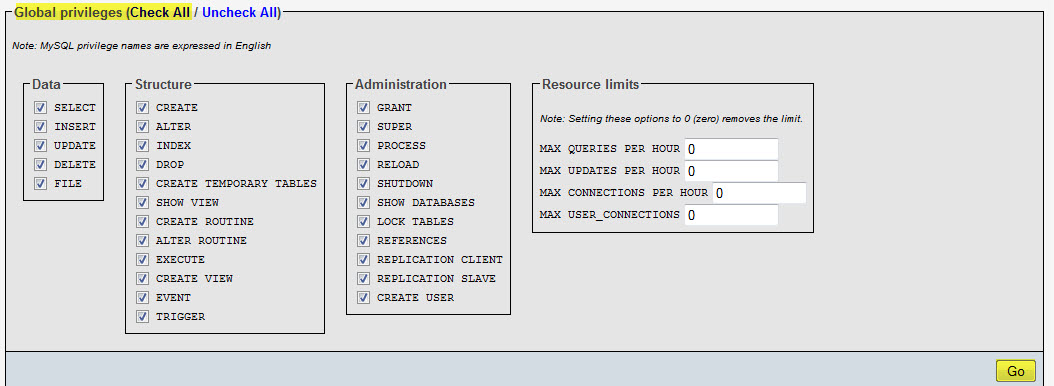
Click on the Privileges tab (see screen shot above) and then click on the Add a new User link.
On the Add a new User page in the Login Information section, fill out the following highlighted fields: NOTE: Select Use text field and Local in the left columns FIRST. You will have to type the password twice.
Grant the new user all permissions (i.e., Data, Structure and Administration) on the database by selecting the Check All link at the top of the Global privileges panel and then click the Go button at the bottom of the page.
Download and/or Upload WP files:
If you are creating the WP site on your computer, download the WP package software and install it. If you are creating the WP site on a remote server, you still need to download the WP package and install it locally on your computer and then you will upload it to your remote ISP server later.
Go to the WordPress website (http://www.wordpress.org) and click on the Download WordPress button to download the WP compress file (i.e., *.zip) to your desktop.
Right-click on the zip file and select Extract... and then click on the Extract button. NOTE: Once you have extracted the files, you can delete the compressed file.
Double-click on the extract folder (i.e., wordpress3.2.1 or whatever the current version is) to see another folder called wordpress. NOTE: If you open the wordpress folder, you will see a host of folders and other files with a "wp" prefix. These are Wordpress specific files. (i.e., wp-includes.php, wp-config.php, etc.) NOTE: You can rename this folder to another name (i.e., your_domain_name instead of wordpress)
Move the folder to the htdocs directory of the PHP server (i.e, c:/xampp/wordpress). NOTE: It is important the you have the folder in the htdocs directory or it will not be recognized by the PHP server.
Delete the empty worpress3.2.1 folder from your desktop.
If you are creating the WP site on a remote server, upload the complete wordpress folder using a FTP client program or FTP from within Dreamweaver typically to the root-level of the server. NOTE: You can upload the folder where ever you wish.
Run WP Installer:
Once you have downloaded and unzip the WP files locally or uploaded the folder after it has been unzipped to a remote server, you are ready to install WP.
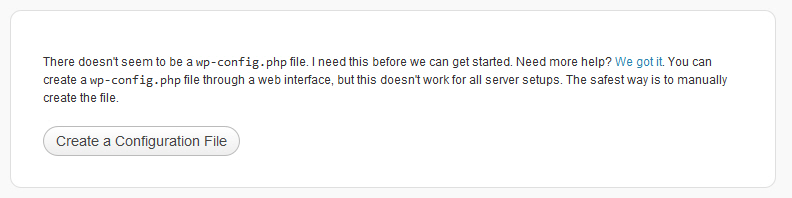
If you are installing the WP site LOCALLY on your computer, browse to the wordpress folder from within a browser (i.e., localhost/wordpress) and you will be prompted to create a wp-config.php file. If you are installing the WP site remotely, browse to the folder from within a browser (i.e., http://www.your_domain_name/wordpress) and you will be prompted to create a wp-config.php file.
You have two options to create the wp-config.php file. Either use the web interface option or manually. Try the web interface option first and if it does not work, do the manual option. If you would like to make some additional settings or turn on or off the troubleshooting setting, you have to do it manually. Instruction on how to do them is included below as well.
Option 1: Web Interface Option:
If you click on the Create a Configuration File button in the previous screenshot, you will be presented with the following screen:
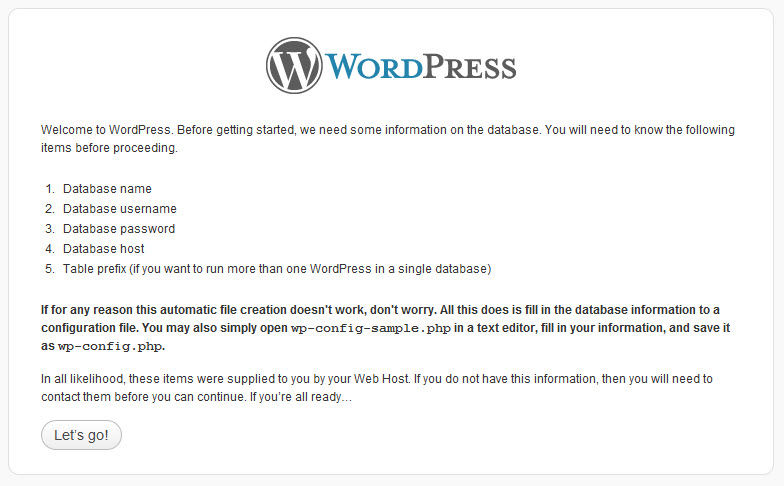
Click on the Let's go! button and you will be presented with another screen that will help you create the wp-config.php file AUTOMATIALLY.
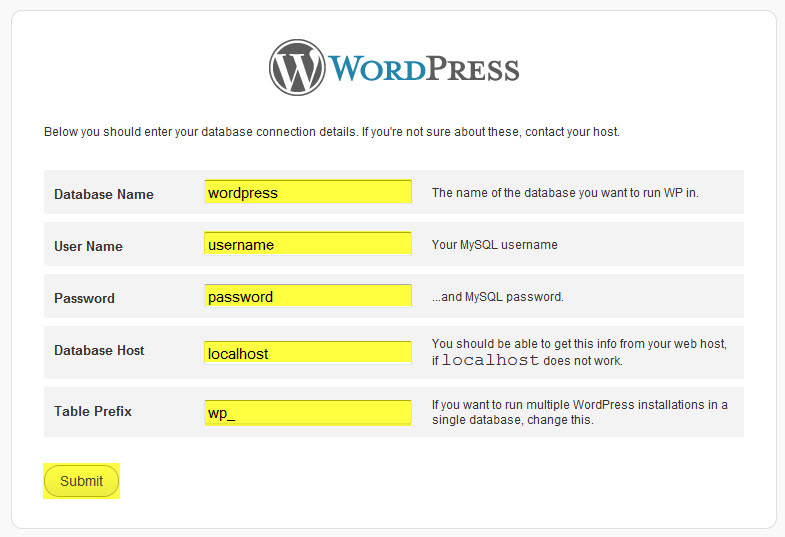
Fill the screen with the necessary information based on the database you created earlier (See tool tips next to fields for instruction).
NOTE: While localhost
is the most common setting for Database Host, your web host provider might require you to use something else. Check your host's documentation or give them a call.
Click on the Submit button to create the wp-config.php file.
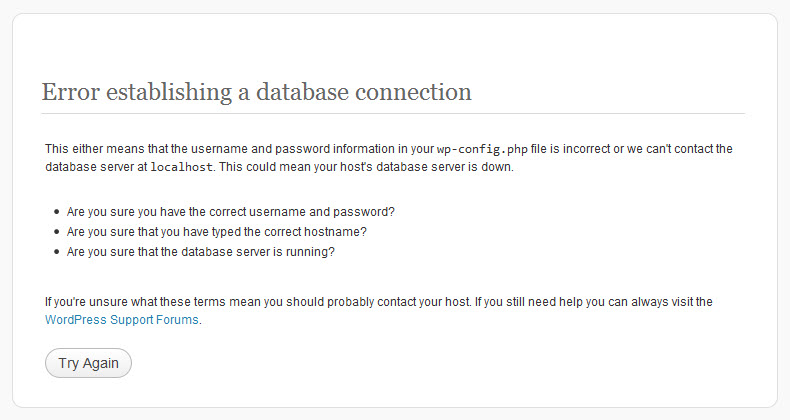
(Skip if you do not get this error message) If you get an error, read the recommendations, fix the problem and the try again.
If you have everything correct, you will be presented with another screen. Click the Run the install button.
In the Install screen, fill the highlighted fields with the correct database connection detail settings that you used when you created the MySQL database earlier.
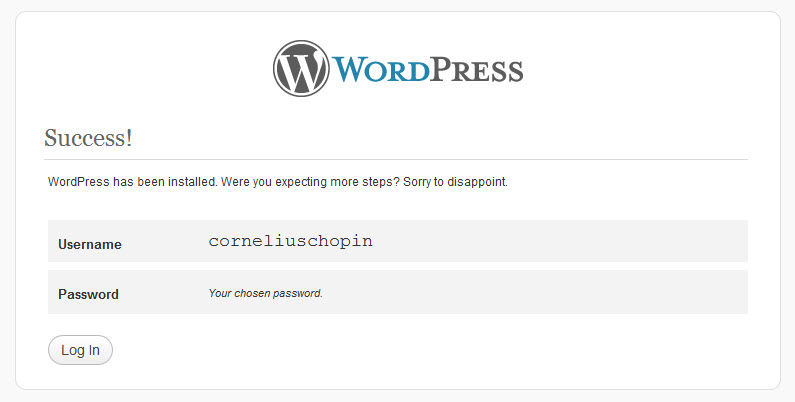
Click on the Install WordPress button. If you are successful, you should see the following screen, click on the Log In button.
Option 2: Manually
If the web interface option did not work or if you prefer to do edit the configuration file yourself to include the BASIC settings, you don't have to write the complete configuration file yourself. You can edit a sample file and rename and save it as wp-config.php.
Navigate to the WP folder that you unzip and move into the PHP root directory (c://xampp/htdocs/wordpress/)
Open the file name wp-config-sample.php in NotePad (or any other text editor or Dreamweaver) and immediately save it as wp-config.php in the same folder. NOTE:
You will have to change about 3-4 lines of codes. The reason for the range of lines is that you may not have to change the DB_HOST line
Replace the default highlighted text with the settings you created when you created the MySQL database:
Save wp-config.php file or keep it open if you want to change some additional settings in the next section.
(Optional) Additional Settings:
If you need to add a port number to the host name, add it the the end of the hostname with a colon between the host name and the port name.
define('DB_HOST', 'localhost:3303');
If your WP database will be shared with other applications, change the default "wp_" to something else. For example, if your ISP only allow one MySQL database but you need to create another WP site on the same account.
$table_prefix = 'wp2_';
If you need a different language other than english, you can change the setting to include a different language. You will also need to download the corresponding language file (visit http://codex.wordpress.org/Installing_WordPress_in_Your_Language for detail).
* WordPress Localized Language, defaults to English.
*
* Change this to localize WordPress. A corresponding MO file for the chosen
* language must be installed to wp-content/languages. For example, install
* de_DE.mo to wp-content/languages and set WPLANG to 'de_DE' to enable German
* language support.
*/ define('WPLANG', ' ' );
(Optional) Troubleshooting Setting:
Typically, PHP errors are logged into a file rather than displayed on screen because of security. It prevents you from inadvertently exposing your database sensitive information (i.e., password, username) if you don't have the configuration file set up correctly. If you know where the error file is located, you could open it; however, you could set a debug setting to see errors on screen.
Normally, if you have errors, you are presented with a blank screen, to "see" the errors if you need to debug your WP installation, you can turn on the debug option by setting it to true. If you should visit the site again, you should see the error on screen.
define('WP_DEBUG', true);
NOTE: It is important to change this setting back to false when you are finish debugging your installation.
Log In:
After you have created a database connection and install the files, you are ready to log into your WP site:
You will have to officially log in using the login screen by clicking the Log In button. (Your UserName and Password should already be filled in.) NOTE: You have the option to click the Remember Me checkbox button if you want WP to remember your Username and Password the next time you log in.
You will see the Dashboard page where you can set some global settings, etc.
(Optional) View database that WP created:
Remember, we only created a blank database before we install WP. However, after we install WP you can see that WP automatcally created 11 tables in the database you created.
Type localhost/phpmyadmin in your browser to open phpMyAdmin.
Click on the database (i.e., wordpress, in this case) you create in the left sidebar and you will see that 11 tables will be displayed in the left side bar and on the main screen that contains default data for your site.
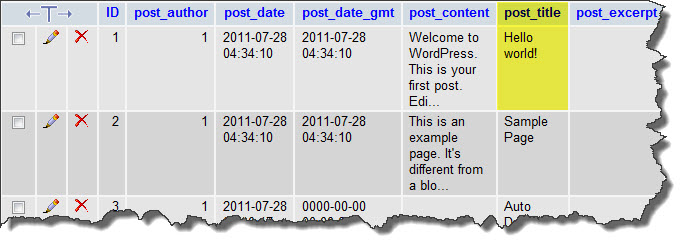
Click on one of the browser icon to the right of the wp_posts table to open the table to see its default data. Notice the phrase "Hello world!" in the post_title column. You will see later when you log into your site this phrase as the post title for the "home" page.
Close the browser to close phpMyAdmin.
Forgotten Password:
If you forget your password, you can open myPHPAdmin and then:
Click on the WordPress database on the left side of the screen.
Select the table wp_users to open this table
Delete the hash (a long string) for userpassword and add a new password.
In the text box next to the password, select the MD5 option from the dropdown menu.
Click on the Go button to save the changes.
(Optional) Click back on the table again to see that a new hash has been created for that password.
Dashboard Settings
NOTE: You have two views of the Dashboard panel in the left side bar. The default view show icons and their labels. Once you are familar with all of the icons, you can switch to the icons only version, click on the Collapse Panel link at the bottom of the sidebar. Then when you hover over a icon you will see the corresponding category submenus.
NOTE: If you click on the Screen Option link at the top-right of the Dashboard page, you have the option to show/hide specific widgets by checking or unchecking the corresponding options. You can also specify the number of columns you would like to display on screen. You can also drag-and-drop the widget panels around as you see fit. In addition, you can click on a widget panel title bar to collapse or expand its content.
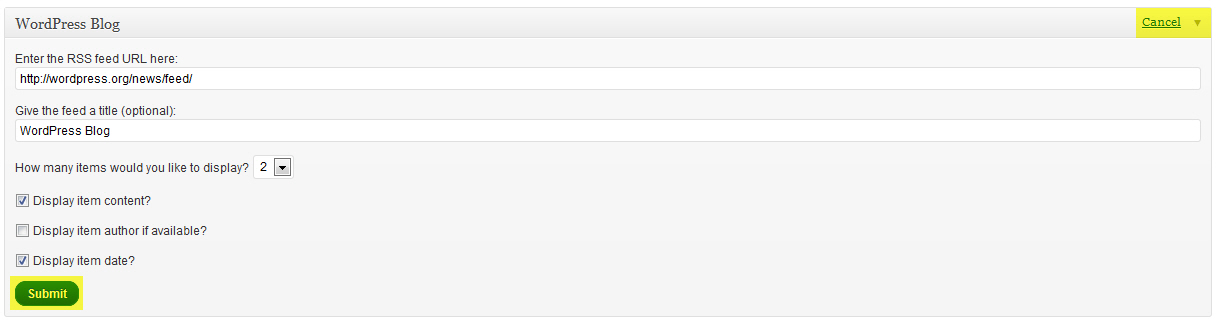
If you hover of the arrow on some widget panels, you will see a Configure link appear. Click on it and you will be presented with option to configure the widget:
Before clicking on the Configure link:
After clicking the Configure link you will see the configuration option for that widget. Make change and then click the Submit button or click the Cancel link to not change the widget.
Let's discuss some of the widgets:
QuickPress – allows you to write a blog WITHIN the Dashboard. However, it is limited because you can tag but not give it a category. You also do NOT have the Rich Text Editor (RTE), etc.
Incoming Links – is used to show Google Blog Search results. You can change the RSS feed to another service (i.e., Technorati) and other options when you click on the Configure link.
Recent Comments – show recent comments, as the name implies.
Right Now – show information about your site (posts, pages, tags, categories)
Once you are logged in and change the password, you will see the Dashboard page where we will set some global settings upfront. You should initially click on the Settings > General Settings tab. We will focus on settings that are not intuitively obvious to fill out or that may need additional clarification.
Click on the Settings > General Settings tab:
In the Site Title text field, enter the blog name (i.e., Rich Media Creative Services).
In the Tagline text field, enter a short tagline (i.e., slogan, etc.) that describle your blog (i.e., Creating a Richer User Experience)
The WordPress address(URL) and Site address (URL) should already be filled in (i.e., http://localhost/yourpostname)
In the Email text field, enter your email address.
Select the Membership's checkbox if you want anyone to register.
In the New User Default role, specify Subsriber, if necessary.
In the Timezone, choose a city in your same timezone.
In the Date Format, choose a date format or create a custom one:
If you are using a custom date format: F is the Full month text (i.e, January) , d is the 2 digit day (i.e., 01) and Y is hte 4 digit year (2011). Click on Documentation on data and time formatting if you need help.
Avoid the last two date formats (i.e., 08/20/2011 and 21/09/2011) because they may confuse some international users.
In the Time Format, choose a time format or create a custom one:
If you are using a custom time format: g is the 12-hour format, i is the 2 digit minutes and a is the lowecase ante meridiam (am / pm). Click on Documentation on data and time formatting if you need help.
In the Weeks Start On drop-down menu select the day you want to set for your calendar widget to start on.
Click Save Changes button.
Click on the Settings > Writing tab: (See page 48 of the Beginning WordPress 3 Book for more info)
The first few options are used to control the Rich Text Editor options for creating posts or pages. Also, how you want to set the default post category/format or default link category.
Post via e-mail: To post to WordPress by e-mail you must set up a secret e-mail account with POP3 access. Any mail received at this address will be posted, so it’s a good idea to keep this address very secret. Here are three random strings you could use: uAtWHD94, JhO28ahh, C3xn84uK.
Remote Publishing: To post to WordPress from a desktop blogging client or remote website that uses the Atom Publishing Protocol or one of the XML-RPC publishing interfaces you must enable them below.
Update Services: When you publish a new post, WordPress automatically notifies the following site update services. For more about this, see Update Services on the Codex. Separate multiple service URLs with line breaks.
Press This: Is a bookmarklet--a little app that runs in your browser and lets you grab bits of the web. Use Press This to clip text, images and videos from any web page. Then edit and add more straight from Press This before you save or publish it in a post on your site. Drag-and-drop the Press This icon link to your bookmarks bar or right click it and add it to your favorites for a posting shortcut.
Click Save Changes button to commit changes.
Click on the Setting > Reading tab:
This is how you display your front page.
If you set a page to be your home page, you can display your posts on another page. However, anything you enter into the body of that page will not be shown. Instead it will be replaced with your most recent post.
You can set how the page blog, feeds and email settings work as well
Click Save Changes button to commit changes.
Click on the Setting > Discussion tab:
Allows you to control articles, comments, e-mail, etc. The first three checkboxes are designs to minimize unwanted comments.
Settings in the Dicussion are self-explanatory. Simply select or deselect checkboxes based on your preferences.
You can set how avatars are viewed, site rating, etc.
Click Save Changes button to commit changes.
NOTES ON COMMENT MODERATION:
Comment Moderatiaon means that comments will not appear on your site but will be held in a moderator queue until approval by the moderator.
Instead of moderate every comments, a better approach is to require that comment authors have at least one previiously approved comment. So the moderator only as to moderate the first author comment.
Since spam comments usually involves a long list of lists, you can limit the number of links in a comment to avoid spammers.
You can also moderate comments based on words, names, e-mails, IP address. This allows you to kill known spammers and to avoid flame wars.
NOTES OF AVATAR, ETC:
Avatars – images that represent persons
Gravatars (gravatars.com) – allows you to choose an avatar associated with an email address
Identicion – are computer generated geometric patterms
MonsterID – are computer generated images of monsters.
Wavatar – are computer generated images that are compiled form pieces (i.e., Mr. Potato Head)
Click on the Setting > Media tab:
You can change the image size, how image is embedded and how images are uploaded. This setting is only for images, not audio or video.
Setting in the Media are self-explanatory. Simply select or deselect checkboxes or fill in the blanks based on your preferences.
Click Save Changes button to commit changes.
Click on the Setting > Privacy tab:
Here you set the site visibility. You may want to create a private site only for members.
You have two options:
After you select a new option, click the Save Changes button.
NOTES ON PRIVACY:
If you choose the second option, WP does the following:
Add a meta tag: <meta name = 'robots' content = 'noindex, nofollow' /> to the <head> tag.
Responds to request for a robots.txt file wht one that disallows allow user agents—but only if a rotots.txt file does not exist and WP is installed in your site root directory.
Prevent you form pinging linked blogs or blog update services when writing a post.
Hide the Update Services section on the Writing settings panel.
The privacy options apply only to search engines crawler and other machines. They do not prevent human visitors form seeing your site. When you write posts and pages, you will have the option to make them private or password-protected on an individual basis. If you want to make your whole WP site private, you will need to install a plugin such as Members Only.
Click on the Setting > Permalink tab:(See pg 57-59 of the Beginning WordPress 3 book)
By default WordPress uses web URLs which have question marks and lots of numbers in them, however WordPress offers you the ability to create a custom URL structure for your permalinks and archives. This can improve the aesthetics, usability, and forward-compatibility of your links. A number of tags are available. If you insert permalink, you will see a permalink on each post or page. You can only add the yellow highlighted portion of the permalink.
Select an option you would like or create a custom structure
Click on the Save Changes button to commit changes.
Click on the Setting > [Other Settings] tab:
You make see other settings under the Settings tab (i.e., XML-Sitemap). There are from plugin that you have installed.
Click on the Users tab and update the Profile settings as you see fit:
Change any fields you like to make changes to your profile.
In the Password section, enter password twice. NOTE:
It is important to update your password regularly to avoid attacks.
Click on the Update Profile button.
Writing and Managing Posts and Pages
Creating posts is like creating a guestbook for your site or a news feed for your site. When you create a post, you can give it a category as well so that your users can select topics from specify categories that you have set up. WordPress ahs a autosave option that can save your work at regular intervals.
To write a post:
In the Dashboard click the Posts tab and select the post that you want to view, add, edit or delete.
To add a post using the visual tab, give the post a title and then write your post using common word processing application conventions like MS Word using the appropiate icons. NOTE: The only two icons that may be different from MS Word is the Split Post with More Tag icon. This insert a tag (<!--more-->) that allows the text written above this tag to have a Read More link which will take reader to the full post. This is ideal for long post only. The other icon is the Show/Hide Kitchen Sink which shows some additions icon like formatting, insert custom character, etc. If you want to insert a table or other HTML objects, install the TinyMCE Advanced plugin and the click on the Settings > TinyMCE and add the objects you want to show in the toolbar. NOTE: While the Paste for Word icon works with MS Words by translating Word style to HTML headings and remove Word-specific markup (i.e., MsoNormal, etc.), it also works MS Excel table and PDF documents. IMPORTANT NOTE: If you use the HTML tab, it is important to note that the editor will automatically convert a single line break tag (< /br>) and a double line breaks to properly nest paragraphs. If you include a <p> and a < /br> tag, they will be removed unless they include attributes (i.e., <p class="myClass">.
To Upload/Insert an image, video, audio or another media type in your post or page, click on the corresponding icon on top of the Rich Text Editor and fill out the appropriate fields like you would with MS Word
To add an image, click on the Add an Image icon and in the dialog box that appears, first choose one of the three tabs at the top of the dialog box (i.e., From computer (default), From URL, Media Library) NOTE: The Flash uploader allows you to upload multiple files at one time. If you are having problem chose the Browser uploader instead that can upload only one image at a time. NOTE: In addition to uploading/inserting an image, you can perform some simple edits (crop, resize or rotate) by clicking on the Edit Image button. CAUTION: Images From URL is not downloaded to your computer, so if the image is deleted from it original location by someone, it will not appear in your post.
Click on the Select Files button to open your computer File Explorer dialog box and navigate to the image you want to upload and then press Open.
The diaog box will expand giving you the several option. The main ones are:
Add a Title, Alternate Text, Caption, and Description if you need to. NOTE:
Title and Description is used by search engines so it is important to be descriptive.
You can define the Link URL as None, File URL, or Post URL.
NOTE: File URL is used to open the image in other browswer window. Post URL is used insert the image in a formatted page when clicked.
Alignment options (i.e., None, Left, Center and Right)
Size options (i.e., Thumbnail, Medium, Large or Full Size).
Use the image a a featured image by clicking on the Use as featured image link.
Delete image altogether by clicking on the Delete link.
Scroll down if necessary in the dialog box and press the Insert into Post button.
Once you complete your post, you have three buttons and one major link option which are self-explanatory to choose from:
Save Draft
Preview
Publish
Move to Trash
If you publish the post and return to the home page by clicking on the Visit Site link at the top of the page, you will see the current post listed on the "home" page.
NOTE: WP allows you to insert shortcodes--brackets words that get replaced with real content with the post is viewed. WP use shortcodes for certain type of media (i.e., photo with captions, image galleries). If you have a snippet of code that use would like to reuse, you could define it as a shortcut using a plugin like Post Snippets or Reusables. NOTE: In the Publish section in the right sidebar, you have the option to set the Status (Draft, Pending Review), Visibility (Public with the option to stick post to front page), Password protected (for registered users only) and Private. You can also set another day or time other than the current day or time if you want to send the post out on a specific day and time automatically. Making a post "sticky" means that it will always appear at the top of the lists including archives or the home page. NOTE: Add notes on how to do gallery later...... NOTE: Inserting a video will result in a link to the video on another server (i.e., YouTube). A better approach is to simply copy and paste the video link directly into the page. WP will replace the link with a video player when the page is viewed. This is known as oEmbed and works with a number of video providers (i.e., YouTube). Visit codex.wordpress.org/Ebeds#oEmbed for a complete list. NOTE: Insert an audio will result in a link to the audio file. A better approach is the use a plugin that will replace the link with a Flash MP3 player. NOTE: If you want to do podcasting install Poddcasting or PowerPress or Podcast Channels plugins. They typically work for both audio and vidoe podcasts. NOTE: If the file size is a problem for your video/audio, edit the php.ini file and change the file_upload, upload_max_filesize and post_max_size values. NOTE: You can edit the details for all media file in the site by choosing Media Library.
To write a page:
Unlike a post, a page:
appears as a static and separate page on your site. You can create unlimited number of pages.
when a page is created a menu button is create on the "home" page with the name of that page.
unlike a post, static page do not appear in the Recent Posts (because it is a page, not a post) and does not show up in the monthly archives.
they are used to make your blog site resemble a standard web site.
pages are not included in feeds.
pages do not have excerpts.
pages do not have categories or tags.
Unlike post, publication date is not displayed for pages in most themes and they are not organized by date. In addition, you don't have categories or tag.
With all of this, pages makes your WP site looks more like a standard website instead of a blog
A page is created exactly like a post (See Above), except you select Pages > Add New.
On a page you also have the option to set submenus based on existing parent menus that you may have created by selecting a new menu from the Parent drop-down menu under the Page Attributes section.
You can also select a different Template for the page by selecting a new template from the Template drop-down menu under the Page Attrributes section.
You can also set the Order by setting a number in the Order text field. The order determines how WP display the pages in a navigational bar like a traditional website. To avoid problem later if you need to insert pages between other pages, you a three digit numbering scheme (i.e., 111, 222, 333). You could also use the My Page Order or PageMesh plugins that allows you to drag-and-drop pages without giving them order numbers.
If you do NOT want comments for a page, expand the Screen Option link (at top of page) and select the Discussion tab. Then, at the bottom of the screen, deselect the Allow comments checkbox. You can also deselect Allow trackbacks and pingbacks by selecting its checkbox.
NOTE: By selecting Setting > Reading, you can set the "home" page to something other than a post by checking the static page' s Front page drop-down menu to a specific static page you have already created and then clicking the Save Changes button. You also have the option to set the number of blogs or the number of feeds as well as how each article in a feed is show (i.e., Full Text or Summary).
NOTE: You also set up a featured image or thumbnail that represents your post. If the Themes support featured image you will see a Feature Image box on the Posts screen. NOTE: Some themes show excerpts rather than the full post and is shown with a series of periods at the end of the post [....]. To preserve HTML formatting use the Advanced Excerpt or the _excerpt Reloaded plugin. By default, excepts are 55 words long. NOTE: You can filter or search posts or pages on the Edit screen. NOTE: WP autosave your posts or page every minute if you make changes. NOTE: When editing, you can turn on/off what is show on screen (Author, Comments, Date) for Pages by clicking on the Screen Option and selecting or deselecting the corresponding checkbox. You can also specify hte number od pages. Two additional options for Posts (Tags and Comments). NOTE: You can either do a Quick Edit or a Bulk Edit. Quick edit is useful if you want to change the attributes of a page or post without editing its content.
There are other ways to post:
Press This -- is a browser add-on that allow you to select something from the web and then click the Press This button to create a post out of the selection.
ScribeFire -- is a Firefox add-on (www.scribefire.com)
Smartphone apps -- you can post from a smartphone
Creating Categories and Categorizing Posts
Categories are like a table of content for your site. Categorizing posts provide an organizational structure. Each post that is assigned a category is grouped with the other posts in the same category. After a ferw months, these categories provides a topical directory of your posts for your readers. You can also create subcategories. Each category can have its own RSS feed.
All posts must have at least one category selected. However, you can selected as many as you need. Once you have selected categories, they will be moved to the top of the list---outside the normal hierarchy---the next time you edit the post. If youre hierarchy is important and you like to preserve the normal, indented view, use the Category Checklist Tree plugin. TIP: By styling your categories differently adn publicizing the otherwise hidden feeds for individual categories, you can create teh illusion of multiple blogs for your visitors even though behind the scenes you are maintaining just one.
To create categories:
Select Post >Categories option from the tab.
In the Name field, add a category name.
In the Slug field, add a slug name. NOTE: By default, WP creates a Post Slug based on the post/page title. Howvever, you can create your own title by entering a slug name. NOTE: Categories must have distinct slug even if tow categories have different parents.
If you are creating a sub-category, click a parent category from the list.
(Optional) In the Description field, add a descriptive title.
Click on the Add New Category button.
Repeat previous six steps to add additional categories.
NOTE: You can also delete categories if you need to.
Once you created several categories, you need to assign them to your posts. To do this:
Click on the All Posts tab and then select one of more checkbox in the Categories section to assign one or more categories to the selected post.
Repeat step one for each post you want to add a category or several categories to.
Creating Tags
While categories may be like the table of contents for your site, tags are like the index for your site. Tags are keywords you can assign to your posts. Unlike posts that must be assigned a category, tags can be created at any time and are used to provide "keywords" for searches. You can get feeds for each tag.
To create Tags:
Select Posts > Post Tags.
Type a name, and an optional slug or description for the tag.
Click on the Add New Tag button.
NOTE: You can also Delete a Tag or a series of Tag by clicking on the drop-down menu above the tag list and then clicking on the Apply button. You can also edit a tag by selecting the Edit button below the tag and making the necessary changes and then clicking the Update button.
Managing Comments and Trackbacks
You can view comments by clicking on the Comments tab and then decide if you want to approve, unapprove, mark as spam or move to trash the selected comment(s). If you approve the comment, it will show up on your site. Comments and trackbacks can be set in the Settings > Discussion tab.
Trackbacks are comments left on your blog by other blogs–this occurs when you provide a link in your post of another blog (called network ping) which in turn post a receipt in a comment to the post that you linked to. Trackbacks are lists alongside of your posts. Keep in mind hte list of sites you chose to ping for all your posts in the Updat Services section of Writing > Settings. Also, if you chose on that screen to pin linked sites, any links included in your post will be pinged automatically. If you want to ping any sites in additon to your Update Services list and tthe sites lined in your post , you can add the URL in the Trackback section. IF your post has already been published, this box will display a list of the sites that have already been pinged. (Except from Beginning WordPress 3--Apress pg 76).
Categorizing links in the Blogroll
Like categories, you can also categorize links in the Blogroll. A Blogroll is a list of links displayed on your blog. (ADD NOTE FROM PAGE 59-61 OF THE WORDPRESS FOR DUMMIES BOOKS.)
WP install several links in the Links tab by default. While useful, you may want to delete these are replace them with you own. Links do not use the same categories as posts. After installing you will have one link category call Blogroll.
To delete all of the current links, click on the top checkbox to select all link and the select delete from the drop-down menu at the top or bottom of the page and then click the Apply button. To add links simply click the Add New buttton at the top of the page on in the sidebar.
Link Relationships: XFN (See pg 99-103 of the Beginning WordPress 3 book for detail.)
Add notes here later.....
Managing Users
You can have multiple users and authors on your blog.
To add a user:
Select Users > Add New from the tab and then fill in the self-explanatory fields to create a new user. Notice the username, email and password are required.
In the Send Password? checkbox, select it if you want to send teh password to the new user by email.
In the Role drop-down menu select the role you want the user to play. These roles applies to registered user only:
Subscriber – can only edit his/her own profile.
Contributor – cna submit post for editors' approval but can not publish anything. Can upload fies and write, edit or manage own posts. Contributor post is saved as a draft to be approved by Administrator because he/she can not publish post.
Author – has the same priviledge as a contributor; however, an author can publish or delete his/her own post without administrative approval.
Editor – has the same access as the author but can moderate comments, manage categories/links, edit pages and edit other author's posts. Can also read and edit private posts.
Administrator – has authority to change any Adminstration options and WordPress settings. NOTE: Normal visitors have no role. You can promote or demote user later from the Users tab.
In the Users > All Users tab, you can view all posts made by a user by clicking on the number under the Post column. You can also edit a user profile by clicking on user name link.
To invite users:
Themes
WordPress comes with a few default themes to get you started. However, you can change the default at any time and even create your own. Themes determine how content is displayed using HTML with WP specific PHP functions. Themes are composed of standard HTML with WP template tags (i.e., the_title(), the_content(), the_author(), the_tags(), etc.). If you want to view different themes, point your browser to: www.wordpress.org/extend/themes/.
You have two options to install Themes:
Manually:
Browse to www.wordpres.org/extend/themes for a theme
Conduct a search for a theme by:
Entering a search criteria and then click the Search Themes button.
Selecting one from a link (i.e., Most Popular) on the home page.
After making a search or clicking a link:
Click the Preview button to preview the theme.
Click the Download button to download the theme to your computer (i.e., desktop)
Unzip the download file and double-click to open the folder that contains the theme files. IMPORTANT NOTE: It is important that you move the correct folder to the themes folder. For example, if you unzip a folder named myNewTheme.3.2.1, this is NOT the folder you want to move. Instead, you want to move the folder inside of this folder with the same name but NO version numbers (i.e., myNewTheme)
Move (or upload if your WP site is on a remote server) the folder to the theme folder under your site name in the htdocs directory: wp-content/themes.
Delete the original download compressed file (*.zip) and the empty folder because you no longer need them.
Click on the Appearance tab and then click on the Activate link under the newly installed theme in the Available Themes section of the Manage Themes tab.
Return to your site by clicking on the Visit Site link at the top of the page to see the newly installed theme.
Automatically:
From within the Dashboard, select Appearance > Themes from the tab. NOTE: Notice under the Manage Themes tab, you will see
the current and available themes.
Click on the Install Themes tab at the top of the page.
You can search for themes either:
By keyword, author or tag by selecting the corresponding option from the drop-down menu, adding a search criteria in the Search text field and then click on the Search button.
Based on specific features by clicking on the checkbox options (i.e., Colors, Columns, Width, Features, and Subject) and then click on the Find Themes button.
After cllcking on the Search or Find Theme button, you will be presented with a list of theme results that you can either Preview, Install or get Details by clicking on the corresponding link.
If you click the Preview link, you will be presented with a preview of the theme. NOTE: You can close the Preview window by clicking on the small "x" in the top-level corner of the screen.
If you click the Install link, you will be present a small window with a preview of the theme with the theme name, author and version number. Click the Install Now button to install the theme. Click on the Cancel button to not install theme. NOTE: Just because you install a theme , does not mean it will be activate on your site, you have to activate it. See step 6.
If you click on the Detail link, the page will expand to show the theme version, author and rating. NOTE: You can collapse the Detail information by clicking on the Detail link again.
Click on the Search link at the top of the page if you need to go back to the search page to conduct another search.
Click on the Manage Themes tab and then click on Activate Link under the newly installed theme in the Available Themes section.
NOTE: You can also delete any theme by clicking on the Appearance tab and then clicking on the Delete link under the theme preview image in the Manage Themes tab.
Plugins
Plugins add PHP functions (template tags, widgets, etc.) to your site.
You have two options to install Plugins:
Manually:
Browse to www.wordpres.org/extend/plugins for a plugin
Conduct a search for a plugin by:
Entering a search criteria and then click the Search Plugins button.
Selecting one from a link (i.e., Most Popular) on the home page.
After making a search or clicking a link:
Unlike Themes, there is no Preview button for a plugin. However, there is usually other information (i.e., description, installation, FAQ, etc.) list on the search result page.
Click the Download button to download the theme to your computer (i.e., desktop)
Unzip the download file and double-click to open the folder that contains the plugins files. IMPORTANT NOTE: It is important that you move the correct folder to the themes folder. For example, if you unzip a folder named myNewPlugIn.3.2.1, this is NOT the folder you want to move. Instead, you want to move the folder inside of this folder with the same name but NO version numbers (i.e., myNewPlugIn)
Move (or upload if your WP site is on a remote server) the folder to the plugins folder under your site name in the htdocs directory: wp-content/plugins.
Delete the original download compressed file (*.zip) and the empty folder because you no longer need them.
Click on the Plugin tab > Installed Plugins and then click on the Activate link under the newly installed plugin. NOTE: When you click on the Activate link it will change to Deactive.
Return to your site by clicking on the Visit Site link at the top of the page. Since some plugins works behind the scene, you may not see if different in your site. For example, the Google XML Sitemaps plugin generate a special XML sitemap which will help search engines like Google, etc. better index your site. However, you don't "see" this on your site.
Automatically:
From within the Dashboard, select Plugins > Add New from the tab.
You can search for plugins either:
Like Themes, by keyword, author or tag by selecting the corresponding option from the drop-down menu, adding a search criteria in the Search text field and then click on the Search Plugins button.
Based on Popular tag by clicking on a link in the Popular tags section.
After cllcking on the Search or clicking on a link, you will be presented with a list of plugin results that you can either Install Now or get Details by clicking on the corresponding link. You will also see the version, rating and a description of the plugin.
If you click the Install Now link, you will be present a small window asking you "Are you sure you want to install this plugin? Click OK to install it or click the Cancel button to not install plugin. NOTE: Just because you install a plugin, does not mean it will be activate on your site, you have to activate it. See step 5.
If you click on the Detail link, another window will open that shows detail description, installation, screenshots, etc. of the selected plugin. NOTE: You can close the Detail window by clicking on the small "x" in the top-right corner of the window.
After clicking OK, you will be given the option to activate the plugin by clicking on the Activate Plugin link (or Return to Plugin Installer). You can also activate the plugin by clicking on the Plugins tabg and then clicking the Activate link.
NOTE: You can also edit or delete any plugin by clicking on the Plugins tab and then clicking on the Delete link under the plugin name.
Below is a list of a few popular plugins that you may want to include in your site:
DB Backup – quickly backup database tables and specific directory. This is useful to do before you import content of upgrade to a new version of WP.
Google XML Sitemaps – generates a Google XML sitemaps that can help better index your site by search engines like Google, Bing, etc.
Maintenance Mode – displays a simple maintenance message to everyone but administrators. This is useful if you are updating your site.
Search and Replace – allows you to update text in a specific database field. This is useful after you import content.
Akismet – included as a default plugin, but require a key to be activate. This is a spam killer for your comments.
Contact Form 7 – allow you to create an email contact form with Akismet spam protection.
NOTE: You can also upgrade plugin as new version become available that fixes security issues, bugs, new features, etc. You will see a number next to the plugin menu. You can upgrade plugin one at a time or in bulk. To perform a bulk upgrades, place a check mark next to each plugin that are available for upgrade and then choose Upgrade in the Bulk Action drop-down menu. WP will place your site automatically in maintenance mode until all plugin are installed.
Widgets
Widgets are drag-and-drop components (snippets of code) that can be added to your site's sidebar.(i.e., Polls, Twiitter streams, etc.). Archives, Catagories, Blogroll are all examples of wdigets as well. Most themes support widgets.
Backup WordPress
You should backup your WordPress site on a regular basis as well as BEFORE you upgrade or move your WP site. You have two options to backup:
Use plugin
dfdf
Backup Manually
adsfdfdfdf
Upgrade WordPress
It is important to upgrade whenever there is an official release of WP to keep up with new features, security updated, etc. When a new version becomes availble, you will see a banner message on every admin page. You will also see an announce in the WP blog.
IMPORTANT NOTE: You should backup your WP site before you upgrade your WP site. NOTE: If you don't update your WP site often to see when update are available, you may want to subscrible to the RSS feed (wordpress.org/development/category/release/feed/ ) or an e-mail announcement.
You have two options to upgrade:
Automatic Upgrade:
Click on the link in the banner announcement to upgrade.
If you installed WP-DB-Backup you should see it now.
If you have a remote WP site, you can use your ISP administration tool, usually phpMyAdmin to make a complete backup of your database and its content. Copy your files to an external storage device (harddrive) or if your WP site is remote , you can use your FTP client or Dreamweaver to backup your files (this is different than the database files). You can backup your entire WP folder or just the config file and content folder (i.e., wp-config.php aand the wp-content directory that holds your plugins and themes).
Manual Upgrade:
Download the latest version and unzip it.
Delete the wp-content directory from the download content so the you don't accidentally overwrite your plugins, themes and media files.
While not required, it is best to delete all of the files and folders from your CURRENT WP site except the wp-config.php and the wp-content directory.
Move the new WP files (not folder) from the unzipped folder to the htdocs directory folder of your WP site on your computer or on your remote directory. NOTE: You could synchronize the files from your local and remote directory but sometimes you run into problems.
Automatic Upgrades via FTP or SSH:
(See page 37-38) in the Beginning Word Press 3 Book– Note will be added later.
Moving WordPress to Another Server
There are occasionss when you need to to move a WP site from one server to another.
Down ALL of the WordPress files and folders from your ISP server.
EXPORT your database from your ISP server using the WP-DB Backup or your ISP phpMyAdmin.
Record your API key that was sent to you when you first install WP. TIP: The API key is available on the Profile Page under My Account. ??????
Place your old WP site in mainentance mode so users cannot submit comments while you are migrating your site. You can use the Maintenance Mode plugin.
Edit the wp-config.php file to:
Change the database connnection settings to reflect the settings of your new server.
Redefine your WP site and blog URL:
define('WP_SITE' , 'http://yourdomain.com);
define('WP_HOME' , 'http://yourdomain.com);
Upload ALL files and folders to new server.
IMPORT database to new server using the new ISP control panel or phpMyAdmin.
Log into site on new server (i.e., newdomain.com/wp-admin)
If the site URL has change, use the Search and Replace plugin to replace the old URL to the new one.