HOW TO CONNECT TO A MYSQL RELATIONAL DATABASE FOR PHP (PART 2)
IMPORTANT NOTE: This is a continuation of the HOW TO CREATE A RELATIONAL DATABASE (PART 1).
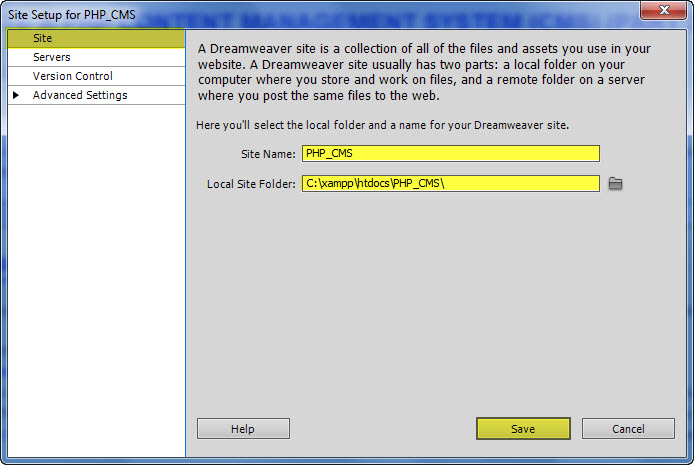
Before we can connect to a database, Dreamweaver requires that we first define a web site for the application:
DEFINING A PHP WEB SITE IN DREAMWEAVER
Before you design a web site, you have to define a web site. Basically, when you define a web site, you are telling Dreamweaver to point to and manage folders on your computer that is associated with your web site.
- For our project, we need to download the resource folder (ResourceFolder.zip) and unzip to the desktop.
- Create a folder at the the top-level directory of the PHP server directory (i.e., C:\\xampp\\htdocs\) and give it a name (StudentDirectory_CMS)
- Create another folder INSIDE of the folder you just created and give it a name of images.
- Move the images and the Template folders from the ResourceFolder that you just unzipped to the PHP site root folder (i.e., C:\\xampp\htdocs\StudentDirectory_CMS)
NOTE: The image folder has images needed for the template (i.e., header logo, footer image, etc.) You can create or use your own images.
TIP: It is a good idea to have a separate folder for each application that you create in the "htdocs" folder. - Open Dreamweaver and define a PHP web site (CS5 or higher):
- Select Site > New Site... from the menu.
- Ensure the Site category is selected and then give the site a name (StudentDirectory_CMS) and then click on the folder icon to navigate to the folder you created earlier (C:\xampp\htdocs\StudentDirectory_CMS\) when you set up the database connection for PHP.
- Click the Select button in the Choose Root Folder dialog box (not displayed) to select the folder and to close this dialog box.
CHANGES: The directory has been changed to StudentDirectory_CMS instead of PHP_CMS
- Back in the Site Setup dialog box for this site (StudentDirectory_CMS), select the Servers category and then click on the large plus sign (+) to setup a server.
- In the dialog box that appears, in the Basic category, set the following highlighted options in the screenshot. Click on the folder icon to navigate to the folder you created earlier again.
CHANGES: The directory has been changed to StudentDirectory_CMS instead of PHP_CMS
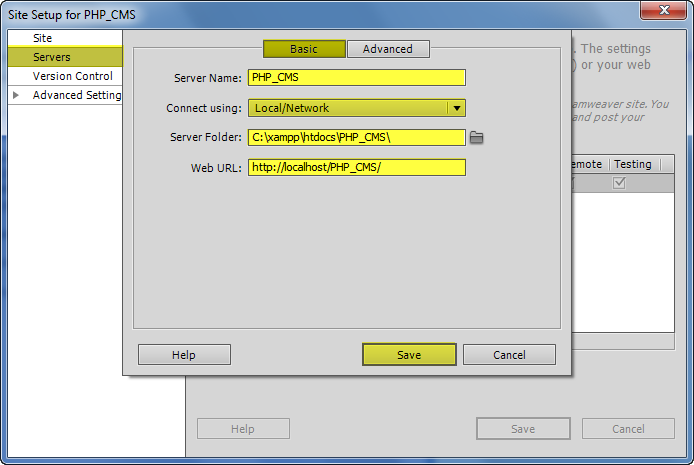
- Select the Testing Server checkbox. (See previous screenshot)
- Select the Advanced category and then select PHP MySQL as the Testing Server Model. Leave the other options at their defaults and then click the Save button.
- (Optional) Create a test page to see if server is working correctly:
- Select File > New and in the New Document dialog box, select Blank Page, PHP as a server type and none (as Layout) and then click the Create button.
- Save the file as test.php and write the following code between the <body> tags in Code View:
<body>
<?php echo "Hello, World" ?>
<?php phpinfo() ?>
<body>
NOTE: The <?php echo "Hello, World" ?> PHP code will display "Hello, World" in the browser. The <?php phpinfo() ?> code will give a ton of data about PHP.
- Click on the Live View button to see the information. If you are using an older version of Dreamweaver, click on F12 to view the page in a browser.
CONNECTING AND SELECTING A MYSQL DATABASE USING A SERVER BEHAVIOR
Since we have already create a database, we need to create a connection to it. The connection basically tells Dreamweaver where the database is located, what database to use and how to connect to the database. Once a connection is made, Dreamweaver will automatically generate the code to access the database when pages are created. Once the connection is established, it can be used in your application pages.
A MySQL connection store details (i.e., server address, username, password, and database name) about the connection in a include file (i.e., <?php require_once('Connections/Student_Directory.php'); ?>) which is automatically attached to a web page whenever you select a connection in a server behavior.
The communication between Dreamweaver and the MySQL database is handled by two files (MMHTTPDB.php and mysql.php) in a hidden folder called _mmServerScripts that Dreamweaver created automatically. Dreamweaver will also automatically upload this hidden folder to your server.
Before you can create a MySQL connection, Dreamweaver requires that you have a PHP page open. So we will start by creating our first page:
- Select File > New... from the menu and then select Page from Template. Ensure the current site is (e.g., StudentDirectory_CMS) and the current Template (e.g., template_base) is selected and then click the Create button.
NOTE: The template (template_base.php.dwt) was created for you, if you want to see how it was created click here. - Add Add Student Page to the page's Title text field (e.g., Student Directory: Add Student Page) and then save the file with a descriptive name (e.g., add_student.php).
Before you attempt to connect to a MySQL database, ensure MySQL is running and have the username and password that you created when you setup a administrative or user account in phpMyAdmin. Now. let us connect to the database:
NOTE: This dialog box will allow you to create a connection to the MySQL database that was created in a previous lesson.
- Connect name: connStudent_Directory
NOTE: It is common practice to add a prefix to the Connection name (i.e., connStudent_Directory). - MySQL Server: localhost
NOTE: If it is on the same computer, enter locahost. Also, if you are running MySQL on another port other than the default 3306, add the port number after a colon (i.e., localhost:8888). If you are running MySQL from a remote testing server, this is the address to the database server that is provided by your ISP--This is normally localhost as well. - User Name: Enter your user name (i.e., Cornelius Chopin) that you created when you set up the MySQL database user account.
- Password: Enter your password (i.e., mysql) that you created when you set up the MySQL database user account.
- Database: Type in the database name or click on the Select button and select the database that you created ealier (i.e., rmcs_corporation1234)
- Click the Test button and you should be prompted that the connection is successful.
- If you get an error, see notes below.
TIP: Once you create a database connection, you can find what the settings are in the Connections folder's Student_Directory.php file.
- If you get an error, see notes below.
- Click OK to close the Select Database dialog box and then click OK again to close the MySQL Connection dialog box and to create the connection file.
CORRECTION: Change to StudentDirectory.
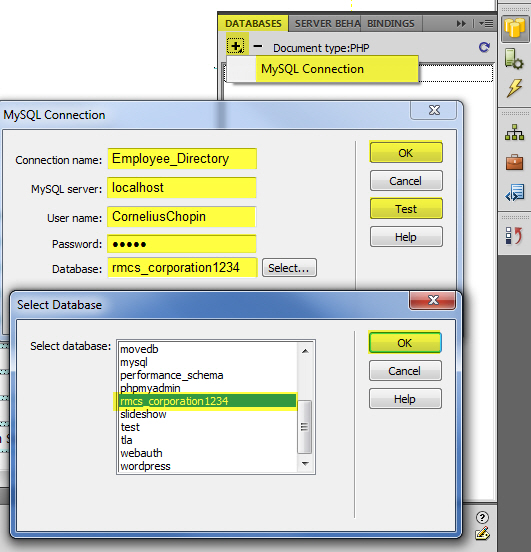
NOTE: phpMyAdmin creates the database in all lower case letters.
NOTE: In the Databases panel, Dreamweaver created a database icon. You can click on the plus sign (or the triangle on the Mac) to expand the database table to see the columns in the database. Both Stored procedures and Views are empty although MySQL 5.0 supports them, Dreamweaver currently does not support them.
NOTE: Dreamweaver will upload hidden files to your remote server and create a local connection there.
NOTE: You can create another MySQL connection if you want to have a separate connection for user. (i.e., conn_StudentDirectory_User) that has limited access privileges (i.e., SELECT only). The admin connection (i.e., rmcs_corporation1234) should have complete access.
NOTE: Dreamweaver stores the connection details in a file with the same name as the connection in a folder called Connections (i.e., Connections/StudentDirectory.php):
NOTE: You only have to create a connection to the database ONCE for all pages in this site so you don't have to do these series of steps for the other pages. The Database panel will be available for ALL pages with this database.
NOTE: Dreamweaver will automatically create a folder in the Files panel called Connections with a file with the same name as the Site that has the connection string settings in it.
IMPORTANT NOTE: Notice that Dreamweaver automatically created the code in the head of the page before the <html> tag. The first line in this file (<?php require_once('Connections/StudentDirectory.php'); ?>) is used to connect to the StudentDirectory.php template page that contains the connection details information (i.e., host name, database, username, password). Also notice the word "require_once" that is used if the site uses the default document-relative links. If your site requires you to use site-root-relative links, than this line would read (<?php virtual('Connections/StudentDirectory.php'); ?>). The virtual function only works on Apache. You can change the word virtual to require_once since it is supported on all servers.
Create a connection and selecting a database by hand-coding
Connecting and selecting a database by hand-coding it is rather easy, however; to see if it is working, you will need to add some conditional logic to ensure that there was a successful connection. In a future tutorial, we will create a recordset that will provide an avenue for the data from the database to be displayed on the page.
- Create a new PHP page or open an existing page and save it with a specific name (e.g., databaseConnectTest.php)
- In the Code view, before the opening <!DOCTYPE>, type or copy the following code to connect to the mySQL database (Comments are optional but are used for explanation of code):
<?php
// Set up variables to be used by the mysql_connect function later in this code. Use localhost as the host and the username/password that you created when you created the database either manually or though phpMyAdmin.
$host = "localhost";
$user = "CorneliusChopin";
$password = "mysql";
// Connect to the MySQL server where all the databases resides using the mysql_connect function
$dbConn = mysql_connect($host, $user, $password);
// Store a reference of the database in this variable
$database = "employeedirectory2";
// Select the database you need using the mysql_select_db function (i.e., EmployeeDirectory)
mysql_select_db($database);
?>
NOTES:
- Notice that the connection name (e.g., conn_StudentDirectory) when using a Dreamweaver server behavior is different than what is used here—You created an alias (or nickname) for the database in the mySQL server. Here, you are connecting DIRECTLY to the database using its real name.
- While the code above may seem like a lot, if you remove the comments it is only six lines of code. All MySQL functions are prefixed with “mysql_ (e.g., mysql_connect, mysql_select_db)” and most are self-explanatory. Later you will use the mysql_query to “query” the database and mysql_fetch to “fetch” data from the database.
- If you are typing the code don’t forget to include the closing semicolon at the end of each statement and the quote around the strings.
- Unlike creating a database using Dreamweaver server behavior, if you hand-code a database, it will not show up in the Database panel.
OPTIONAL: Add Logic to Page
- Comment out the code in the <head> tag and write the following code in the <body> tags so that you can see the result displayed on the page.
<?php
// Attempt to connect to the MySQL server
if ($dbConn = @mysql_connect('localhost', 'CorneliusChopin', 'mysql')) {
print '<p>Successfully connected to the MySQL server</p>';
// Attempt to select the database
if (@mysql_select_db('employeedirectory22')) {
print '<p>The database has been selected.</p>';
} else {
print '<p style="color: red;">Could not select the database because:<br />' . mysql_error() . '.</p>';
}
mysql_close(); // Close the connection.
} else {
print '<p style="color: red;">Could not connect to the MySQL server:<br />' . mysql_error() . '.</p>';
}
?>2. Test file in browser or with Dreamweaver Live view.
3. Add a number to the end of the database name and test again.
NOTE: You should see that you get an error message this time.
4. Undo the previous step ans save file again.
NOTE: When the “@” is used in front of a myql function, you are telling PHP to suppress errors that the function may throw so that it can be handled in the “else” statements of the script by concatenating the sql_error() function to the end instead. The “@” is an error suppression operator that does not stop the error from happening only suppress it so that it will not be immediately displayed by the function. Some errors that are common are:
NOTE: The “@” operator can be used with any mysql function (e.g., @include (….)).
- Failure to connect to the mySQL server or to select a database.
- Not able to run a query or no results returned from a query
- Information not being saved to database
NOTE: Error messages should be used for debugging only and not for a live site so they should be deleted afterward.
NOTE: Notice that the two "if" statements checks to see if the connection or selection were successful and in either case display a message.
Export script to file
While the first script above works fine, it is best practice to externize this code so that it does not have to be placed in every files that needs to be connected to a database. Then, you can attach it to each page with a simple server side include.
1. Delete the second script you created and CUT the first script from the <head> tag and save it to a file (i.e., myConnection.php) in a folder (e.g.,Connections). You can use the same folder that Dreamweaver created if you used the server behavior method.
2. Attach the script back to the file you cut it from by typing in the following code in the first line.
<?php require_once('Connections/myConnection.php'); ?>
NOTE: This is a server-side include (SSI) that basically attached the external code in the existing file where this code is located.3. Test file again and it should work the same.
4. You will need to manually add this server side include to each page that you want to connect to a database.
Troubleshooting the MySQL connection:
If the connection was not successful, check out these recommendations:
- Check to see if the web server is actually running by clicking on the XAMPP Control Panel icon
- Ensure the Testing Server information you setup when you defined the site is correct.
- Ensure that you are using the right username and password and note that they are case sensitive.
- Check to see if your software firewall is blocking the connection between Dreamweaver and your MySQL database. Temporarily turn it off or change its settings.
- If you are running from a remote testing server, ensure you have permission to upload the _mmServerScripts folder. You may have to create the folder yourself.
- If you recieve an error that says your testing server does not map to a particular URL, adjust the testing server site definition.